Dodaj UIPickerView i przycisk w arkuszu akcji - jak?
Moja aplikacja wymaga dodania następujących rzeczy do arkusza akcji.
- UIToolbar
- Przycisk na UIToolbar
- UIPicker Control
Dodałem obraz, aby zrozumieć moje wymagania.
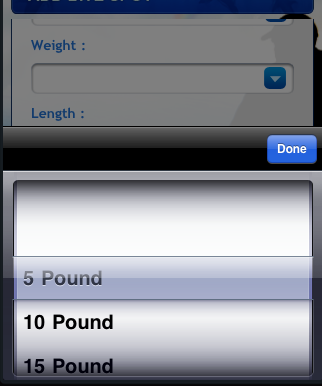
Czy mógłby Pan wyjaśnić, w jaki sposób można to zrealizować?
11 answers
Aktualizacja dla iOS 7
Apple docs for UIActionSheet: UIActionSheet is not designed to be subclassed, nor should you add views to its hierarchy
Zalecam, aby nie próbować dostosowywać zawartości arkusza działań, ponieważ może to prowadzić do poważnych nieprawidłowych błędów kontekstu w iOS 7. Po prostu spędziłem kilka godzin pracując nad tym problemem i ostatecznie zdecydowałem się na inne podejście. Zastąpiłem wywołanie wyświetlania arkusza akcji kontrolerem widoku modalnego zawierającym prosty widok tableview.
Istnieje wiele sposobów, aby osiągnąć to. Oto jeden ze sposobów, który właśnie wdrożyłem w bieżącym projekcie. To miłe, ponieważ mogę go ponownie użyć między 5 lub 6 różnych ekranów, gdzie wszyscy użytkownicy mogą wybrać z listy opcji.
- Utwórz nową podklasę UITableViewController,
SimpleTableViewController. - Utwórz UITableViewController w storyboardzie (osadzonym w kontrolerze nawigacyjnym) i ustaw jego niestandardową klasę na SimpleTableViewController.
- daj Kontroler nawigacyjny dla SimpleTableViewController Storyboard ID "SimpleTableVC".
- W SimpleTableViewController.H, Utwórz właściwość NSArray, która będzie reprezentować dane w tabeli.
- również w SimpleTableViewController.H, Utwórz protokół {[3] } z wymaganą metodą
itemSelectedatRow:i słabą właściwością o nazwie delegat typuid<SimpleTableViewControllerDelegate>. W ten sposób zaznaczenia zostaną przekazane z powrotem do kontrolera nadrzędnego. - W SimpleTableViewController.m, zaimplementować źródło danych tableview i delegować metody, wywołując
itemSelectedatRow:wtableView:didSelectRowAtIndexPath:.
itemSelectedAtRow:. Następnie, aby otworzyć modal wystarczy utworzyć nową instancję SimpleTableViewController, ustawić Dane tabeli i delegować i przedstawić je.
UINavigationController *navigationController = (UINavigationController *)[self.storyboard instantiateViewControllerWithIdentifier:@"SimpleTableVC"];
SimpleTableViewController *tableViewController = (SimpleTableViewController *)[[navigationController viewControllers] objectAtIndex:0];
tableViewController.tableData = self.statesArray;
tableViewController.navigationItem.title = @"States";
tableViewController.delegate = self;
[self presentViewController:navigationController animated:YES completion:nil];
Stworzyłem prosty przykład i opublikowałem go na GitHubie.
Zobacz też Pokazywanie przyczyn działania Cgcontext invalid context errors .
Warning: date(): Invalid date.timezone value 'Europe/Kyiv', we selected the timezone 'UTC' for now. in /var/www/agent_stack/data/www/doraprojects.net/template/agent.layouts/content.php on line 54
2017-05-23 12:30:43
Jeszcze jedno rozwiązanie:
-
Brak paska narzędzi, ale sterowanie segmentowe (eyecandy)
UIActionSheet *actionSheet = [[UIActionSheet alloc] initWithTitle:nil
                                                    delegate:nil
                                                    cancelButtonTitle:nil
                                                    destructiveButtonTitle:nil
                                                    otherButtonTitles:nil];

[actionSheet setActionSheetStyle:UIActionSheetStyleBlackTranslucent];

CGRect pickerFrame = CGRectMake(0, 40, 0, 0);

UIPickerView *pickerView = [[UIPickerView alloc] initWithFrame:pickerFrame];
pickerView.showsSelectionIndicator = YES;
pickerView.dataSource = self;
pickerView.delegate = self;

[actionSheet addSubview:pickerView];
[pickerView release];

UISegmentedControl *closeButton = [[UISegmentedControl alloc] initWithItems:[NSArray arrayWithObject:@"Close"]];
closeButton.momentary = YES;
closeButton.frame = CGRectMake(260, 7.0f, 50.0f, 30.0f);
closeButton.segmentedControlStyle = UISegmentedControlStyleBar;
closeButton.tintColor = [UIColor blackColor];
[closeButton addTarget:self action:@selector(dismissActionSheet:) forControlEvents:UIControlEventValueChanged];
[actionSheet addSubview:closeButton];
[closeButton release];

[actionSheet showInView:[[UIApplication sharedApplication] keyWindow]];

[actionSheet setBounds:CGRectMake(0, 0, 320, 485)];
Warning: date(): Invalid date.timezone value 'Europe/Kyiv', we selected the timezone 'UTC' for now. in /var/www/agent_stack/data/www/doraprojects.net/template/agent.layouts/content.php on line 54
2011-10-15 23:52:06
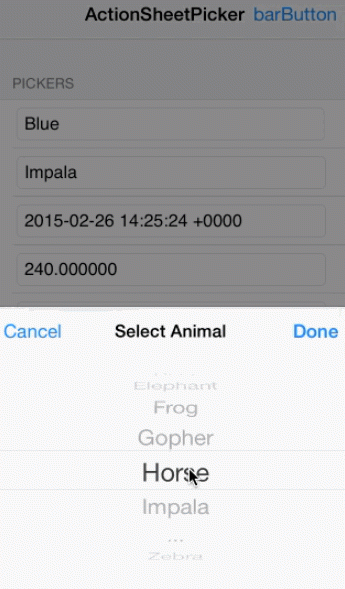
Mimo, że to pytanie jest stare, szybko wspomnę, że rzuciłem actionsheetpicker class {[2] } z funkcją wygody, więc możesz odradzać arkusz ActionSheet z UIPickerView w jednej linii. Opiera się na kodzie z odpowiedzi na to pytanie.
Edit: teraz obsługuje również użycie DatePicker i DistancePicker.
Upd:
Ta wersja jest przestarzała: zamiast tego użyj ActionSheetPicker-3.0.
Warning: date(): Invalid date.timezone value 'Europe/Kyiv', we selected the timezone 'UTC' for now. in /var/www/agent_stack/data/www/doraprojects.net/template/agent.layouts/content.php on line 54
2015-03-05 09:43:24
Tak ! W końcu to znalazłem.
Zaimplementuj następujący kod na wydarzeniu kliknięcia przycisku, aby wyświetlić arkusz akcji, jak podano na obrazku pytania.
UIActionSheet *aac = [[UIActionSheet alloc] initWithTitle:@"How many?"
                                             delegate:self
                                    cancelButtonTitle:nil
                               destructiveButtonTitle:nil
                                    otherButtonTitles:nil];

UIDatePicker *theDatePicker = [[UIDatePicker alloc] initWithFrame:CGRectMake(0.0, 44.0, 0.0, 0.0)];
if(IsDateSelected==YES)
{
    theDatePicker.datePickerMode = UIDatePickerModeDate;
    theDatePicker.maximumDate=[NSDate date];
}else {
    theDatePicker.datePickerMode = UIDatePickerModeTime;
}

self.dtpicker = theDatePicker;
[theDatePicker release];
[dtpicker addTarget:self action:@selector(dateChanged) forControlEvents:UIControlEventValueChanged];

pickerDateToolbar = [[UIToolbar alloc] initWithFrame:CGRectMake(0, 0, 320, 44)];
pickerDateToolbar.barStyle = UIBarStyleBlackOpaque;
[pickerDateToolbar sizeToFit];

NSMutableArray *barItems = [[NSMutableArray alloc] init];

UIBarButtonItem *flexSpace = [[UIBarButtonItem alloc] initWithBarButtonSystemItem:UIBarButtonSystemItemFlexibleSpace target:self action:nil];
[barItems addObject:flexSpace];

UIBarButtonItem *doneBtn = [[UIBarButtonItem alloc] initWithBarButtonSystemItem:UIBarButtonSystemItemDone target:self action:@selector(DatePickerDoneClick)];
[barItems addObject:doneBtn];

[pickerDateToolbar setItems:barItems animated:YES];

[aac addSubview:pickerDateToolbar];
[aac addSubview:dtpicker];
[aac showInView:self.view];
[aac setBounds:CGRectMake(0,0,320, 464)];
Warning: date(): Invalid date.timezone value 'Europe/Kyiv', we selected the timezone 'UTC' for now. in /var/www/agent_stack/data/www/doraprojects.net/template/agent.layouts/content.php on line 54
2009-08-11 20:19:40
Doskonałe rozwiązanie Marcio na to pytanie było bardzo pomocne dla mnie w dodawaniu wszelkiego rodzaju podglądy do interfejsu użytkownika.
Z powodów, które nie są (jeszcze) całkowicie jasne dla mnie, granice arkusza UIActionSheet mogą być ustawione dopiero po jego wyświetleniu; zarówno rozwiązania Sagara, jak i marcio z powodzeniem rozwiązują to za pomocą setBounds: CGRectMake (...) wiadomość wysyłana do arkusza działań Po jest wyświetlana.
Jednak ustawianie granic interfejsu użytkownika po arkuszu został wyświetlony tworzy skokowe Przejście, gdy pojawi się arkusz akcji, gdzie "wyskakuje" do widoku, a następnie przewija się tylko na ostatnich 40 pikselach.
Przy dobieraniu rozmiaru UIPickerView po dodaniu podglądu, zalecam zawijanie wiadomości setbound wysyłanej do arkusza akcji wewnątrz bloku animacji. Sprawi to, że wejście do arkusza czynności będzie gładsze.
UIActionSheet *actionSheet = [[[UIActionSheet alloc] initWithTitle:nil delegate:nil cancelButtonTitle:nil destructiveButtonTitle:nil otherButtonTitles:nil];


// add one or more subviews to the UIActionSheet
// this could be a UIPickerView, or UISegmentedControl buttons, or any other
// UIView.  Here, let's just assume it's already set up and is called
// (UIView *)mySubView
[actionSheet addSubview:myView];

// show the actionSheet
[actionSheet showInView:[UIApplication mainWindow]];


// Size the actionSheet with smooth animation
    [UIView beginAnimations:nil context:nil];
    [actionSheet setBounds:CGRectMake(0, 0, 320, 485)];
    [UIView commitAnimations];
Warning: date(): Invalid date.timezone value 'Europe/Kyiv', we selected the timezone 'UTC' for now. in /var/www/agent_stack/data/www/doraprojects.net/template/agent.layouts/content.php on line 54
2010-03-28 18:21:59
Dla tych, którzy próbują znaleźć funkcję DatePickerDoneClick... Oto prosty kod do odrzucenia arkusza działania. Oczywiście aac powinien być ivar (ten, który idzie w Twojej implmentacji .plik h)
- (void)DatePickerDoneClick:(id)sender{
    [aac dismissWithClickedButtonIndex:0 animated:YES];
}Warning: date(): Invalid date.timezone value 'Europe/Kyiv', we selected the timezone 'UTC' for now. in /var/www/agent_stack/data/www/doraprojects.net/template/agent.layouts/content.php on line 54
2011-04-11 11:15:51
Nie bardzo rozumiem, dlaczego {[1] } wchodzi do UIActionSheet. Wydaje się to być niechlujne i chwiejne rozwiązanie, które można złamać w przyszłym wydaniu iOS. (Miałem wcześniej takie rzeczy w aplikacji, gdzie UIPickerView nie był prezentowany na pierwszym dotknięciu i musiał zostać ponownie wykorzystany-dziwne dziwactwa z UIActionSheet).
Po prostu zaimplementowałem UIPickerView, a następnie dodałem go jako subview do mojego widoku i animowałem go poruszając się w górę, jakby był prezentowany jako akcja arkusz.
/// Add the PickerView as a private variable
@interface EMYourClassName ()

@property (nonatomic, strong) UIPickerView *picker;
@property (nonatomic, strong) UIButton *backgroundTapButton;

@end

///
/// This is your action which will present the picker view
///
- (IBAction)showPickerView:(id)sender {

    // Uses the default UIPickerView frame.
    self.picker = [[UIPickerView alloc] initWithFrame:CGRectZero];

    // Place the Pickerview off the bottom of the screen, in the middle set the datasource delegate and indicator
    _picker.center = CGPointMake([[UIScreen mainScreen] bounds].size.width / 2.0, [[UIScreen mainScreen] bounds].size.height + _picker.frame.size.height);
    _picker.dataSource = self;
    _picker.delegate = self;
    _picker.showsSelectionIndicator = YES;

    // Create the toolbar and place it at -44, so it rests "above" the pickerview.
    // Borrowed from @Spark, thanks!
    UIToolbar *pickerDateToolbar = [[UIToolbar alloc] initWithFrame:CGRectMake(0, -44, 320, 44)];
    pickerDateToolbar.barStyle = UIBarStyleBlackTranslucent;
    [pickerDateToolbar sizeToFit];

    NSMutableArray *barItems = [[NSMutableArray alloc] init];

    UIBarButtonItem *flexSpace = [[UIBarButtonItem alloc] initWithBarButtonSystemItem:UIBarButtonSystemItemFlexibleSpace target:self action:nil];
    [barItems addObject:flexSpace];

    // The action can whatever you want, but it should dimiss the picker.
    UIBarButtonItem *doneBtn = [[UIBarButtonItem alloc] initWithBarButtonSystemItem:UIBarButtonSystemItemDone target:self action:@selector(backgroundTapped:)];
    [barItems addObject:doneBtn];

    [pickerDateToolbar setItems:barItems animated:YES];
    [_picker addSubview:pickerDateToolbar];

    // If you have a UITabBarController, you should add the picker as a subview of it
    // so it appears to go over the tabbar, not under it. Otherwise you can add it to
    // self.view
    [self.tabBarController.view addSubview:_picker];

    // Animate it moving up
    [UIView animateWithDuration:.3 animations:^{
        [_picker setCenter:CGPointMake(160, [[UIScreen mainScreen] bounds].size.height - 148)]; //148 seems to put it in place just right.
    } completion:^(BOOL finished) {
        // When done, place an invisible button on the view behind the picker, so if the
        // user "taps to dismiss" the picker, it will go away. Good user experience!
        self.backgroundTapButton = [UIButton buttonWithType:UIButtonTypeCustom];
        _backgroundTapButton.frame = CGRectMake(0, 0, self.view.frame.size.width, self.view.frame.size.height);
        [_backgroundTapButton addTarget:self action:@selector(backgroundTapped:) forControlEvents:UIControlEventTouchUpInside];
        [self.view addSubview:_backgroundTapButton];
    }];

}

// And lastly, the method to hide the picker.  You should handle the picker changing
// in a method with UIControlEventValueChanged on the pickerview.
- (void)backgroundTapped:(id)sender {

    [UIView animateWithDuration:.3 animations:^{
        _picker.center = CGPointMake(160, [[UIScreen mainScreen] bounds].size.height + _picker.frame.size.height);
    } completion:^(BOOL finished) {
        [_picker removeFromSuperview];
        self.picker = nil;
        [self.backgroundTapButton removeFromSuperview];
        self.backgroundTapButton = nil;
    }];
}
Warning: date(): Invalid date.timezone value 'Europe/Kyiv', we selected the timezone 'UTC' for now. in /var/www/agent_stack/data/www/doraprojects.net/template/agent.layouts/content.php on line 54
2013-06-04 06:48:53
Aby dodać do niesamowitego rozwiązania marcio, dismissActionSheet: można zaimplementować w następujący sposób.
- Dodaj obiekt ActionSheet do swojego .plik h, zsyntetyzuj go i odwołaj do swojego .plik M.
-
Dodaj tę metodę do kodu.
- (void)dismissActionSheet:(id)sender{
  [_actionSheet dismissWithClickedButtonIndex:0 animated:YES];
  [_myButton setTitle:@"new title"]; //set to selected text if wanted
}
Warning: date(): Invalid date.timezone value 'Europe/Kyiv', we selected the timezone 'UTC' for now. in /var/www/agent_stack/data/www/doraprojects.net/template/agent.layouts/content.php on line 54
2012-09-04 21:13:13
Myślę, że to najlepszy sposób, aby to zrobić.
To prawie to, co wszyscy sugerują, ale używa bloków, co jest miłym akcentem!
Warning: date(): Invalid date.timezone value 'Europe/Kyiv', we selected the timezone 'UTC' for now. in /var/www/agent_stack/data/www/doraprojects.net/template/agent.layouts/content.php on line 54
2014-10-13 16:23:35
Od iOS 8 nie można, nie działa, ponieważ Apple zmieniło wewnętrzną implementację UIActionSheet. Proszę zapoznać się z dokumentacją Apple:
Notatki Subklasyczne
UIActionSheet nie jest przeznaczony do podklasowania, ani należy dodać widoki do jego hierarchii . Jeśli chcesz zaprezentować arkusz z większą personalizacją niż zapewnia interfejs API interfejsu UIActionSheet, możesz utworzyć swój własny i zaprezentować go modalnie za pomocą presentViewController: animated: completion:.
Warning: date(): Invalid date.timezone value 'Europe/Kyiv', we selected the timezone 'UTC' for now. in /var/www/agent_stack/data/www/doraprojects.net/template/agent.layouts/content.php on line 54
2014-08-17 12:47:01
Spodobało mi się podejście zastosowane przez Wayfarer i flexaddicted, ale okazało się (podobnie jak aZtral), że nie działa, ponieważ tła jest jedynym elementem, który reaguje na interakcję użytkownika. To doprowadziło mnie do umieszczenia wszystkich trzech jego podwizów: _picker, _pickerToolbar i backgroundTapButton wewnątrz widoku zawierającego (popup), który następnie był animowany na ekranie i poza nim. Potrzebowałem również przycisku Anuluj na pasku _pickertoolbar. Oto odpowiednie elementy kodu dla widoku wyskakującego (musisz podaj własne źródło danych selektora i metody delegowania).
#define DURATION            0.4
#define PICKERHEIGHT        162.0
#define TOOLBARHEIGHT       44.0

@interface ViewController ()
@property (nonatomic, strong) UIView        *popup;
@property (nonatomic, strong) UIPickerView  *picker;
@property (nonatomic, strong) UIToolbar     *pickerToolbar;
@property (nonatomic, strong) UIButton      *backgroundTapButton;
@end

-(void)viewDidLoad {
    // These are ivars for convenience
    rect = self.view.bounds;
    topNavHeight = self.navigationController.navigationBar.frame.size.height;
    bottomNavHeight = self.navigationController.toolbar.frame.size.height;
    navHeights = topNavHeight + bottomNavHeight;
}

-(void)showPickerView:(id)sender {
    [self createPicker];
    [self createToolbar];

    // create view container
    _popup = [[UIView alloc] initWithFrame:CGRectMake(0.0, topNavHeight, rect.size.width, rect.size.height - navHeights)];
    // Initially put the centre off the bottom of the screen
    _popup.center = CGPointMake(rect.size.width / 2.0, rect.size.height + _popup.frame.size.height / 2.0);
    [_popup addSubview:_picker];
    [_popup insertSubview:_pickerToolbar aboveSubview:_picker];

    // Animate it moving up
    // This seems to work though I am not sure why I need to take off the topNavHeight
    CGFloat vertCentre = (_popup.frame.size.height - topNavHeight) / 2.0;

    [UIView animateWithDuration:DURATION animations:^{
        // move it to a new point in the middle of the screen
        [_popup setCenter:CGPointMake(rect.size.width / 2.0, vertCentre)];
    } completion:^(BOOL finished) {
        // When done, place an invisible 'button' on the view behind the picker,
        // so if the user "taps to dismiss" the picker, it will go away
        self.backgroundTapButton = [UIButton buttonWithType:UIButtonTypeCustom];
        _backgroundTapButton.frame = CGRectMake(0, 0, _popup.frame.size.width, _popup.frame.size.height);
        [_backgroundTapButton addTarget:self action:@selector(doneAction:) forControlEvents:UIControlEventTouchUpInside];
        [_popup insertSubview:_backgroundTapButton belowSubview:_picker];
        [self.view addSubview:_popup];
    }];
}

-(void)createPicker {
    // To use the default UIPickerView frame of 216px set frame to CGRectZero, but we want the 162px height one
    CGFloat     pickerStartY = rect.size.height - navHeights - PICKERHEIGHT;
    self.picker = [[UIPickerView alloc] initWithFrame:CGRectMake(0.0, pickerStartY, rect.size.width, PICKERHEIGHT)];
    _picker.dataSource = self;
    _picker.delegate = self;
    _picker.showsSelectionIndicator = YES;
    // Otherwise you can see the view underneath the picker
    _picker.backgroundColor = [UIColor whiteColor];
    _picker.alpha = 1.0f;
}

-(void)createToolbar {
    CGFloat     toolbarStartY = rect.size.height - navHeights - PICKERHEIGHT - TOOLBARHEIGHT;
    _pickerToolbar = [[UIToolbar alloc] initWithFrame:CGRectMake(0, toolbarStartY, rect.size.width, TOOLBARHEIGHT)];
    [_pickerToolbar sizeToFit];

    NSMutableArray *barItems = [[NSMutableArray alloc] init];
    UIBarButtonItem *cancelButton = [[UIBarButtonItem alloc] initWithBarButtonSystemItem:UIBarButtonSystemItemCancel target:self action:@selector(cancelAction:)];
    [barItems addObject:cancelButton];

    // Flexible space to make the done button go on the right
    UIBarButtonItem *flexSpace = [[UIBarButtonItem alloc] initWithBarButtonSystemItem:UIBarButtonSystemItemFlexibleSpace target:self action:nil];
    [barItems addObject:flexSpace];

    // The done button
    UIBarButtonItem *doneButton = [[UIBarButtonItem alloc] initWithBarButtonSystemItem:UIBarButtonSystemItemDone target:self action:@selector(doneAction:)];
    [barItems addObject:doneButton];
    [_pickerToolbar setItems:barItems animated:YES];
}

// The method to process the picker, if we have hit done button
- (void)doneAction:(id)sender {
    [UIView animateWithDuration:DURATION animations:^{
        _popup.center = CGPointMake(rect.size.width / 2.0, rect.size.height + _popup.frame.size.height / 2.0);
    } completion:^(BOOL finished) { [self destroyPopup]; }];
    // Do something to process the returned value from your picker
}

// The method to process the picker, if we have hit cancel button
- (void)cancelAction:(id)sender {
    [UIView animateWithDuration:DURATION animations:^{
        _popup.center = CGPointMake(rect.size.width / 2.0, rect.size.height + _popup.frame.size.height / 2.0);
    } completion:^(BOOL finished) { [self destroyPopup]; }];
}

-(void)destroyPopup {
    [_picker removeFromSuperview];
    self.picker = nil;
    [_pickerToolbar removeFromSuperview];
    self.pickerToolbar = nil;
    [self.backgroundTapButton removeFromSuperview];
    self.backgroundTapButton = nil;
    [_popup removeFromSuperview];
    self.popup = nil;
}
Warning: date(): Invalid date.timezone value 'Europe/Kyiv', we selected the timezone 'UTC' for now. in /var/www/agent_stack/data/www/doraprojects.net/template/agent.layouts/content.php on line 54
2014-07-17 01:14:11