Białe obramowanie wraz z przezroczystością w "LinearLayout"
Chciałem dodać układ liniowy, z przezroczystym tłem i białymi obramowaniami. Problem w tym, że o ile googlowałem, mogę osiągnąć tylko jeden z obu.
Oto co zrobiłem:
-
Zapisano następujące wartości jako border.xml w drawable
<?xml version="1.0" encoding="utf-8"?> <layer-list xmlns:android="http://schemas.android.com/apk/res/android"> <item> <shape android:shape="rectangle"> <solid android:color="#FFFFFF" /> </shape> </item> <item android:left="5dp" android:right="5dp" android:top="5dp" android:bottom="5dp" > <shape android:shape="rectangle"> </shape> </item> </layer-list> -
Mój istniejący układ strony
     <LinearLayout
        android:id="@+id/quiz"
        android:layout_width="150dp"
        android:layout_height="120dp"
        android:background="#66041414"          <-------- replaced it with android:background="@drawable/border"
        android:orientation="vertical"
        android:layout_marginLeft="5dp" >

         ......
       </LinearLayout>
Otrzymuję nieprzezroczyste tło, gdy ramka była włączona.
Chciałem, aby efekt końcowy był jak: 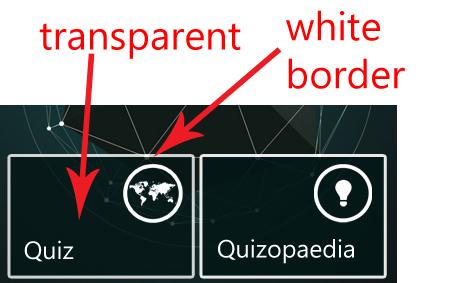
4 answers
Twoje Rysowanie dla tła układu:
Możesz zmienić promień dla kształtu narożnika, jeśli chcesz. Ale obrys stworzy obramowanie, a solidna część to tło, które robimy przezroczystym.
<?xml version="1.0" encoding="utf-8"?>
<shape xmlns:android="http://schemas.android.com/apk/res/android"
       android:shape="rectangle">
  <corners
      android:radius="2dp"
      android:topRightRadius="0dp"
      android:bottomRightRadius="0dp"
      android:bottomLeftRadius="0dp" />
  <stroke
      android:width="1dp"
      android:color="@android:color/white" />
  <solid android:color="@android:color/transparent"/>
</shape>
I mój układ testowy.xml
<?xml version="1.0" encoding="utf-8"?>
<LinearLayout xmlns:android="http://schemas.android.com/apk/res/android"
    android:id="@+id/ll1"
    android:layout_width="fill_parent"
    android:layout_height="fill_parent"
    android:orientation="vertical" >


    <LinearLayout
        android:id="@+id/ll2"
        android:layout_height="50dp"
        android:layout_width="50dp"
        android:background="@drawable/my_transparent_linear_layout"></LinearLayout>
</LinearLayout>
To działa, poniżej jest dowód:
Warning: date(): Invalid date.timezone value 'Europe/Kyiv', we selected the timezone 'UTC' for now. in /var/www/agent_stack/data/www/doraprojects.net/template/agent.layouts/content.php on line 54
2013-01-26 09:53:51
W tym celu możesz użyć dwóch układów aligned jeden z drugim, a następnie ustawić tło {[1] } dla top view i ustawić białą ramkę jako tło dla bottom view. Możesz to zrobić wewnątrz relative layouts.
Warning: date(): Invalid date.timezone value 'Europe/Kyiv', we selected the timezone 'UTC' for now. in /var/www/agent_stack/data/www/doraprojects.net/template/agent.layouts/content.php on line 54
2013-01-26 09:44:37
XML Drawable dla tła:
<shape xmlns:android="http://schemas.android.com/apk/res/android">
<corners android:radius="30dp" />
<stroke android:width="5dp" android:color="#ffffffff"/>
<solid android:color="#66000000"/>
</shape>
Dostosuj promień, szerokość i przezroczystość ciemnego koloru (części #ff i #66) według własnego uznania.
Warning: date(): Invalid date.timezone value 'Europe/Kyiv', we selected the timezone 'UTC' for now. in /var/www/agent_stack/data/www/doraprojects.net/template/agent.layouts/content.php on line 54
2013-01-26 09:57:08
Rzeczywiście dobrze sugestia przez @ Ali Imran, Sprawdź poniżej sposób, mam nadzieję, że to pomoże.
do tyłu.xml
<?xml version="1.0" encoding="UTF-8"?>
    <shape xmlns:android="http://schemas.android.com/apk/res/android" android:shape="rectangle">
         <stroke android:width="1dp" android:color="#dd7b7a"/>
         <corners android:bottomRightRadius="10dp" android:bottomLeftRadius="10dp"
         android:topLeftRadius="10dp" android:topRightRadius="10dp"/>
         <solid android:color="#dd7b7a"/>
     </shape>
main.xml
<?xml version="1.0" encoding="utf-8"?>
<LinearLayout xmlns:android="http://schemas.android.com/apk/res/android"
    android:orientation="vertical"
    android:layout_width="fill_parent"
    android:layout_height="fill_parent"
    android:gravity="center"
    >
<LinearLayout
     android:padding="4dip"
    android:orientation="vertical"
    android:layout_width="wrap_content"
    android:layout_height="wrap_content"
    android:background="@drawable/back"
    android:gravity="center_horizontal"
    >
<LinearLayout
    android:layout_width="wrap_content"
    android:layout_height="wrap_content"
   android:background="@drawable/tile_mode" // your transparent image
    />
</LinearLayout>
</LinearLayout>
Przejrzyj również poniższe linki w ten sposób, Sposób użycia xml będzie działał dla Ciebie.
Warning: date(): Invalid date.timezone value 'Europe/Kyiv', we selected the timezone 'UTC' for now. in /var/www/agent_stack/data/www/doraprojects.net/template/agent.layouts/content.php on line 54
2017-05-23 12:02:12