Dynamiczne dodawanie wierszy tabeli w systemie Android
Próbuję stworzyć układ, w którym muszę dynamicznie dodawać wiersze tabeli. Poniżej znajduje się układ tabeli XML
<TableLayout xmlns:android="http://schemas.android.com/apk/res/android"
    android:layout_width="match_parent"
    android:layout_height="match_parent"
    android:id="@+id/displayLinear"
    android:background="@color/background_df"
    android:orientation="vertical" >

         <TableRow
            android:layout_width="wrap_content"
            android:layout_height="wrap_content"
            android:id="@+id/display_row"
            android:layout_marginTop="280dip" >

</TableLayout>
Plik aktywności, do którego wiersze są dodawane dynamicznie, to
public void init(){
    menuDB = new MenuDBAdapter(this);
    ll = (TableLayout) findViewById(R.id.displayLinear);

    TableRow row=(TableRow)findViewById(R.id.display_row);
    for (int i = 0; i <2; i++) {

        checkBox = new CheckBox(this);
        tv = new TextView(this);
        addBtn = new ImageButton(this);
        addBtn.setImageResource(R.drawable.add);
        minusBtn = new ImageButton(this);
        minusBtn.setImageResource(R.drawable.minus);
        qty = new TextView(this);
        checkBox.setText("hello");
        qty.setText("10");
        row.addView(checkBox);
        row.addView(minusBtn);
        row.addView(qty);
        row.addView(addBtn);
        ll.addView(row,i);

    }
}
Ale kiedy uruchamiam to, dostaję poniżej błędu
08-13 16:27:46.437: E/AndroidRuntime(23568): java.lang.RuntimeException: Unable to start activity ComponentInfo{com.example.roms/com.example.roms.DisplayActivity}: java.lang.IllegalStateException: The specified child already has a parent. You must call removeView() on the child's parent first.
Rozumiem, że jest to spowodowane komend ll.addView(row,i); ale kiedy to usunąć jego dodanie wszystkich rzeczy w jednym wierszu raczej tan tworzenie nowego wiersza dla następnego elementu. Próbowałem z podaniem indeksu również jako row.addView(addBtn,i), ale nadal nie jest wypełniony prawidłowo. Proszę o radę. Dzięki.
5 answers
Nie powinieneś używać elementu zdefiniowanego w układzie XML, aby utworzyć więcej jego instancji. Należy albo utworzyć go w osobnym XML i napompować go lub utworzyć TableRow programowo. JeĹ " li tworzÄ ... c je programowo, powinno byÄ ‡ to mniej wiÄ ™ cej:
    public void init(){
    TableLayout ll = (TableLayout) findViewById(R.id.displayLinear);


    for (int i = 0; i <2; i++) {

        TableRow row= new TableRow(this);
        TableRow.LayoutParams lp = new TableRow.LayoutParams(TableRow.LayoutParams.WRAP_CONTENT);
        row.setLayoutParams(lp);
        checkBox = new CheckBox(this);
        tv = new TextView(this);
        addBtn = new ImageButton(this);
        addBtn.setImageResource(R.drawable.add);
        minusBtn = new ImageButton(this);
        minusBtn.setImageResource(R.drawable.minus);
        qty = new TextView(this);
        checkBox.setText("hello");
        qty.setText("10");
        row.addView(checkBox);
        row.addView(minusBtn);
        row.addView(qty);
        row.addView(addBtn);
        ll.addView(row,i);
    }
}
Warning: date(): Invalid date.timezone value 'Europe/Kyiv', we selected the timezone 'UTC' for now. in /var/www/agent_stack/data/www/doraprojects.net/template/agent.layouts/content.php on line 54
2013-08-13 11:29:03
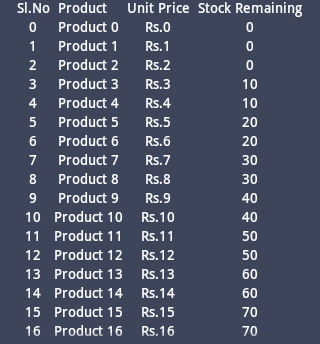
Utwórz funkcję init () i wskaż układ tabeli. Następnie utwórz potrzebne wiersze i kolumny.
   public void init() {
            TableLayout stk = (TableLayout) findViewById(R.id.table_main);
            TableRow tbrow0 = new TableRow(this);
            TextView tv0 = new TextView(this);
            tv0.setText(" Sl.No ");
            tv0.setTextColor(Color.WHITE);
            tbrow0.addView(tv0);
            TextView tv1 = new TextView(this);
            tv1.setText(" Product ");
            tv1.setTextColor(Color.WHITE);
            tbrow0.addView(tv1);
            TextView tv2 = new TextView(this);
            tv2.setText(" Unit Price ");
            tv2.setTextColor(Color.WHITE);
            tbrow0.addView(tv2);
            TextView tv3 = new TextView(this);
            tv3.setText(" Stock Remaining ");
            tv3.setTextColor(Color.WHITE);
            tbrow0.addView(tv3);
            stk.addView(tbrow0);
            for (int i = 0; i < 25; i++) {
                TableRow tbrow = new TableRow(this);
                TextView t1v = new TextView(this);
                t1v.setText("" + i);
                t1v.setTextColor(Color.WHITE);
                t1v.setGravity(Gravity.CENTER);
                tbrow.addView(t1v);
                TextView t2v = new TextView(this);
                t2v.setText("Product " + i);
                t2v.setTextColor(Color.WHITE);
                t2v.setGravity(Gravity.CENTER);
                tbrow.addView(t2v);
                TextView t3v = new TextView(this);
                t3v.setText("Rs." + i);
                t3v.setTextColor(Color.WHITE);
                t3v.setGravity(Gravity.CENTER);
                tbrow.addView(t3v);
                TextView t4v = new TextView(this);
                t4v.setText("" + i * 15 / 32 * 10);
                t4v.setTextColor(Color.WHITE);
                t4v.setGravity(Gravity.CENTER);
                tbrow.addView(t4v);
                stk.addView(tbrow);
            }

        }
Wywołanie funkcji init w metodzie onCreate:
@Override
    protected void onCreate(Bundle savedInstanceState) {
        super.onCreate(savedInstanceState);
        requestWindowFeature(Window.FEATURE_NO_TITLE);
        setContentView(R.layout.activity_main);

        init();
    }
Plik układu jak:
 <ScrollView
        android:id="@+id/scrollView1"
        android:layout_width="fill_parent"
        android:layout_height="wrap_content"
        android:background="#3d455b"
        android:layout_alignParentLeft="true" >

        <HorizontalScrollView
            android:id="@+id/hscrll1"
            android:layout_width="fill_parent"
            android:layout_height="wrap_content" >

            <RelativeLayout
                android:id="@+id/RelativeLayout1"
                android:layout_width="fill_parent"
                android:layout_gravity="center"
                android:layout_height="fill_parent"
                android:orientation="vertical" >

                <TableLayout
                    android:id="@+id/table_main"
                    android:layout_width="wrap_content"
                    android:layout_height="wrap_content"
                    android:layout_centerHorizontal="true" >
                </TableLayout>
            </RelativeLayout>
        </HorizontalScrollView>
    </ScrollView>
Będzie wyglądać następująco:
Warning: date(): Invalid date.timezone value 'Europe/Kyiv', we selected the timezone 'UTC' for now. in /var/www/agent_stack/data/www/doraprojects.net/template/agent.layouts/content.php on line 54
2014-03-27 08:41:54
Możesz również, jak powiedział Fredigato, zadeklarować RelativeLayout w oddzielnym pliku układu. Następnie utwórz instancję używając:
for(int i = 0; i < 6; i ++){
LayoutInflater inflater = (LayoutInflater)getApplicationContext().getSystemService
                (Context.LAYOUT_INFLATER_SERVICE);
RelativeLayout row = (RelativeLayout) inflater.inflate(R.layout.table_view,null);
        quizesTableLayout.addView(row,i);
}
W tym podejściu można łatwo zaprojektować jeden niestandardowy wiersz za pomocą XML i użyć go ponownie.
Teraz, aby móc zmienić widoki dzieci w instancyjnym RelativeLayout. Możesz wywołać row.childAt (indeks) .
Więc powiedzmy, że masz TextView w RelativeLayout, możesz użyć:
TextView tv = (TextView) row.childAt(0);
tv.setText("Text");
Warning: date(): Invalid date.timezone value 'Europe/Kyiv', we selected the timezone 'UTC' for now. in /var/www/agent_stack/data/www/doraprojects.net/template/agent.layouts/content.php on line 54
2015-11-08 20:05:21
Zmień kod init jak poniżej,
public void init(){
    menuDB = new MenuDBAdapter(this);
    ll = (TableLayout) findViewById(R.id.displayLinear);
    ll.removeAllViews()

    for (int i = 0; i <2; i++) {
        TableRow row=(TableRow)findViewById(R.id.display_row);
        checkBox = new CheckBox(this);
        tv = new TextView(this);
        addBtn = new ImageButton(this);
        addBtn.setImageResource(R.drawable.add);
        minusBtn = new ImageButton(this);
        minusBtn.setImageResource(R.drawable.minus);
        qty = new TextView(this);
        checkBox.setText("hello");
        qty.setText("10");
        row.addView(checkBox);
        row.addView(minusBtn);
        row.addView(qty);
        row.addView(addBtn);
        ll.addView(row,i);

    }
Warning: date(): Invalid date.timezone value 'Europe/Kyiv', we selected the timezone 'UTC' for now. in /var/www/agent_stack/data/www/doraprojects.net/template/agent.layouts/content.php on line 54
2013-08-13 11:12:07
Activity
    <HorizontalScrollView
        android:layout_width="match_parent"
        android:layout_height="match_parent">

        <TableLayout
            android:id="@+id/mytable"
            android:layout_width="match_parent"
            android:layout_height="match_parent">

        </TableLayout>
    </HorizontalScrollView>
Twoja Klasa
protected void onCreate(Bundle savedInstanceState) {
    super.onCreate(savedInstanceState);
    setContentView(R.layout.activity_testtable);
    table = (TableLayout)findViewById(R.id.mytable);
    showTableLayout();
}


public  void showTableLayout(){
    Date date = new Date();
    int rows = 80;
    int colums  = 10;
    table.setStretchAllColumns(true);
    table.bringToFront();

    for(int i = 0; i < rows; i++){

        TableRow tr =  new TableRow(this);
        for(int j = 0; j < colums; j++)
        {
            TextView txtGeneric = new TextView(this);
            txtGeneric.setTextSize(18);
            txtGeneric.setText( dateFormat.format(date) + "\t\t\t\t" );
            tr.addView(txtGeneric);
            /*txtGeneric.setHeight(30); txtGeneric.setWidth(50);   txtGeneric.setTextColor(Color.BLUE);*/
        }
        table.addView(tr);
    }
}
Warning: date(): Invalid date.timezone value 'Europe/Kyiv', we selected the timezone 'UTC' for now. in /var/www/agent_stack/data/www/doraprojects.net/template/agent.layouts/content.php on line 54
2017-09-12 05:12:42