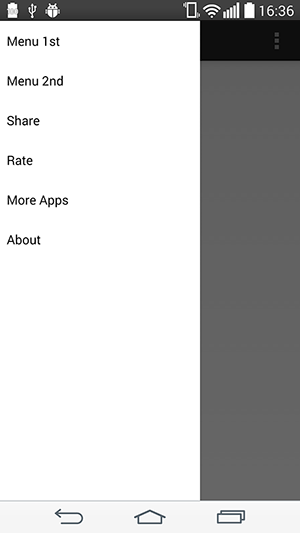
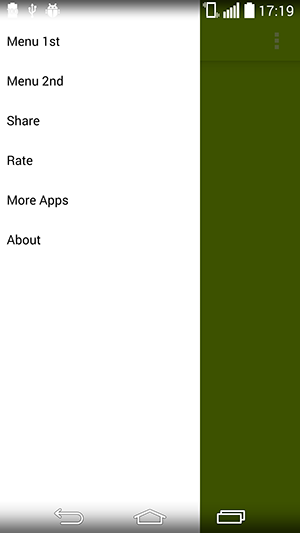
Szuflada Nawigacji Android na górnym pasku działania
Próbuję zrobić szufladę nawigacyjną nad paskiem akcji, gdy był przesuwany w prawo, jak ta aplikacja: [Usunięty]
To jest mój główny układ działania:
<?xml version="1.0" encoding="utf-8"?>
<android.support.v4.widget.DrawerLayout ...>
    <RelativeLayout android:orientation="vertical"
        android:layout_width="fill_parent"
        android:layout_height="fill_parent">
        ...
    </RelativeLayout>
    <fragment android:name="com...."
        android:layout_gravity="start"
        android:id="@id/navigation"
        android:layout_width="@dimen/navigation_menu_width"
        android:layout_height="fill_parent" />
</android.support.v4.widget.DrawerLayout>
Niektóre inne pytania na stackoverflow są podobne, np. to pytanie , ale wszystkie odpowiedzi są zalecane do korzystania z przesuwanego menu lib. Ale ta aplikacja nadal używać Androida.wsparcie.v4.widget./ Align = "left" / Nie pytaj mnie skąd wiem, że używają standardowej szuflady nawigacyjnej, ale na pewno o to.
Byłabym wdzięczna za pomoc.Oto ostateczne rozwiązanie : Wielkie podziękowania dla@Peter Cai to działa doskonale. https://github.com/lemycanh/DrawerOnTopActionBar
4 answers
Mam małą "sztuczkę" wyciągniętą z https://github.com/jfeinstein10/SlidingMenu aby zaimplementować wymagany efekt.
Wystarczy usunąć pierwsze dziecko widoku dekoracji okna i dodać pierwsze dziecko do widoku zawartości szuflady. Następnie wystarczy dodać szufladę do widoku wystroju okna.
Poniżej znajduje się kilka szczegółowych kroków, aby to zrobić.
Najpierw Utwórz xml o nazwie " decor.xml " lub cokolwiek chcesz. Umieść tylko szufladę i szuflada w środku. "FrameLayout" poniżej jest tylko kontenerem. Będziemy go używać do pakowania treści Twojej aktywności.
<?xml version="1.0" encoding="utf-8"?>
<android.support.v4.widget.DrawerLayout ...>
    <FrameLayout android:id="@+id/container"
        android:orientation="vertical"
        android:layout_width="fill_parent"
        android:layout_height="fill_parent"/>
    <fragment android:name="com...."
        android:layout_gravity="start"
        android:id="@id/navigation"
        android:layout_width="@dimen/navigation_menu_width"
        android:layout_height="fill_parent" />
</android.support.v4.widget.DrawerLayout>
A następnie usuń szufladę w głównym układzie. Teraz układ głównej aktywności powinien wyglądać tak:
<RelativeLayout android:orientation="vertical"
    android:layout_width="fill_parent"
    android:layout_height="fill_parent">
    ...
</RelativeLayout>
Zakładamy, że główny układ działania nosi nazwę " main.xml".
W swojej głównej aktywności, napisz jak następuje:
@Override
protected void onCreate(Bundle savedInstanceState) {
    super.onCreate(savedInstanceState);
    setContentView(R.layout.main);

    // Inflate the "decor.xml"
    LayoutInflater inflater = (LayoutInflater) getSystemService(Context.LAYOUT_INFLATER_SERVICE);
    DrawerLayout drawer = (DrawerLayout) inflater.inflate(R.layout.decor, null); // "null" is important.

    // HACK: "steal" the first child of decor view
    ViewGroup decor = (ViewGroup) getWindow().getDecorView();
    View child = decor.getChildAt(0);
    decor.removeView(child);
    FrameLayout container = (FrameLayout) drawer.findViewById(R.id.container); // This is the container we defined just now.
    container.addView(child);

    // Make the drawer replace the first child
    decor.addView(drawer);

    // Do what you want to do.......

}
Teraz masz szufladę, która może przesuwać się po pasku czynności. Ale możesz znaleźć to pokryte przez pasek stanu. Aby to naprawić, konieczne może być dodanie płyty wyściełającej do szuflady.
Warning: date(): Invalid date.timezone value 'Europe/Kyiv', we selected the timezone 'UTC' for now. in /var/www/agent_stack/data/www/doraprojects.net/template/agent.layouts/content.php on line 54
2014-10-03 07:38:05
Aktualizacja: Jak nakładać Pasek działania z szufladą nav. (Z nowym paskiem narzędzi) Użyj ich w zależności w swojej kompilacji.gradle
compile 'com.android.support:appcompat-v7:21.0.0'
compile 'com.android.support:support-v4:21.0.0'
To jako twoja szuflada
<!-- A DrawerLayout is intended to be used as the top-level content view using match_parent for both width and height to consume the full space available. -->
<android.support.v4.widget.DrawerLayout
    xmlns:android="http://schemas.android.com/apk/res/android"
    xmlns:tools="http://schemas.android.com/tools"
    android:id="@+id/drawer_layout"
    android:layout_width="match_parent"
    android:layout_height="match_parent">
    <LinearLayout
        android:id="@+id/layout_main"
        android:layout_width="match_parent"
        android:layout_height="match_parent"
        android:orientation="vertical">
    <include layout="@layout/toolbar"/>
    <!-- As the main content view, the view below consumes the entire
         space available using match_parent in both dimensions. -->
    <FrameLayout
        android:id="@+id/content_frame"
        android:layout_width="match_parent"
        android:layout_height="match_parent"
        android:background="@color/white"/>

    </LinearLayout>
    <fragment android:id="@+id/navigation_drawer"
        android:layout_width="@dimen/navigation_drawer_width"
        android:layout_height="match_parent"
        android:layout_gravity="start"
        android:background="@color/list_background"
         />

</android.support.v4.widget.DrawerLayout>
Utwórz nowy pasek narzędzi.plik xml w folderze układu.
<?xml version="1.0" encoding="utf-8"?>
<android.support.v7.widget.Toolbar
    xmlns:android="http://schemas.android.com/apk/res/android"
    xmlns:app="http://schemas.android.com/apk/res-auto"
    android:id="@+id/toolbar"
    android:layout_height="wrap_content"
    android:layout_width="match_parent"
    app:theme="@style/ThemeOverlay.AppCompat.Dark.ActionBar"
    app:popupTheme="@style/ThemeOverlay.AppCompat.Light"
    android:minHeight="?attr/actionBarSize"
    android:background="?attr/colorPrimary" />
Przejdź do aktywności, która rozszerza szufladę nawigacyjną. i dodaj to po SetContentView ()
Toolbar toolbar = (Toolbar) findViewById(R.id.toolbar);
setSupportActionBar(toolbar);
Nie zapomnij rozszerzyć paska motywu NoActionBar w folderze wartości.
<style name="Theme.Whtsnxt" parent="@style/Theme.AppCompat.Light.NoActionBar">
    <item name="windowActionBar">false</item>
    <!-- colorPrimary is used for the default action bar background -->
    <item name="windowActionModeOverlay">true</item>
    <item name="android:textColorPrimary">@color/white</item>
    <item name="colorPrimary">@color/splashscreen</item>
    <item name="colorPrimaryDark">@color/holo_blue_light</item>

    <item name="android:windowBackground">@color/white</item>
    <item name="android:colorBackground">@color/white</item>

</style>
Warning: date(): Invalid date.timezone value 'Europe/Kyiv', we selected the timezone 'UTC' for now. in /var/www/agent_stack/data/www/doraprojects.net/template/agent.layouts/content.php on line 54
2014-11-17 21:46:27
Opublikowałem sztuczkę, która umożliwia to w poprzednich wersjach Androida L. Moje rozwiązanie znajdziesz w tym poście. Mam nadzieję, że może się komuś przydać.
Warning: date(): Invalid date.timezone value 'Europe/Kyiv', we selected the timezone 'UTC' for now. in /var/www/agent_stack/data/www/doraprojects.net/template/agent.layouts/content.php on line 54
2017-05-23 11:54:55
Jeśli nie chcesz użyć lib lub tego hacka:
- Extend " Theme.AppCompat.NoActionBar "
- Przenieś pierwszy Element szuflady do liniowejlayout.
-
Dodaj pasek narzędzi do tego LinearLayout.
<android.support.v7.widget.Toolbar android:id="@+id/toolbar" android:minHeight="?attr/actionBarSize" android:layout_width="match_parent" android:layout_height="wrap_content" app:titleTextColor="@android:color/white" android:background="?attr/colorPrimary"> </android.support.v7.widget.Toolbar> -
W aktywności Dodaj następujący wiersz po setContentView
setSupportActionBar((Toolbar) findViewById(R.id.toolbar));
Teraz powinno zadziałać.
Warning: date(): Invalid date.timezone value 'Europe/Kyiv', we selected the timezone 'UTC' for now. in /var/www/agent_stack/data/www/doraprojects.net/template/agent.layouts/content.php on line 54
2017-11-28 00:30:32