Jak wyrównać widoki u dołu ekranu?
Oto Mój kod układu;
<?xml version="1.0" encoding="utf-8"?>
<LinearLayout xmlns:android="http://schemas.android.com/apk/res/android"
    android:orientation="vertical"
    android:layout_width="fill_parent"
    android:layout_height="fill_parent">

    <TextView android:text="@string/welcome"
        android:id="@+id/TextView"
        android:layout_width="fill_parent"
        android:layout_height="wrap_content">
    </TextView>

    <LinearLayout android:id="@+id/LinearLayout"
        android:orientation="horizontal"
        android:layout_width="wrap_content"
        android:layout_height="wrap_content"
        android:gravity="bottom">

            <EditText android:id="@+id/EditText"
                android:layout_width="fill_parent"
                android:layout_height="wrap_content">
            </EditText>

            <Button android:text="@string/label_submit_button"
                android:id="@+id/Button"
                android:layout_width="wrap_content"
                android:layout_height="wrap_content">
            </Button>

    </LinearLayout>

</LinearLayout>
Jak to wygląda jest po lewej, a jak chcę, żeby wyglądało po prawej.
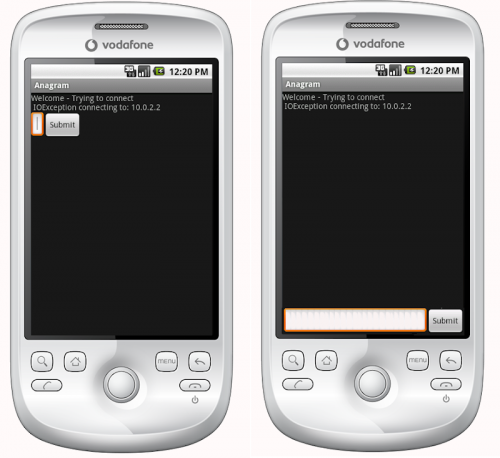
Oczywistą odpowiedzią jest ustawienie widoku tekstowego na fill_parent na wysokości, ale to powoduje, że nie ma miejsca na przycisk lub pole wprowadzania. Zasadniczo problem polega na tym, że chcę, aby przycisk submit i wpis tekstowy były stałą wysokością na dole, a Widok tekstowy wypełniał resztę przestrzeni, podobnie w poziomym układzie liniowym I chcesz, aby przycisk submit zawijał jego zawartość, a wpis tekstowy wypełniał resztę miejsca.
Jeśli pierwszy element w układzie liniowym ma być fill_parent, robi to dokładnie tak, nie pozostawiając miejsca na inne elementy, jak uzyskać element, który jest pierwszy w układzie liniowym, aby wypełnić całą przestrzeń poza minimum wymaganym przez resztę elementów w układzie?
EDIT:
Względne Układy rzeczywiście były odpowiedzią-Dziękuję!
    <?xml version="1.0" encoding="utf-8"?>
    <RelativeLayout
    xmlns:android="http://schemas.android.com/apk/res/android"
    android:layout_width="fill_parent"
    android:layout_height="fill_parent">

    <TextView
        android:text="@string/welcome"
        android:id="@+id/TextView"
        android:layout_width="fill_parent"
        android:layout_height="wrap_content"
        android:layout_alignParentTop="true">
    </TextView>

    <RelativeLayout
        android:id="@+id/InnerRelativeLayout"
        android:layout_width="wrap_content"
        android:layout_height="wrap_content"
        android:layout_alignParentBottom="true" >

        <Button
            android:text="@string/label_submit_button"
            android:id="@+id/Button"
            android:layout_alignParentRight="true"
            android:layout_width="wrap_content"
            android:layout_height="wrap_content">
        </Button>

        <EditText
            android:id="@+id/EditText"
            android:layout_width="fill_parent"
            android:layout_toLeftOf="@id/Button"
            android:layout_height="wrap_content">
        </EditText>

    </RelativeLayout>

</RelativeLayout>
18 answers
Myślę, że powinieneś spróbować układu względnego .
Jeśli masz układ względny, który wypełnia cały ekran, powinieneś być w stanie użyć android:layout_alignParentBottom Aby przesunąć przycisk na dole ekranu.
Jeśli Twoje widoki na dole nie są wyświetlane w układzie względnym, to może układ powyżej zajmuje całą przestrzeń. W tym przypadku możesz umieścić widok, który powinien znajdować się na dole, najpierw w pliku układu, a resztę układu umieścić nad widokami za pomocą android:layout_above. To włącz widok dolny, aby zajmował tyle miejsca, ile potrzebuje, a reszta układu może wypełnić całą resztę ekranu.
Warning: date(): Invalid date.timezone value 'Europe/Kyiv', we selected the timezone 'UTC' for now. in /var/www/agent_stack/data/www/doraprojects.net/template/agent.layouts/content.php on line 54
2013-11-15 22:13:47
W ScrollView to nie działa, ponieważ RelativeLayout nakładałoby się na to, co jest w ScrollView na dole strony.
Naprawiłem to za pomocą dynamicznego rozciągania FrameLayout:
<ScrollView
    xmlns:android="http://schemas.android.com/apk/res/android"
    android:layout_height="match_parent"
    android:layout_width="match_parent"
    android:fillViewport="true">
    <LinearLayout
        android:id="@+id/LinearLayout01"
        android:layout_width="match_parent"
        android:layout_height="match_parent"
        xmlns:android="http://schemas.android.com/apk/res/android"
        android:orientation="vertical">

                <!-- content goes here -->

                <!-- stretching frame layout, using layout_weight -->
        <FrameLayout
            android:layout_width="match_parent"
            android:layout_height="0dp"
            android:layout_weight="1">
        </FrameLayout>

                <!-- content fixated to the bottom of the screen -->
        <LinearLayout
            android:layout_width="match_parent"
            android:layout_height="wrap_content"
            android:orientation="horizontal">
                                   <!-- your bottom content -->
        </LinearLayout>
    </LinearLayout>
</ScrollView>
Warning: date(): Invalid date.timezone value 'Europe/Kyiv', we selected the timezone 'UTC' for now. in /var/www/agent_stack/data/www/doraprojects.net/template/agent.layouts/content.php on line 54
2016-03-01 19:11:59
Możesz zachować swój początkowy układ liniowy, zagnieżdżając układ względny w układzie liniowym:
<LinearLayout
    android:orientation="vertical"
    android:layout_width="fill_parent"
    android:layout_height="fill_parent">

    <TextView android:text="welcome"
        android:id="@+id/TextView"
        android:layout_width="fill_parent"
        android:layout_height="wrap_content">
    </TextView>

    <RelativeLayout
        android:layout_width="match_parent"
        android:layout_height="match_parent">
        <Button android:text="submit"
            android:id="@+id/Button"
            android:layout_width="wrap_content"
            android:layout_height="wrap_content"
            android:layout_alignParentBottom="true"
            android:layout_alignParentRight="true">
        </Button>
        <EditText android:id="@+id/EditText"
            android:layout_width="match_parent"
            android:layout_height="wrap_content"
            android:layout_toLeftOf="@id/Button"
            android:layout_alignParentBottom="true">
        </EditText>
    </RelativeLayout>
</LinearLayout>
Warning: date(): Invalid date.timezone value 'Europe/Kyiv', we selected the timezone 'UTC' for now. in /var/www/agent_stack/data/www/doraprojects.net/template/agent.layouts/content.php on line 54
2011-06-25 21:05:45
Powyższa odpowiedź (autorstwa Janusza) jest całkiem poprawna, ale nie czuję się w 100% komfortowo z relatywnymi wersjami, więc wolę wprowadzić "wypełniacz", pusty tekst, jak to:
<!-- filler -->
<TextView android:layout_height="0dip"
          android:layout_width="fill_parent"
          android:layout_weight="1" />
Przed elementem, który powinien znajdować się na dole ekranu.
Warning: date(): Invalid date.timezone value 'Europe/Kyiv', we selected the timezone 'UTC' for now. in /var/www/agent_stack/data/www/doraprojects.net/template/agent.layouts/content.php on line 54
2011-04-17 15:39:51
Możesz to zrobić za pomocą LinearLayout lub widoku przewijania. Czasami łatwiej jest zaimplementować wtedy RelativeLayout. Jedyne, co musisz zrobić, to dodać następujący widok przed widoki, które chcesz wyrównać do dołu ekranu:
<View
        android:layout_width="wrap_content"
        android:layout_height="0dp"
        android:layout_weight="1" />
Tworzy to pusty widok, wypełniając pustą przestrzeń i przesuwając kolejne widoki na dół ekranu.
Warning: date(): Invalid date.timezone value 'Europe/Kyiv', we selected the timezone 'UTC' for now. in /var/www/agent_stack/data/www/doraprojects.net/template/agent.layouts/content.php on line 54
2013-03-10 01:09:12
To również działa.
<LinearLayout
    android:id="@+id/linearLayout4"
    android:layout_width="wrap_content"
    android:layout_height="fill_parent"
    android:layout_below="@+id/linearLayout3"
    android:layout_centerHorizontal="true"
    android:orientation="horizontal"
    android:gravity="bottom"
    android:layout_alignParentBottom="true"
    android:layout_marginTop="20dp"
>

    <Button
        android:id="@+id/button1"
        android:layout_width="wrap_content"
        android:layout_height="wrap_content"
        android:text="Button"

    />

    <Button
        android:id="@+id/button2"
        android:layout_width="wrap_content"
        android:layout_height="wrap_content"
        android:text="Button"


    />

</LinearLayout>

Warning: date(): Invalid date.timezone value 'Europe/Kyiv', we selected the timezone 'UTC' for now. in /var/www/agent_stack/data/www/doraprojects.net/template/agent.layouts/content.php on line 54
2011-12-28 14:03:37
Podążając za eleganckim rozwiązaniem Timores, odkryłem, że poniższe tworzy pionowe wypełnienie w linii pionowej i poziome wypełnienie w linii poziomej:
<Space
    android:layout_width="match_parent"
    android:layout_height="match_parent"
    android:layout_weight="1" />
Warning: date(): Invalid date.timezone value 'Europe/Kyiv', we selected the timezone 'UTC' for now. in /var/www/agent_stack/data/www/doraprojects.net/template/agent.layouts/content.php on line 54
2015-11-15 21:51:51
Nie musisz nawet zagnieżdżać drugiego relative układu wewnątrz pierwszego. Po prostu użyj android:layout_alignParentBottom="true" w przycisku i EditText.
Warning: date(): Invalid date.timezone value 'Europe/Kyiv', we selected the timezone 'UTC' for now. in /var/www/agent_stack/data/www/doraprojects.net/template/agent.layouts/content.php on line 54
2011-06-29 11:14:02
Jeśli nie chcesz wprowadzać wielu zmian, możesz po prostu umieścić:
android:layout_weight="1"
Dla TextView o ID jako @+id/TextView czyli
<TextView android:text="@string/welcome"
    android:id="@+id/TextView"
    android:layout_width="fill_parent"
    android:layout_height="wrap_content"
    android:layout_weight="1">
</TextView>
Warning: date(): Invalid date.timezone value 'Europe/Kyiv', we selected the timezone 'UTC' for now. in /var/www/agent_stack/data/www/doraprojects.net/template/agent.layouts/content.php on line 54
2014-10-09 09:58:41
1.Użyj ConstraintLayout w głównym układzie
I ustaw app:layout_constraintBottom_toBottomOf="parent", aby układ na dole ekranu
<LinearLayout
    android:id="@+id/LinearLayout"
    android:layout_width="match_parent"
    android:layout_height="wrap_content"
    android:orientation="horizontal"
    app:layout_constraintBottom_toBottomOf="parent">
</LinearLayout>
2.Użyj FrameLayout w głównym układzie
Po prostu ustaw android:layout_gravity="bottom" w swoim układzie
<LinearLayout
    android:id="@+id/LinearLayout"
    android:layout_width="match_parent"
    android:layout_height="wrap_content"
    android:layout_gravity="bottom"
    android:orientation="horizontal">
</LinearLayout>
3.Użyj LinearLayout w głównym układzie (android:orientation="vertical")
(1)Ustaw układ android:layout_weight="1" na górze układu
<TextView
    android:id="@+id/TextView"
    android:layout_width="match_parent"
    android:layout_height="0dp"
    android:layout_weight="1"
    android:text="welcome" />
(2)Ustaw dziecko LinearLayout dla android:layout_width="match_parent" android:layout_height="match_parent" android:gravity="bottom"
Głównym atrybutem jest ndroid:gravity="bottom" ,niech widok potomny na dole układu .
<LinearLayout
    android:id="@+id/LinearLayout"
    android:layout_width="match_parent"
    android:layout_height="match_parent"
    android:gravity="bottom"
    android:orientation="horizontal">
</LinearLayout>
4.Użyj RelativeLayout w układzie głównym
I ustaw android:layout_alignParentBottom="true", aby układ na dole ekranu
<LinearLayout
    android:id="@+id/LinearLayout"
    android:layout_width="match_parent"
    android:layout_height="wrap_content"
    android:layout_alignParentBottom="true"
    android:orientation="horizontal">
</LinearLayout>
Wyjście

Warning: date(): Invalid date.timezone value 'Europe/Kyiv', we selected the timezone 'UTC' for now. in /var/www/agent_stack/data/www/doraprojects.net/template/agent.layouts/content.php on line 54
2017-10-18 11:43:44
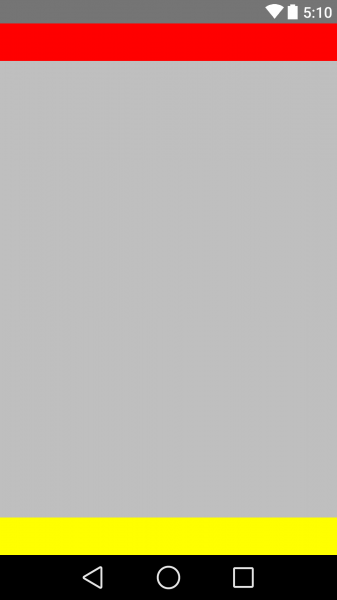
Tworzenie nagłówka i stopki, oto przykład
[ Layout XML]
<RelativeLayout
    xmlns:android="http://schemas.android.com/apk/res/android"
    xmlns:tools="http://schemas.android.com/tools"
    android:layout_width="fill_parent"
    android:layout_height="fill_parent"
    android:background="@color/backgroundcolor"
    tools:context=".MainActivity">

    <RelativeLayout
        android:layout_width="fill_parent"
        android:layout_height="40dp"
        android:background="#FF0000">
    </RelativeLayout>

    <RelativeLayout
        android:layout_width="fill_parent"
        android:layout_height="40dp"
        android:layout_alignParentBottom="true"
        android:background="#FFFF00">
    </RelativeLayout>

</RelativeLayout>
[ Screenshot]
Warning: date(): Invalid date.timezone value 'Europe/Kyiv', we selected the timezone 'UTC' for now. in /var/www/agent_stack/data/www/doraprojects.net/template/agent.layouts/content.php on line 54
2015-05-10 02:25:25
Użyj poniższego przycisku wyrównaj kod, aby usunąć jego działanie
    <?xml version="1.0" encoding="utf-8"?>
<LinearLayout xmlns:android="http://schemas.android.com/apk/res/android"
    android:layout_width="match_parent"
    android:layout_height="match_parent"
    android:orientation="vertical" >

    <Button
        android:id="@+id/btn_back"
        android:layout_width="100dp"
        android:layout_height="80dp"
        android:text="Back" />

    <TextView
        android:layout_width="match_parent"
        android:layout_height="0dp"
        android:layout_weight="0.97"
        android:gravity="center"
        android:text="Payment Page" />

    <LinearLayout
        android:layout_width="match_parent"
        android:layout_height="wrap_content" >

        <EditText
            android:layout_width="wrap_content"
            android:layout_height="wrap_content"
            android:layout_weight="1"/>

        <Button
            android:layout_width="wrap_content"
            android:layout_height="wrap_content"
            android:text="Submit"/>
    </LinearLayout>

</LinearLayout>
Warning: date(): Invalid date.timezone value 'Europe/Kyiv', we selected the timezone 'UTC' for now. in /var/www/agent_stack/data/www/doraprojects.net/template/agent.layouts/content.php on line 54
2014-03-23 06:30:06
W takim przypadku zawsze stosuj RelativeLayouts. LinearLayout nie jest przeznaczony do takiego użycia.
<?xml version="1.0" encoding="utf-8"?>
<RelativeLayout
xmlns:android="http://schemas.android.com/apk/res/android"
          android:id="@+id/db1_root"
          android:layout_width="match_parent"
          android:layout_height="match_parent"
          android:orientation="vertical" >

<LinearLayout
    android:layout_width="match_parent"
    android:layout_height="match_parent"
    android:orientation="vertical">

    <!-- Place your layout here -->

</LinearLayout>

<LinearLayout
    android:layout_width="match_parent"
    android:layout_height="wrap_content"
    android:layout_alignParentBottom="true"
    android:layout_gravity="bottom"
    android:orientation="horizontal"
    android:paddingLeft="20dp"
    android:paddingRight="20dp" >

    <Button
        android:id="@+id/setup_macroSavebtn"
        android:layout_width="0dp"
        android:layout_height="wrap_content"
        android:layout_weight="1"
        android:text="Save" />

    <Button
        android:id="@+id/setup_macroCancelbtn"
        android:layout_width="0dp"
        android:layout_height="wrap_content"
        android:layout_weight="1"
        android:text="Cancel" />

    </LinearLayout>

</RelativeLayout>
Warning: date(): Invalid date.timezone value 'Europe/Kyiv', we selected the timezone 'UTC' for now. in /var/www/agent_stack/data/www/doraprojects.net/template/agent.layouts/content.php on line 54
2015-05-20 04:28:16
Użyj android:layout_alignParentBottom="true" w swoim <RelativeLayout>.
Warning: date(): Invalid date.timezone value 'Europe/Kyiv', we selected the timezone 'UTC' for now. in /var/www/agent_stack/data/www/doraprojects.net/template/agent.layouts/content.php on line 54
2014-07-29 20:46:45
W przypadku, gdy masz taką hierarchię:
<ScrollView>
  |-- <RelativeLayout>
    |-- <LinearLayout>
Najpierw zastosuj {[2] } do ScrollView, a następnie Zastosuj android:layout_alignParentBottom="true" do LinearLayout.
<ScrollView
    android:layout_height="match_parent"
    android:layout_width="match_parent"
    android:scrollbars="none"
    android:fillViewport="true">
    <RelativeLayout
        android:layout_width="match_parent"
        android:layout_height="wrap_content">
        <LinearLayout
            android:orientation="horizontal"
            android:layout_width="match_parent"
            android:layout_height="wrap_content"
            android:gravity="center"
            android:id="@+id/linearLayoutHorizontal"
            android:layout_alignParentBottom="true">
        </LinearLayout>
    </RelativeLayout>
</ScrollView>
Warning: date(): Invalid date.timezone value 'Europe/Kyiv', we selected the timezone 'UTC' for now. in /var/www/agent_stack/data/www/doraprojects.net/template/agent.layouts/content.php on line 54
2015-04-15 08:32:11
Możesz po prostu nadać swojemu topowi potomnemu (TextView @+id/TextView) atrybut:
android:layout_weight="1".
Spowoduje to, że wszystkie inne elementy znajdujące się pod nim zostaną zepchnięte na dno.
Warning: date(): Invalid date.timezone value 'Europe/Kyiv', we selected the timezone 'UTC' for now. in /var/www/agent_stack/data/www/doraprojects.net/template/agent.layouts/content.php on line 54
2016-02-17 22:19:36
Użyłem rozwiązania, które napisał Janusz, ale dodałem padding do ostatniego widoku, ponieważ górną częścią mojego układu był widok przewijania. Widok przewijania będzie częściowo ukryty wraz z zawartością. Korzystanie z systemu android: paddingBottom w ostatnim widoku pomaga wyświetlić całą zawartość w widoku przewijania.
Warning: date(): Invalid date.timezone value 'Europe/Kyiv', we selected the timezone 'UTC' for now. in /var/www/agent_stack/data/www/doraprojects.net/template/agent.layouts/content.php on line 54
2012-03-22 07:45:01
Można to zrobić również za pomocą układu liniowego Wystarczy podać Height = 0DP i weight = 1 do powyższego układu, a ten, który chcesz na dole, wystarczy napisać height = wrap content i bez wagi. To, co robi, to zapewnia zawartość zawijania dla układu (ten, który zawiera Twój tekst edycji i przycisk), a następnie ten, który ma wagę, zajmuje resztę układu. Odkryłem to przez przypadek.
Warning: date(): Invalid date.timezone value 'Europe/Kyiv', we selected the timezone 'UTC' for now. in /var/www/agent_stack/data/www/doraprojects.net/template/agent.layouts/content.php on line 54
2013-09-05 08:22:39