Jak używać UIVisualEffectView do rozmycia obrazu?
Mógłby ktoś podać mały przykład zastosowania rozmycia do obrazu? Od jakiegoś czasu próbuję rozgryźć kod: (wciąż nowy w obj c!
UIVisualEffectViewzapewnia prostą abstrakcję nad złożonym efekty wizualne. W zależności od pożądanego efektu, wyniki mogą wpływa na zawartość warstwową za widokiem lub zawartość dodaną do widoku contentView.Zastosuj
UIVisualEffectViewdo istniejącego widoku, Aby zastosować rozmycie lub efekt wibracji do wyjście z widoku. Po dodaniu UIVisualEffectView do hierarchii widoku, dodaj dowolne podwidywacze do contentView of theUIVisualEffectView. Nie dodawaj podglądów bezpośrednio do samegoUIVisualEffectView.
6 answers
Po prostu umieść ten widok rozmycia na imageView. Oto przykład w Objective-C:
UIVisualEffect *blurEffect;
blurEffect = [UIBlurEffect effectWithStyle:UIBlurEffectStyleLight];

UIVisualEffectView *visualEffectView;
visualEffectView = [[UIVisualEffectView alloc] initWithEffect:blurEffect];

visualEffectView.frame = imageView.bounds;
[imageView addSubview:visualEffectView];
I Swift:
var visualEffectView = UIVisualEffectView(effect: UIBlurEffect(style: .Light))

visualEffectView.frame = imageView.bounds

imageView.addSubview(visualEffectView)
Warning: date(): Invalid date.timezone value 'Europe/Kyiv', we selected the timezone 'UTC' for now. in /var/www/agent_stack/data/www/doraprojects.net/template/agent.layouts/content.php on line 54
2016-06-29 19:33:15
Oto jak używać UIVibrancyEffect i UIBlurEffect z UIVisualEffectView
Objective-C:
// Blur effect
UIBlurEffect *blurEffect = [UIBlurEffect effectWithStyle:UIBlurEffectStyleDark];
UIVisualEffectView *blurEffectView = [[UIVisualEffectView alloc] initWithEffect:blurEffect];
[blurEffectView setFrame:self.view.bounds];
[self.view addSubview:blurEffectView];

// Vibrancy effect
UIVibrancyEffect *vibrancyEffect = [UIVibrancyEffect effectForBlurEffect:blurEffect];
UIVisualEffectView *vibrancyEffectView = [[UIVisualEffectView alloc] initWithEffect:vibrancyEffect];
[vibrancyEffectView setFrame:self.view.bounds];

// Label for vibrant text
UILabel *vibrantLabel = [[UILabel alloc] init];
[vibrantLabel setText:@"Vibrant"];
[vibrantLabel setFont:[UIFont systemFontOfSize:72.0f]];
[vibrantLabel sizeToFit];
[vibrantLabel setCenter: self.view.center];

// Add label to the vibrancy view
[[vibrancyEffectView contentView] addSubview:vibrantLabel];

// Add the vibrancy view to the blur view
[[blurEffectView contentView] addSubview:vibrancyEffectView];
Swift 4:
    // Blur Effect
    let blurEffect = UIBlurEffect(style: UIBlurEffectStyle.dark)
    let blurEffectView = UIVisualEffectView(effect: blurEffect)
    blurEffectView.frame = view.bounds
    view.addSubview(blurEffectView)

    // Vibrancy Effect
    let vibrancyEffect = UIVibrancyEffect(blurEffect: blurEffect)
    let vibrancyEffectView = UIVisualEffectView(effect: vibrancyEffect)
    vibrancyEffectView.frame = view.bounds

    // Label for vibrant text
    let vibrantLabel = UILabel()
    vibrantLabel.text = "Vibrant"
    vibrantLabel.font = UIFont.systemFont(ofSize: 72.0)
    vibrantLabel.sizeToFit()
    vibrantLabel.center = view.center

    // Add label to the vibrancy view
    vibrancyEffectView.contentView.addSubview(vibrantLabel)

    // Add the vibrancy view to the blur view
    blurEffectView.contentView.addSubview(vibrancyEffectView)
Warning: date(): Invalid date.timezone value 'Europe/Kyiv', we selected the timezone 'UTC' for now. in /var/www/agent_stack/data/www/doraprojects.net/template/agent.layouts/content.php on line 54
2017-11-20 20:10:58
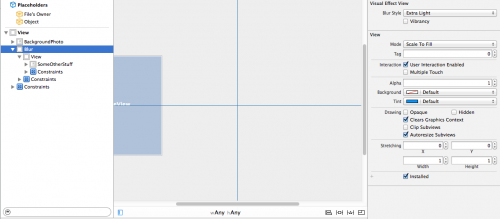
Możesz również użyć kreatora interfejsu, aby łatwo stworzyć te efekty w prostych sytuacjach. Ponieważ wartości z widoków będą zależeć od kolejności, w jakiej są wymienione w obrysie dokumentu, możesz przeciągnąć znak UIVisualEffectView Na obrys dokumentu przed rozmyciem widoku. To automatycznie tworzy zagnieżdżoną UIView, która jest właściwością contentView podanej UIVisualEffectView. Zagnieżdżaj w tym widoku rzeczy, które mają pojawić się na rozmyciu.
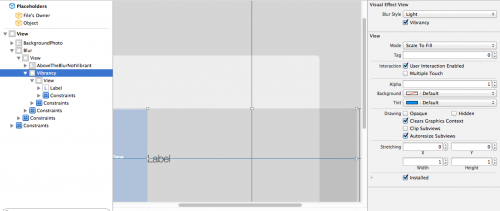
Można również łatwo wziąć zaletą vibrancy UIVisualEffect, która automatycznie utworzy kolejny zagnieżdżony UIVisualEffectView w obrysie dokumentu z domyślnie włączoną vibrancy. Następnie możesz dodać Widok etykiety lub tekstu do zagnieżdżonego UIView (ponownie właściwość contentView UIVisualEffectView), aby osiągnąć ten sam efekt, co element interfejsu "> slide to unlock".
Warning: date(): Invalid date.timezone value 'Europe/Kyiv', we selected the timezone 'UTC' for now. in /var/www/agent_stack/data/www/doraprojects.net/template/agent.layouts/content.php on line 54
2014-08-18 19:16:59
Wolę tworzenie efektów wizualnych za pomocą storyboardu - brak kodu używanego do tworzenia lub utrzymywania elementów interfejsu użytkownika. Daje mi też pełne wsparcie krajobrazowe. Zrobiłem małe demo z wykorzystaniem UIVisualEffects z rozmyciem, a także Vibrancy.
Warning: date(): Invalid date.timezone value 'Europe/Kyiv', we selected the timezone 'UTC' for now. in /var/www/agent_stack/data/www/doraprojects.net/template/agent.layouts/content.php on line 54
2015-04-14 09:19:08
Jeśli ktoś chciałby znać odpowiedź w języku Swift:
var blurEffect = UIBlurEffect(style: UIBlurEffectStyle.Dark) // Change .Dark into .Light if you'd like.

var blurView = UIVisualEffectView(effect: blurEffect)

blurView.frame = theImage.bounds // 'theImage' is an image. I think you can apply this to the view too!
Aktualizacja:
Od teraz jest dostępny pod IB więc nie musisz nic do niego kodować:)
Warning: date(): Invalid date.timezone value 'Europe/Kyiv', we selected the timezone 'UTC' for now. in /var/www/agent_stack/data/www/doraprojects.net/template/agent.layouts/content.php on line 54
2016-01-28 06:02:18
-(void) addBlurEffectOverImageView:(UIImageView *) _imageView
{
    UIVisualEffect *blurEffect;
    blurEffect = [UIBlurEffect effectWithStyle:UIBlurEffectStyleDark];

    UIVisualEffectView *visualEffectView;
    visualEffectView = [[UIVisualEffectView alloc] initWithEffect:blurEffect];

    visualEffectView.frame = _imageView.bounds;
    [_imageView addSubview:visualEffectView];
}
Warning: date(): Invalid date.timezone value 'Europe/Kyiv', we selected the timezone 'UTC' for now. in /var/www/agent_stack/data/www/doraprojects.net/template/agent.layouts/content.php on line 54
2016-01-27 15:00:24