Jak używać DrawerLayout do wyświetlania na pasku akcji/pasku narzędzi i pod paskiem stanu?
Widziałem w nowym material design Side nav spec, że możesz wyświetlić szufladę nad paskiem akcji i za paskiem stanu. Jak mogę to wdrożyć?
10 answers
Nowa funkcjonalność w frameworku i bibliotekach wsparcia właśnie na to pozwala. Są trzy "kawałki układanki":
- używanie paska narzędzi , aby można było osadzić pasek akcji w hierarchii widoku.
- Robienie szuflady
fitsSystemWindowstak, że jest umieszczony za kratkami systemu. - wyłączenie kolorowania zwykłego paska stanu
Theme.Material, aby Szuflada mogła tam rysować.
Zakładam, że użyjesz nowego appcompat.
Po pierwsze, twój layout powinien wyglądać tak:
<!-- The important thing to note here is the added fitSystemWindows -->
<android.support.v4.widget.DrawerLayout
    xmlns:android="http://schemas.android.com/apk/res/android"
    android:id="@+id/my_drawer_layout"
    android:layout_width="match_parent"
    android:layout_height="match_parent"
    android:fitsSystemWindows="true">

    <!-- Your normal content view -->
    <LinearLayout
        android:layout_width="match_parent"
        android:layout_height="match_parent"
        android:orientation="vertical">

        <!-- We use a Toolbar so that our drawer can be displayed
             in front of the action bar -->
        <android.support.v7.widget.Toolbar
            android:id="@+id/my_awesome_toolbar"
            android:layout_height="wrap_content"
            android:layout_width="match_parent"
            android:minHeight="?attr/actionBarSize"
            android:background="?attr/colorPrimary" />

        <!-- The rest of your content view -->

    </LinearLayout>

    <!-- Your drawer view. This can be any view, LinearLayout
         is just an example. As we have set fitSystemWindows=true
         this will be displayed under the status bar. -->
    <LinearLayout
        android:layout_width="304dp"
        android:layout_height="match_parent"
        android:layout_gravity="left|start"
        android:fitsSystemWindows="true">

        <!-- Your drawer content -->

    </LinearLayout>

</android.support.v4.widget.DrawerLayout>
Następnie w aktywności / fragmencie:
public void onCreate(Bundled savedInstanceState) {
    super.onCreate(savedInstanceState);

    // Your normal setup. Blah blah ...

    // As we're using a Toolbar, we should retrieve it and set it
    // to be our ActionBar
    Toolbar toolbar = (...) findViewById(R.id.my_awesome_toolbar);
    setSupportActionBar(toolbar);

    // Now retrieve the DrawerLayout so that we can set the status bar color.
    // This only takes effect on Lollipop, or when using translucentStatusBar
    // on KitKat.
    DrawerLayout drawerLayout = (...) findViewById(R.id.my_drawer_layout);
    drawerLayout.setStatusBarBackgroundColor(yourChosenColor);
}
Następnie upewnij się, że szuflada jest widoczna za paskiem stanu. Można to zrobić, zmieniając motyw values-v21:
Values-v21 / themes.xml
<style name="Theme.MyApp" parent="Theme.AppCompat.Light.NoActionBar">
    <item name="android:windowDrawsSystemBarBackgrounds">true</item>
    <item name="android:statusBarColor">@android:color/transparent</item>
    <item name="android:windowTranslucentStatus">true</item>
</style>
Uwaga: Jeśli zamiast
<LinearLayout
    android:layout_width="304dp"
    android:layout_height="match_parent"
    android:layout_gravity="left|start"
    android:fitsSystemWindows="true">

    <!-- Your drawer content -->

</LinearLayout>
Rzeczywisty układ, pożądany efekt zostanie osiągnięty, jeśli wywołasz fitsSystemWindows(boolean) w widoku, z którego wracasz onCreateView metoda.
@Override
public View onCreateView(LayoutInflater inflater,
                         ViewGroup container,
                         Bundle savedInstanceState) {
    View mDrawerListView = inflater.inflate(
        R.layout.fragment_navigation_drawer, container, false);
    mDrawerListView.setFitsSystemWindows(true);
    return mDrawerListView;
}
Warning: date(): Invalid date.timezone value 'Europe/Kyiv', we selected the timezone 'UTC' for now. in /var/www/agent_stack/data/www/doraprojects.net/template/agent.layouts/content.php on line 54
2016-05-04 11:19:15
EDIT: Nowa biblioteka wsparcia projektowania obsługuje to i poprzednia metoda nie jest już wymagana.
Można to teraz osiągnąć za pomocą nowej Android Design Support Library .
Możesz zobaczyć cheesesquare przykładowa aplikacja Chris Banes, który demonstruje wszystkie nowe funkcje.
Poprzednia metoda:
Ponieważ nie ma kompletnego rozwiązania zamieszczonego, oto sposób, w jaki osiągnąłem pożądany rezultat.
Najpierw Dołącz ScrimInsetsFrameLayout w Twoim projekcie.
/*
* Copyright 2014 Google Inc.
*
* Licensed under the Apache License, Version 2.0 (the "License");
* you may not use this file except in compliance with the License.
* You may obtain a copy of the License at
*
*     http://www.apache.org/licenses/LICENSE-2.0
*
* Unless required by applicable law or agreed to in writing, software
* distributed under the License is distributed on an "AS IS" BASIS,
* WITHOUT WARRANTIES OR CONDITIONS OF ANY KIND, either express or implied.
* See the License for the specific language governing permissions and
* limitations under the License.
*/

/**
* A layout that draws something in the insets passed to
* {@link #fitSystemWindows(Rect)}, i.e. the area above UI chrome
* (status and navigation bars, overlay action bars).
*/
public class ScrimInsetsFrameLayout extends FrameLayout {
    private Drawable mInsetForeground;

    private Rect mInsets;
    private Rect mTempRect = new Rect();
    private OnInsetsCallback mOnInsetsCallback;

    public ScrimInsetsFrameLayout(Context context) {
        super(context);
        init(context, null, 0);
    }

    public ScrimInsetsFrameLayout(Context context, AttributeSet attrs) {
        super(context, attrs);
        init(context, attrs, 0);
    }

    public ScrimInsetsFrameLayout(
        Context context, AttributeSet attrs, int defStyle) {
        super(context, attrs, defStyle);
        init(context, attrs, defStyle);
    }

    private void init(Context context, AttributeSet attrs, int defStyle) {
        final TypedArray a = context.obtainStyledAttributes(attrs,
                R.styleable.ScrimInsetsView, defStyle, 0);
        if (a == null) {
            return;
        }
        mInsetForeground = a.getDrawable(
            R.styleable.ScrimInsetsView_insetForeground);
        a.recycle();

        setWillNotDraw(true);
    }

    @Override
    protected boolean fitSystemWindows(Rect insets) {
        mInsets = new Rect(insets);
        setWillNotDraw(mInsetForeground == null);
        ViewCompat.postInvalidateOnAnimation(this);
        if (mOnInsetsCallback != null) {
            mOnInsetsCallback.onInsetsChanged(insets);
        }
        return true; // consume insets
    }

    @Override
    public void draw(Canvas canvas) {
        super.draw(canvas);

        int width = getWidth();
        int height = getHeight();
        if (mInsets != null && mInsetForeground != null) {
            int sc = canvas.save();
            canvas.translate(getScrollX(), getScrollY());

            // Top
            mTempRect.set(0, 0, width, mInsets.top);
            mInsetForeground.setBounds(mTempRect);
            mInsetForeground.draw(canvas);

            // Bottom
            mTempRect.set(0, height - mInsets.bottom, width, height);
            mInsetForeground.setBounds(mTempRect);
            mInsetForeground.draw(canvas);

            // Left
            mTempRect.set(
                0,
                mInsets.top,
                mInsets.left,
                height - mInsets.bottom);
            mInsetForeground.setBounds(mTempRect);
            mInsetForeground.draw(canvas);

            // Right
            mTempRect.set(
                width - mInsets.right,
                mInsets.top, width,
                height - mInsets.bottom);
            mInsetForeground.setBounds(mTempRect);
            mInsetForeground.draw(canvas);

            canvas.restoreToCount(sc);
        }
    }

    @Override
    protected void onAttachedToWindow() {
        super.onAttachedToWindow();
        if (mInsetForeground != null) {
            mInsetForeground.setCallback(this);
        }
    }

    @Override
    protected void onDetachedFromWindow() {
        super.onDetachedFromWindow();
        if (mInsetForeground != null) {
            mInsetForeground.setCallback(null);
        }
    }

    /**
     * Allows the calling container to specify a callback for custom
     * processing when insets change (i.e. when {@link #fitSystemWindows(Rect)}
     * is called. This is useful for setting padding on UI elements
     * based on UI chrome insets (e.g. a Google Map or a ListView).
     * When using with ListView or GridView, remember to set
     * clipToPadding to false.
     */
    public void setOnInsetsCallback(OnInsetsCallback onInsetsCallback) {
        mOnInsetsCallback = onInsetsCallback;
    }

    public static interface OnInsetsCallback {
        public void onInsetsChanged(Rect insets);
    }
}
Następnie utwórz styleable tak, aby można było ustawić insetForeground.
Wartości / attrs.xml
<declare-styleable name="ScrimInsetsView">
    <attr name="insetForeground" format="reference|color" />
</declare-styleable>
Zaktualizuj plik XML swojej aktywności i upewnij się, że android:fitsSystemWindows jest ustawione na true zarówno w DrawerLayout, jak i w ScrimInsetsFrameLayout.
Layout / activity_main.xml
<android.support.v4.widget.DrawerLayout
    xmlns:android="http://schemas.android.com/apk/res/android"
    xmlns:tools="http://schemas.android.com/tools"
    android:id="@+id/drawerLayout"
    android:layout_width="match_parent"
    android:layout_height="match_parent"
    android:fitsSystemWindows="true"
    tools:context=".MainActivity">

    <!-- The main content view -->
    <LinearLayout
        android:layout_width="match_parent"
        android:layout_height="match_parent"
        android:orientation="vertical">

        <!-- Your main content -->

    </LinearLayout>

    <!-- The navigation drawer -->
    <com.example.app.util.ScrimInsetsFrameLayout
        xmlns:app="http://schemas.android.com/apk/res-auto"
        android:id="@+id/scrimInsetsFrameLayout"
        android:layout_width="320dp"
        android:layout_height="match_parent"
        android:layout_gravity="start"
        android:background="@color/white"
        android:elevation="10dp"
        android:fitsSystemWindows="true"
        app:insetForeground="#4000">

        <!-- Your drawer content -->

    </com.example.app.util.ScrimInsetsFrameLayout>

</android.support.v4.widget.DrawerLayout>
Wewnątrz metody onCreate Twojej aktywności Ustaw kolor tła paska stanu na szufladzie układ.
Główna aktywność.java
@Override
protected void onCreate(Bundle savedInstanceState) {
    super.onCreate(savedInstanceState);
    setContentView(R.layout.activity_main);

    // ...

    mDrawerLayout = (DrawerLayout) findViewById(R.id.drawerLayout);
    mDrawerLayout.setStatusBarBackgroundColor(
        getResources().getColor(R.color.primary_dark));
}
Na koniec zaktualizuj motyw aplikacji, aby DrawerLayout był za paskiem stanu.
Wartości-V21 / style.xml
<style name="AppTheme" parent="Theme.AppCompat.Light.NoActionBar">
    <item name="android:windowDrawsSystemBarBackgrounds">true</item>
    <item name="android:statusBarColor">@android:color/transparent</item>
</style>
Wynik:

Warning: date(): Invalid date.timezone value 'Europe/Kyiv', we selected the timezone 'UTC' for now. in /var/www/agent_stack/data/www/doraprojects.net/template/agent.layouts/content.php on line 54
2015-06-24 20:17:48
Wraz z wydaniem najnowszej Android Support Library (rev 22.2.0) mamy Design Support Library i jako część tego nowego widoku o nazwie NavigationView. Więc zamiast robić wszystko na własną rękę z ScrimInsetsFrameLayout i wszystkimi innymi rzeczami, po prostu używamy tego widoku i wszystko jest robione za nas.
Przykład
Krok 1
Dodaj Design Support Library do pliku build.gradle
dependencies {
    // Other dependencies like appcompat
    compile 'com.android.support:design:22.2.0'
}
Krok 2
Dodaj NavigationView do swojego DrawerLayout:
<android.support.v4.widget.DrawerLayout xmlns:android="http://schemas.android.com/apk/res/android"
     xmlns:app="http://schemas.android.com/apk/res-auto"
     android:id="@+id/drawer_layout"
     android:layout_width="match_parent"
     android:layout_height="match_parent"
     android:fitsSystemWindows="true"> <!-- this is important -->

     <!-- Your contents -->

     <android.support.design.widget.NavigationView
         android:id="@+id/navigation"
         android:layout_width="wrap_content"
         android:layout_height="match_parent"
         android:layout_gravity="start"
         app:menu="@menu/navigation_items" /> <!-- The items to display -->
 </android.support.v4.widget.DrawerLayout>
Krok 3
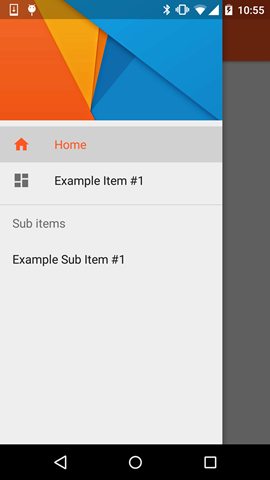
Utwórz nowy zasób menu w /res/menu i dodaj elementy i ikony, które chcesz wyświetlić:
<menu xmlns:android="http://schemas.android.com/apk/res/android">

    <group android:checkableBehavior="single">
        <item
            android:id="@+id/nav_home"
            android:icon="@drawable/ic_action_home"
            android:title="Home" />
        <item
            android:id="@+id/nav_example_item_1"
            android:icon="@drawable/ic_action_dashboard"
            android:title="Example Item #1" />
    </group>

    <item android:title="Sub items">
        <menu>
            <item
                android:id="@+id/nav_example_sub_item_1"
                android:title="Example Sub Item #1" />
        </menu>
    </item>

</menu>
Krok 4
Uruchom nawigację i obsługuj zdarzenia kliknięć:
public class MainActivity extends AppCompatActivity {

    NavigationView mNavigationView;
    DrawerLayout mDrawerLayout;

    // Other stuff

    private void init() {
        mDrawerLayout = (DrawerLayout) findViewById(R.id.drawer_layout);
        mNavigationView = (NavigationView) findViewById(R.id.navigation_view);
        mNavigationView.setNavigationItemSelectedListener(new NavigationView.OnNavigationItemSelectedListener() {
            @Override
            public boolean onNavigationItemSelected(MenuItem menuItem) {
                mDrawerLayout.closeDrawers();
                menuItem.setChecked(true);
                switch (menuItem.getItemId()) {
                    case R.id.nav_home:
                        // TODO - Do something
                        break;
                    // TODO - Handle other items
                }
                return true;
            }
        });
    }
}
Krok 5
Pamiętaj, aby ustawić android:windowDrawsSystemBarBackgrounds i android:statusBarColor w values-v21 w przeciwnym razie twoja Szuflada nie będzie wyświetlana " pod " paskiem stanu
<style name="AppTheme" parent="Theme.AppCompat.Light.NoActionBar">
    <!-- Other attributes like colorPrimary, colorAccent etc. -->
    <item name="android:windowDrawsSystemBarBackgrounds">true</item>
    <item name="android:statusBarColor">@android:color/transparent</item>
</style>
Opcjonalny Krok
Dodaj nagłówek do widoku nawigacyjnego. W tym celu po prostu utwórz nowy układ i dodaj app:headerLayout="@layout/my_header_layout" do widoku nawigacyjnego.
Wynik
Uwagi
- kolor podświetlony używa koloru zdefiniowanego za pomocą atrybutu
colorPrimary - elementy listy używają koloru zdefiniowanego za pomocą atrybutu
textColorPrimary - ikony używają koloru zdefiniowanego za pomocą atrybutu
textColorSecondary
Możesz również sprawdzić przykładową aplikację by Chris Banes , która podświetla NavigationView wraz z innymi nowymi widokami, które są częścią biblioteki Design Support Library (np., TextInputLayout, Snackbar, TabLayout itd.)
Warning: date(): Invalid date.timezone value 'Europe/Kyiv', we selected the timezone 'UTC' for now. in /var/www/agent_stack/data/www/doraprojects.net/template/agent.layouts/content.php on line 54
2015-05-29 08:58:54
Aby to działało, w stylach values-V21 lub theme xml musi użyć tego atrybutu:
<item name="android:windowTranslucentStatus">true</item>
Warning: date(): Invalid date.timezone value 'Europe/Kyiv', we selected the timezone 'UTC' for now. in /var/www/agent_stack/data/www/doraprojects.net/template/agent.layouts/content.php on line 54
2014-11-04 22:03:15
Powyższe podejścia są poprawne i mogą działać . Stworzyłem działające demo zgodnie z powyższym przewodnikiem i przetestowałem na 2.x do 5.x
Możesz sklonować z Github
Ważną rzeczą do zabawy jest główna aktywność
toolbar = (Toolbar) findViewById(R.id.toolbar);
res = this.getResources();

this.setSupportActionBar(toolbar);
ActionBar actionBar = getSupportActionBar();
actionBar.setDisplayHomeAsUpEnabled(true);
actionBar.setHomeButtonEnabled(true);
if (Build.VERSION.SDK_INT >= Build.VERSION_CODES.LOLLIPOP) {
    ScrimInsetsFrameLayout scrimInsetsFrameLayout = (ScrimInsetsFrameLayout)
            findViewById(R.id.linearLayout);
    scrimInsetsFrameLayout.setOnInsetsCallback(this);
}
And the call back
@Override
public void onInsetsChanged(Rect insets) {
    Toolbar toolbar = this.toolbar;
    ViewGroup.MarginLayoutParams lp = (ViewGroup.MarginLayoutParams)
        toolbar.getLayoutParams();
    lp.topMargin = insets.top;
    int top = insets.top;
    insets.top += toolbar.getHeight();
    toolbar.setLayoutParams(lp);
    insets.top = top; // revert
}
Absolutnie motyw dla V21 robi magię
<style name="AppTheme" parent="Theme.AppCompat.Light.NoActionBar">
    <!-- API 21 theme customizations can go here. -->
    <item name="colorPrimary">@color/colorPrimary</item>
    <item name="colorPrimaryDark">@color/colorPrimaryDark</item>
    <item name="colorAccent">@color/accent_material_light</item>
    <item name="windowActionModeOverlay">true</item>
    <item name="android:windowDrawsSystemBarBackgrounds">true</item>
    <item name="android:statusBarColor">@android:color/transparent</item>
    <item name="android:windowTranslucentStatus">true</item>
</style>
I ScrimInsetsFrameLayout
Teraz jest to łatwiejsze dzięki nowej Design Support library
compile 'com.android.support:design:22.2.0'
Klon z @ Chris Banes https://github.com/chrisbanes/cheesesquare
Warning: date(): Invalid date.timezone value 'Europe/Kyiv', we selected the timezone 'UTC' for now. in /var/www/agent_stack/data/www/doraprojects.net/template/agent.layouts/content.php on line 54
2015-06-05 10:04:36
Wszystkie wymienione tutaj odpowiedzi są zbyt stare i długie.Najlepszym i krótkim rozwiązaniem, które działa z najnowszym Navigationview jest
@Override
public void onDrawerSlide(View drawerView, float slideOffset) {
    super.onDrawerSlide(drawerView, slideOffset);

    try {
        //int currentapiVersion = android.os.Build.VERSION.SDK_INT;
        if (android.os.Build.VERSION.SDK_INT >= android.os.Build.VERSION_CODES.LOLLIPOP){
            // Do something for lollipop and above versions

        Window window = getWindow();

        // clear FLAG_TRANSLUCENT_STATUS flag:
        window.clearFlags(WindowManager.LayoutParams.FLAG_TRANSLUCENT_STATUS);

        // add FLAG_DRAWS_SYSTEM_BAR_BACKGROUNDS flag to the window
        window.addFlags(WindowManager.LayoutParams.FLAG_DRAWS_SYSTEM_BAR_BACKGROUNDS);

        // finally change the color to any color with transparency

         window.setStatusBarColor(getResources().getColor(R.color.colorPrimaryDarktrans));}

    } catch (Exception e) {

        Crashlytics.logException(e);

    }
}
Spowoduje to zmianę koloru paska stanu na przezroczysty po otwarciu szuflady
Teraz po zamknięciu szuflady należy ponownie zmienić kolor paska stanu na dark.So możesz to zrobić w ten sposób.
        public void onDrawerClosed(View drawerView) {
        super.onDrawerClosed(drawerView);
        try {
    if (android.os.Build.VERSION.SDK_INT >= android.os.Build.VERSION_CODES.LOLLIPOP){
    // Do something for lollipop and above versions

    Window window = getWindow();

    // clear FLAG_TRANSLUCENT_STATUS flag:
    window.clearFlags(WindowManager.LayoutParams.FLAG_TRANSLUCENT_STATUS);

    // add FLAG_DRAWS_SYSTEM_BAR_BACKGROUNDS flag to the window
    window.addFlags(WindowManager.LayoutParams.FLAG_DRAWS_SYSTEM_BAR_BACKGROUNDS);

    // finally change the color again to dark
    window.setStatusBarColor(getResources().getColor(R.color.colorPrimaryDark));}
    } catch (Exception e) {
    Crashlytics.logException(e);
                    }
                    }
A następnie w głównym układzie dodaj pojedynczą linię tzn.
android:fitsSystemWindows="true"
I twój układ szuflady będzie wyglądał jak
            <android.support.v4.widget.DrawerLayout
            xmlns:android="http://schemas.android.com/apk/res/android"
            xmlns:app="http://schemas.android.com/apk/res-auto"
            xmlns:tools="http://schemas.android.com/tools"
            android:id="@+id/drawer_layout"
            android:fitsSystemWindows="true"
            android:layout_width="match_parent"
            android:layout_height="match_parent">
I twoje widok nawigacji będzie wyglądał tak:
    <android.support.design.widget.NavigationView
        android:id="@+id/navigation_view"
        android:layout_height="match_parent"
        android:layout_width="wrap_content"
        android:layout_gravity="start"
        android:fitsSystemWindows="true"
        app:headerLayout="@layout/navigation_header"
        app:menu="@menu/drawer"
        />
Przetestowałem go i w pełni działa.Mam nadzieję, że to komuś pomoże.Może to nie jest najlepsze podejście, ale działa płynnie i jest proste do wdrożenia. Zaznacz, jeśli to pomoże.Szczęśliwego kodowania:)
Warning: date(): Invalid date.timezone value 'Europe/Kyiv', we selected the timezone 'UTC' for now. in /var/www/agent_stack/data/www/doraprojects.net/template/agent.layouts/content.php on line 54
2016-02-12 12:31:53
korzystam z biblioteki Design Support Library. I właśnie za pomocą niestandardowego motywu uzyskałem przezroczysty pasek stanu po otwarciu szuflady nawigacyjnej.


<style name="NavigationStyle" parent="Theme.AppCompat.Light.NoActionBar">
    <!-- Customize your theme here. -->
    <item name="colorPrimary">@color/primaryColor</item>
    <item name="colorPrimaryDark">@color/primaryColorDark</item>

    <!-- To Make Navigation Drawer Fill Status Bar and become Transparent Too -->
    <item name="android:windowDrawsSystemBarBackgrounds">true</item>
    <item name="android:statusBarColor">@android:color/transparent</item>

</style>
na koniec dodaj motyw w pliku Manifest
<activity
  ........
  ........
 android:theme="@style/NavigationStyle">
</activity>
nie zapomnij użyć właściwości, android:fitsSystemWindows="true" w "Szuflayout"
Warning: date(): Invalid date.timezone value 'Europe/Kyiv', we selected the timezone 'UTC' for now. in /var/www/agent_stack/data/www/doraprojects.net/template/agent.layouts/content.php on line 54
2015-08-06 05:03:46
To jest najprostsze, i to działało dla mnie:
W wartościach-21:
<resources>
    <style name="AppTheme" parent="AppTheme.Base">
        ...
        <item name="android:windowTranslucentStatus">true</item>
    </style>
    <dimen name="topMargin">25dp</dimen>
</resources>
W wartościach:
<resources>
    <dimen name="topMargin">0dp</dimen>
</resources>
I ustaw na pasku narzędzi
android:layout_marginTop="@dimen/topMargin"
Warning: date(): Invalid date.timezone value 'Europe/Kyiv', we selected the timezone 'UTC' for now. in /var/www/agent_stack/data/www/doraprojects.net/template/agent.layouts/content.php on line 54
2014-11-21 19:59:31
Zamiast używać ScrimInsetsFrameLayout... Czy nie łatwiej jest po prostu dodać widok ze stałą wysokością 24dp i tłem primaryColor?
Rozumiem, że wiąże się to z dodaniem atrapy widoku w hierarchii, ale wydaje mi się to czystsze.
Już próbowałem i działa dobrze.<android.support.v4.widget.DrawerLayout xmlns:android="http://schemas.android.com/apk/res/android"
xmlns:tools="http://schemas.android.com/tools"
android:id="@+id/activity_base_drawer_layout"
android:layout_width="match_parent"
android:layout_height="match_parent">
<LinearLayout
android:layout_width="match_parent"
android:layout_height="match_parent"
android:orientation="vertical">
<!-- THIS IS THE VIEW I'M TALKING ABOUT... -->
<View
android:layout_width="match_parent"
android:layout_height="24dp"
android:background="?attr/colorPrimary" />
<android.support.v7.widget.Toolbar
android:id="@+id/activity_base_toolbar"
android:layout_width="match_parent"
android:layout_height="?attr/actionBarSize"
android:background="?attr/colorPrimary"
android:elevation="2dp"
android:theme="@style/ThemeOverlay.AppCompat.Dark" />
<FrameLayout
android:id="@+id/activity_base_content_frame_layout"
android:layout_width="match_parent"
android:layout_height="match_parent" />
</LinearLayout>
<fragment
android:id="@+id/activity_base_drawer_fragment"
android:name="com.myapp.drawer.ui.DrawerFragment"
android:layout_width="240dp"
android:layout_height="match_parent"
android:layout_gravity="start"
android:elevation="4dp"
tools:layout="@layout/fragment_drawer" />
</android.support.v4.widget.DrawerLayout>
Warning: date(): Invalid date.timezone value 'Europe/Kyiv', we selected the timezone 'UTC' for now. in /var/www/agent_stack/data/www/doraprojects.net/template/agent.layouts/content.php on line 54
2015-05-25 22:15:46
Spróbuj z tym:
<android.support.v4.widget.DrawerLayout xmlns:android="http://schemas.android.com/apk/res/android"
android:layout_width="match_parent"
android:layout_height="match_parent"
android:id="@+id/drawer_layout"
android:fitsSystemWindows="true">


<FrameLayout
    android:layout_width="match_parent"
    android:layout_height="match_parent">

    <!--Main layout and ads-->
    <LinearLayout
        android:layout_width="match_parent"
        android:layout_height="match_parent"
        android:orientation="vertical">

        <FrameLayout
            android:id="@+id/ll_main_hero"
            android:layout_width="match_parent"
            android:layout_height="0dp"
            android:layout_weight="1">

        </FrameLayout>

        <FrameLayout
            android:id="@+id/ll_ads"
            android:layout_width="match_parent"
            android:layout_height="wrap_content">

            <View
                android:layout_width="320dp"
                android:layout_height="50dp"
                android:layout_gravity="center"
                android:background="#ff00ff" />
        </FrameLayout>


    </LinearLayout>

    <!--Toolbar-->
    <android.support.v7.widget.Toolbar
        android:layout_width="match_parent"
        android:layout_height="wrap_content"
        android:id="@+id/toolbar"
        android:elevation="4dp" />
</FrameLayout>


<!--left-->
<ListView
    android:layout_width="240dp"
    android:layout_height="match_parent"
    android:layout_gravity="start"
    android:choiceMode="singleChoice"
    android:divider="@null"
    android:background="@mipmap/layer_image"
    android:id="@+id/left_drawer"></ListView>

<!--right-->
<FrameLayout
    android:layout_width="240dp"
    android:layout_height="match_parent"
    android:layout_gravity="right"
    android:background="@mipmap/layer_image">

    <ImageView
        android:layout_width="match_parent"
        android:layout_height="match_parent"
        android:src="@mipmap/ken2"
        android:scaleType="centerCrop" />
</FrameLayout>
Style:
<style name="ts_theme_overlay" parent="Theme.AppCompat.Light.NoActionBar">
    <item name="colorPrimary">@color/red_A700</item>
    <item name="colorPrimaryDark">@color/red1</item>
    <item name="android:windowBackground">@color/blue_A400</item>
</style>
Główna aktywność rozszerza ActionBarActivity
toolBar = (Toolbar) findViewById(R.id.toolbar);
    setSupportActionBar(toolBar);
Teraz możesz onCreateOptionsMenu jak zwykły ActionBar z paskiem narzędzi.
This is my Layout
- Góra: Lewa Szuflada-prawa Szuflada
- MID: ToolBar (ActionBar)
- BOTTOM: ListFragment
Warning: date(): Invalid date.timezone value 'Europe/Kyiv', we selected the timezone 'UTC' for now. in /var/www/agent_stack/data/www/doraprojects.net/template/agent.layouts/content.php on line 54
2015-03-20 07:58:25