Animacja rysunku koła
Szukam sposobu na animację rysunku koła. Udało mi się stworzyć krąg, ale to wszystko łączy.
Oto moja CircleView klasa:
import UIKit

class CircleView: UIView {
  override init(frame: CGRect) {
    super.init(frame: frame)
    self.backgroundColor = UIColor.clearColor()
  }

  required init(coder aDecoder: NSCoder) {
    fatalError("init(coder:) has not been implemented")
  }


  override func drawRect(rect: CGRect) {
    // Get the Graphics Context
    var context = UIGraphicsGetCurrentContext();

    // Set the circle outerline-width
    CGContextSetLineWidth(context, 5.0);

    // Set the circle outerline-colour
    UIColor.redColor().set()

    // Create Circle
    CGContextAddArc(context, (frame.size.width)/2, frame.size.height/2, (frame.size.width - 10)/2, 0.0, CGFloat(M_PI * 2.0), 1)

    // Draw
    CGContextStrokePath(context);
  }
}
A oto jak dodaję go do hierarchii widoku w moim kontrolerze widoku:
func addCircleView() {
    let diceRoll = CGFloat(Int(arc4random_uniform(7))*50)
    var circleWidth = CGFloat(200)
    var circleHeight = circleWidth
    // Create a new CircleView
    var circleView = CircleView(frame: CGRectMake(diceRoll, 0, circleWidth, circleHeight))

    view.addSubview(circleView)
}
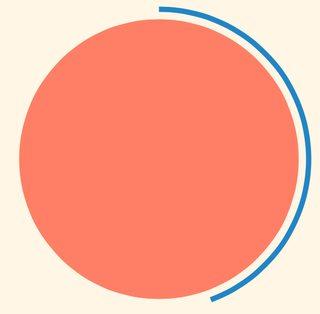
Czy istnieje sposób na animowanie rysunku okręgu przez 1 sekundę?
Przykład, część drogi przez animację wyglądałaby jak Niebieska linia na tym obrazku:
4 answers
Najprostszym sposobem na to jest wykorzystanie mocy core animation, aby wykonać większość pracy za Ciebie. Aby to zrobić, będziemy musieli przenieść kod rysowania okręgu z funkcji drawRect do CAShapeLayer. Wtedy możemy użyć CABasicAnimation aby animować CAShapeLayer ' s strokeEnd własność od 0.0 do 1.0. Jest to duża część magii tutaj; z docs:
W połączeniu z właściwością strokeStart, właściwość ta definiuje podregion ścieżki do udaru. Na wartość w tej właściwości wskazuje względny punkt wzdłuż ścieżki, w którym zakończyć głaskanie podczas właściwość strokeStart określa punkt początkowy. Wartość 0.0 przedstawia początek ścieżki, podczas gdy wartość 1.0 reprezentuje koniec ścieżki. Wartości pomiędzy nimi są interpretowane liniowo wzdłuż długość ścieżki.
Jeśli ustawimy strokeEnd na 0.0, to nic nie narysuje. Jeśli ustawimy go na 1.0, narysuje pełne kółko. Jeśli ustawimy go na 0.5, narysuje połowę koło. itd.
Na początek utwórzmy CAShapeLayer w swojej CircleView'S init i dodaj tę warstwę do widoku sublayers (Pamiętaj również, aby usunąć drawRect funkcja, ponieważ warstwa będzie teraz rysować okrąg):
let circleLayer: CAShapeLayer!

override init(frame: CGRect) {
    super.init(frame: frame)
    self.backgroundColor = UIColor.clearColor()

    // Use UIBezierPath as an easy way to create the CGPath for the layer.
    // The path should be the entire circle.
    let circlePath = UIBezierPath(arcCenter: CGPoint(x: frame.size.width / 2.0, y: frame.size.height / 2.0), radius: (frame.size.width - 10)/2, startAngle: 0.0, endAngle: CGFloat(M_PI * 2.0), clockwise: true)

    // Setup the CAShapeLayer with the path, colors, and line width
    circleLayer = CAShapeLayer()
    circleLayer.path = circlePath.CGPath
    circleLayer.fillColor = UIColor.clearColor().CGColor
    circleLayer.strokeColor = UIColor.redColor().CGColor
    circleLayer.lineWidth = 5.0;

    // Don't draw the circle initially
    circleLayer.strokeEnd = 0.0

    // Add the circleLayer to the view's layer's sublayers
    layer.addSublayer(circleLayer)
}
Uwaga: ustawiamy circleLayer.strokeEnd = 0.0 tak, aby okrąg nie został narysowany od razu.
Teraz dodajmy funkcję, którą możemy wywołać, aby wywołać animację okręgu:
func animateCircle(duration: NSTimeInterval) {
    // We want to animate the strokeEnd property of the circleLayer
    let animation = CABasicAnimation(keyPath: "strokeEnd")

    // Set the animation duration appropriately
    animation.duration = duration

    // Animate from 0 (no circle) to 1 (full circle)
    animation.fromValue = 0
    animation.toValue = 1

    // Do a linear animation (i.e. the speed of the animation stays the same)
    animation.timingFunction = CAMediaTimingFunction(name: kCAMediaTimingFunctionLinear)

    // Set the circleLayer's strokeEnd property to 1.0 now so that it's the
    // right value when the animation ends.
    circleLayer.strokeEnd = 1.0

    // Do the actual animation
    circleLayer.addAnimation(animation, forKey: "animateCircle")
}
Następnie, wszystko, co musimy zrobić, to zmienić twoje addCircleView funkcja, która uruchamia animację po dodaniu CircleView do jej superview:
func addCircleView() {
    let diceRoll = CGFloat(Int(arc4random_uniform(7))*50)
     var circleWidth = CGFloat(200)
     var circleHeight = circleWidth

        // Create a new CircleView
     var circleView = CircleView(frame: CGRectMake(diceRoll, 0, circleWidth, circleHeight))

     view.addSubview(circleView)

     // Animate the drawing of the circle over the course of 1 second
     circleView.animateCircle(1.0)
}
Wszystko, co razem powinno wyglądać mniej więcej tak:

Uwaga: nie powtórzy się w ten sposób, pozostanie w pełnym kręgu po animacji.
Warning: date(): Invalid date.timezone value 'Europe/Kyiv', we selected the timezone 'UTC' for now. in /var/www/agent_stack/data/www/doraprojects.net/template/agent.layouts/content.php on line 54
2014-10-26 22:53:37
Odpowiedź Mikes zaktualizowana dla Swift 3.0
var circleLayer: CAShapeLayer!

override init(frame: CGRect) {
    super.init(frame: frame)
    self.backgroundColor = UIColor.clear

    // Use UIBezierPath as an easy way to create the CGPath for the layer.
    // The path should be the entire circle.
    let circlePath = UIBezierPath(arcCenter: CGPoint(x: frame.size.width / 2.0, y: frame.size.height / 2.0), radius: (frame.size.width - 10)/2, startAngle: 0.0, endAngle: CGFloat(M_PI * 2.0), clockwise: true)

    // Setup the CAShapeLayer with the path, colors, and line width
    circleLayer = CAShapeLayer()
    circleLayer.path = circlePath.cgPath
    circleLayer.fillColor = UIColor.clear.cgColor
    circleLayer.strokeColor = UIColor.red.cgColor
    circleLayer.lineWidth = 5.0;

    // Don't draw the circle initially
    circleLayer.strokeEnd = 0.0

    // Add the circleLayer to the view's layer's sublayers
    layer.addSublayer(circleLayer)
}

required init?(coder aDecoder: NSCoder) {
        fatalError("init(coder:) has not been implemented")
}

func animateCircle(duration: TimeInterval) {
    // We want to animate the strokeEnd property of the circleLayer
    let animation = CABasicAnimation(keyPath: "strokeEnd")

    // Set the animation duration appropriately
    animation.duration = duration

    // Animate from 0 (no circle) to 1 (full circle)
    animation.fromValue = 0
    animation.toValue = 1

    // Do a linear animation (i.e The speed of the animation stays the same)
    animation.timingFunction = CAMediaTimingFunction(name: kCAMediaTimingFunctionLinear)

    // Set the circleLayer's strokeEnd property to 1.0 now so that it's the
    // Right value when the animation ends
    circleLayer.strokeEnd = 1.0

    // Do the actual animation
    circleLayer.add(animation, forKey: "animateCircle")
}
Wywołanie funkcji:
func addCircleView() {
    let diceRoll = CGFloat(Int(arc4random_uniform(7))*50)
    var circleWidth = CGFloat(200)
    var circleHeight = circleWidth

    // Create a new CircleView
    let circleView = CircleView(frame: CGRect(x: diceRoll, y: 0, width: circleWidth, height: circleHeight))
    //let test = CircleView(frame: CGRect(x: diceRoll, y: 0, width: circleWidth, height: circleHeight))

    view.addSubview(circleView)

    // Animate the drawing of the circle over the course of 1 second
    circleView.animateCircle(duration: 1.0)
}
Warning: date(): Invalid date.timezone value 'Europe/Kyiv', we selected the timezone 'UTC' for now. in /var/www/agent_stack/data/www/doraprojects.net/template/agent.layouts/content.php on line 54
2017-11-02 10:59:16
Odpowiedź Mike ' a jest świetna! Innym miłym i prostym sposobem jest użycie drawRect w połączeniu z setNeedsDisplay (). Wydaje się laggy, ale jego nie :-)

Chcemy narysować okrąg zaczynający się od góry, który wynosi -90° i kończy się na 270°. Środek okręgu to (centerX, centerY), o podanym promieniu. CurrentAngle to bieżący kąt punktu końcowego okręgu, przechodzący od minAngle (-90) do maxAngle (270).
// MARK: Properties
let centerX:CGFloat = 55
let centerY:CGFloat = 55
let radius:CGFloat = 50

var currentAngle:Float = -90
let minAngle:Float = -90
let maxAngle:Float = 270
W drawRect określamy jak okrąg jest ma wyświetlać:
override func drawRect(rect: CGRect) {

    let context = UIGraphicsGetCurrentContext()

    let path = CGPathCreateMutable()

    CGPathAddArc(path, nil, centerX, centerY, radius, CGFloat(GLKMathDegreesToRadians(minAngle)), CGFloat(GLKMathDegreesToRadians(currentAngle)), false)

    CGContextAddPath(context, path)
    CGContextSetStrokeColorWithColor(context, UIColor.blueColor().CGColor)
    CGContextSetLineWidth(context, 3)
    CGContextStrokePath(context)
}
Problem polega na tym, że w tej chwili, ponieważ currentAngle nie zmienia się, okrąg jest statyczny i nawet się nie pokazuje, jak currentAngle = minAngle.
Następnie tworzymy timer i za każdym razem, gdy ten timer zostanie uruchomiony, zwiększamy currentAngle. Na górze swojej klasy, Dodaj Czas pomiędzy dwoma pożarami:
let timeBetweenDraw:CFTimeInterval = 0.01
W Twoim init dodaj timer:
NSTimer.scheduledTimerWithTimeInterval(timeBetweenDraw, target: self, selector: #selector(updateTimer), userInfo: nil, repeats: true)
Możemy dodać funkcję, która zostanie wywołana po wywołaniu timera:
func updateTimer() {

    if currentAngle < maxAngle {
        currentAngle += 1
    }
}
Niestety, kiedy uruchamiając aplikację, nic się nie wyświetla, ponieważ nie określiliśmy systemu, który powinien narysować ponownie. Odbywa się to poprzez wywołanie metody setNeedsDisplay(). Oto zaktualizowana funkcja timera:
func updateTimer() {

    if currentAngle < maxAngle {
        currentAngle += 1
        setNeedsDisplay()
    }
}
_ _ _
Cały potrzebny kod jest podsumowany tutaj:
import UIKit
import GLKit

class CircleClosing: UIView {

    // MARK: Properties
    let centerX:CGFloat = 55
    let centerY:CGFloat = 55
    let radius:CGFloat = 50

    var currentAngle:Float = -90

    let timeBetweenDraw:CFTimeInterval = 0.01

    // MARK: Init
    required init?(coder aDecoder: NSCoder) {
        super.init(coder: aDecoder)
        setup()
    }

    override init(frame: CGRect) {
        super.init(frame: frame)
        setup()
    }

    func setup() {
        self.backgroundColor = UIColor.clearColor()
        NSTimer.scheduledTimerWithTimeInterval(timeBetweenDraw, target: self, selector: #selector(updateTimer), userInfo: nil, repeats: true)
    }

    // MARK: Drawing
    func updateTimer() {

        if currentAngle < 270 {
            currentAngle += 1
            setNeedsDisplay()
        }
    }

    override func drawRect(rect: CGRect) {

        let context = UIGraphicsGetCurrentContext()

        let path = CGPathCreateMutable()

        CGPathAddArc(path, nil, centerX, centerY, radius, -CGFloat(M_PI/2), CGFloat(GLKMathDegreesToRadians(currentAngle)), false)

        CGContextAddPath(context, path)
        CGContextSetStrokeColorWithColor(context, UIColor.blueColor().CGColor)
        CGContextSetLineWidth(context, 3)
        CGContextStrokePath(context)
    }
}
Jeśli chcesz zmienić prędkość, po prostu zmodyfikuj funkcję updateTimer lub szybkość, z jaką ta funkcja jest wywoływana. Możesz również unieważnić timer po zakończeniu okręgu, czego zapomniałem zrobić :-)
UWAGA: Aby dodać okrąg w storyboardzie, po prostu dodaj Widok, wybierz go, przejdź do Inspektora tożsamości i jako Klasa określ CircleClosing.
Zdrówko! bRoWarning: date(): Invalid date.timezone value 'Europe/Kyiv', we selected the timezone 'UTC' for now. in /var/www/agent_stack/data/www/doraprojects.net/template/agent.layouts/content.php on line 54
2016-05-11 12:06:28
Jeśli chcesz obsługi zakończenia, jest to inne rozwiązanie podobne do tego autorstwa Mike ' a S, wykonane w Swift 3.0
func animateCircleFull(duration: TimeInterval) {
    CATransaction.begin()
    let animation = CABasicAnimation(keyPath: "strokeEnd")
    animation.duration = duration
    animation.fromValue = 0
    animation.toValue = 1
    animation.timingFunction = CAMediaTimingFunction(name: kCAMediaTimingFunctionEaseInEaseOut)
    circleLayer.strokeEnd = 1.0
    CATransaction.setCompletionBlock {
        print("animation complete")
    }
    // Do the actual animation
    circleLayer.add(animation, forKey: "animateCircle")
    CATransaction.commit()
}
Za pomocą funkcji dopełniania, możesz uruchomić animację ponownie albo przez rekurencyjne wywołanie tej samej funkcji, aby wykonać animację ponownie (co nie będzie wyglądać zbyt ładnie), albo możesz mieć funkcję odwróconą, która będzie ciągła aż do spełnienia warunku, na przykład:
func animate(duration: TimeInterval){
    self.isAnimating = true
    self.animateCircleFull(duration: 1)
}

func endAnimate(){
    self.isAnimating = false
}

func animateCircleFull(duration: TimeInterval) {
    if self.isAnimating{
        CATransaction.begin()
        let animation = CABasicAnimation(keyPath: "strokeEnd")
        animation.duration = duration
        animation.fromValue = 0
        animation.toValue = 1
        animation.timingFunction = CAMediaTimingFunction(name: kCAMediaTimingFunctionEaseInEaseOut)
        circleLayer.strokeEnd = 1.0
        CATransaction.setCompletionBlock {
            self.animateCircleEmpty(duration: duration)
        }
        // Do the actual animation
        circleLayer.add(animation, forKey: "animateCircle")
        CATransaction.commit()
    }
}

func animateCircleEmpty(duration: TimeInterval){
    if self.isAnimating{
        CATransaction.begin()
        let animation = CABasicAnimation(keyPath: "strokeEnd")
        animation.duration = duration
        animation.fromValue = 1
        animation.toValue = 0
        animation.timingFunction = CAMediaTimingFunction(name: kCAMediaTimingFunctionEaseInEaseOut)
        circleLayer.strokeEnd = 0
        CATransaction.setCompletionBlock {
            self.animateCircleFull(duration: duration)
        }
        // Do the actual animation
        circleLayer.add(animation, forKey: "animateCircle")
        CATransaction.commit()
    }
}
Aby uczynić go jeszcze bardziej fantazyjnym, możesz zmienić kierunek animacji tak:
 func setCircleClockwise(){
    let circlePath = UIBezierPath(arcCenter: CGPoint(x: frame.size.width / 2.0, y: frame.size.height / 2.0), radius: (frame.size.width - 10)/2, startAngle: 0.0, endAngle: CGFloat(M_PI * 2.0), clockwise: true)
    self.circleLayer.removeFromSuperlayer()
    self.circleLayer = formatCirle(circlePath: circlePath)
    self.layer.addSublayer(self.circleLayer)
}

func setCircleCounterClockwise(){
    let circlePath = UIBezierPath(arcCenter: CGPoint(x: frame.size.width / 2.0, y: frame.size.height / 2.0), radius: (frame.size.width - 10)/2, startAngle: 0.0, endAngle: CGFloat(M_PI * 2.0), clockwise: false)
    self.circleLayer.removeFromSuperlayer()
    self.circleLayer = formatCirle(circlePath: circlePath)
    self.layer.addSublayer(self.circleLayer)
}

func formatCirle(circlePath: UIBezierPath) -> CAShapeLayer{
    let circleShape = CAShapeLayer()
    circleShape.path = circlePath.cgPath
    circleShape.fillColor = UIColor.clear.cgColor
    circleShape.strokeColor = UIColor.red.cgColor
    circleShape.lineWidth = 10.0;
    circleShape.strokeEnd = 0.0
    return circleShape
}

func animate(duration: TimeInterval){
    self.isAnimating = true
    self.animateCircleFull(duration: 1)
}

func endAnimate(){
    self.isAnimating = false
}

func animateCircleFull(duration: TimeInterval) {
    if self.isAnimating{
        CATransaction.begin()
        let animation = CABasicAnimation(keyPath: "strokeEnd")
        animation.duration = duration
        animation.fromValue = 0
        animation.toValue = 1
        animation.timingFunction = CAMediaTimingFunction(name: kCAMediaTimingFunctionEaseInEaseOut)
        circleLayer.strokeEnd = 1.0
        CATransaction.setCompletionBlock {
            self.setCircleCounterClockwise()
            self.animateCircleEmpty(duration: duration)
        }
        // Do the actual animation
        circleLayer.add(animation, forKey: "animateCircle")
        CATransaction.commit()
    }
}

func animateCircleEmpty(duration: TimeInterval){
    if self.isAnimating{
        CATransaction.begin()
        let animation = CABasicAnimation(keyPath: "strokeEnd")
        animation.duration = duration
        animation.fromValue = 1
        animation.toValue = 0
        animation.timingFunction = CAMediaTimingFunction(name: kCAMediaTimingFunctionEaseInEaseOut)
        circleLayer.strokeEnd = 0
        CATransaction.setCompletionBlock {
            self.setCircleClockwise()
            self.animateCircleFull(duration: duration)
        }
        // Do the actual animation
        circleLayer.add(animation, forKey: "animateCircle")
        CATransaction.commit()
    }
}
Warning: date(): Invalid date.timezone value 'Europe/Kyiv', we selected the timezone 'UTC' for now. in /var/www/agent_stack/data/www/doraprojects.net/template/agent.layouts/content.php on line 54
2016-09-24 01:20:49