Rozszerzanie i zwijanie komórek UITableViewCells za pomocą DatePicker
Buduję aplikację, która pozwala użytkownikowi wybrać daty z widoku UITableView. Widok tabeli jest statyczny i pogrupowany. Przejrzałem wiele pytań, w tym to , próbując dowiedzieć się, jak to osiągnąć - ale nic nie wydaje się działać optymalnie. Aplikacja kalendarza Apple oferuje bardzo płynną i ładną animację, której żaden z przykładów, przez które przeszedłem, nie zdołał odtworzyć.
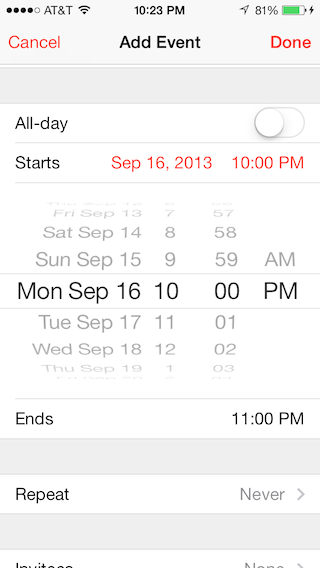
To jest mój pożądany rezultat:
Czy ktoś mógłby wskaż mi tutorial lub wyjaśnij, w jaki sposób mogę wykonać tak płynną animację z najbardziej zwięzłym i prostym sposobem, jak widzimy w aplikacji Kalendarz?
Wielkie dzięki!
Erik
6 answers
Zakładam, że używasz storyboard, przykład jest z UIPickerView:
Utwórz tableviewcell tuż pod komórką zawierającą pole tekstowe, które chcesz wypełnić i ustaw wysokość wiersza komórek na 216.0 w Inspektorze i dodaj UIPickerView do tej komórki.
Następnie podłącz UIPickerView poprzez gniazdo do kontrolera viewcontroller i dodaj następującą właściwość do kontrolera ViewController.h:
@property (weak, nonatomic) IBOutlet UIPickerView *statusPicker;
@property BOOL statusPickerVisible;
W Twoim ViewController.m do in viewWillAppear
self.statusPickerVisible = NO;
self.statusPicker.hidden = YES;
self.statusPicker.translatesAutoresizingMaskIntoConstraints = NO;
Dodaj dwa metody:
- (void)showStatusPickerCell {
    self.statusPickerVisible = YES;
    [self.tableView beginUpdates];
    [self.tableView endUpdates];
    self.statusPicker.alpha = 0.0f;
    [UIView animateWithDuration:0.25
                 animations:^{
                     self.statusPicker.alpha = 1.0f;
                 } completion:^(BOOL finished){
                     self.statusPicker.hidden = NO;
                 }];];
}

- (void)hideStatusPickerCell {
    self.statusPickerVisible = NO;
    [self.tableView beginUpdates];
    [self.tableView endUpdates];
    [UIView animateWithDuration:0.25
                 animations:^{
                     self.statusPicker.alpha = 0.0f;
                 }
                 completion:^(BOOL finished){
                     self.statusPicker.hidden = YES;
                 }];
}
W heightForRowAtIndexPath
-(CGFloat)tableView:(UITableView *)tableView heightForRowAtIndexPath:(NSIndexPath *)indexPath {
    CGFloat height = self.tableView.rowHeight;
    if (indexPath.row == 1){
        height = self.statusPickerVisible ? 216.0f : 0.0f;
    }
    return height;
}
W didSelectRowAtIndexPath
-(void)tableView:(UITableView *)tableView didSelectRowAtIndexPath:(NSIndexPath *)indexPath {
    if (indexPath.row == 0) {
        if (self.statusPickerVisible){
            [self hideStatusPickerCell];
        } else {
            [self showStatusPickerCell];
        }
    }
    [self.tableView deselectRowAtIndexPath:indexPath animated:YES];
}
Warning: date(): Invalid date.timezone value 'Europe/Kyiv', we selected the timezone 'UTC' for now. in /var/www/agent_stack/data/www/doraprojects.net/template/agent.layouts/content.php on line 54
2017-06-02 10:40:50
2 odpowiedzi powyżej pozwoliły mi rozwiązać ten problem. Zasługują na uznanie, dodaję to przypomnienie dla siebie-format podsumowania.
To jest moja wersja powyższych odpowiedzi.
1. Jak wspomniano powyżej-dodaj selektor do komórki, którą chcesz pokazać / ukryć.
2. Dodaj ograniczenia dla selektora w interface builder-center X / center Y / equal height / equal width do widoku zawartości komórki
3. Podłącz do siebie selektor
@IBOutlet weak var dobDatePicker: UIDatePicker!
Równie dobrze możesz kontrolować przeciąganie i dodawać metodę, która zarejestruje zmiany daty
@IBAction func dateChanged(sender: UIDatePicker) {
    // updates ur label in the cell above
    dobLabel.text = "\(dobDatePicker.date)"
}
4. In viewDidLoad
dobDatePicker.date = NSDate()
dobLabel.text = "\(dobDatePicker.date)" // my label in cell above
dobDatePicker.hidden = true
5. Ustawianie wysokości komórek, w moim przykładzie komórka, którą chcę rozwinąć, to sekcja 0, wiersz 3... ustaw to na to, co chcesz rozwinąć / ukryć komórkę. Jeśli masz wiele komórek o różnych wysokościach, pozwala to na to.
override func tableView(tableView: UITableView, heightForRowAtIndexPath indexPath: NSIndexPath) -> CGFloat {

    if indexPath.section == 0 && indexPath.row == 3 {
        let height:CGFloat = dobDatePicker.hidden ? 0.0 : 216.0
        return height
    }

    return super.tableView(tableView, heightForRowAtIndexPath: indexPath)
}
6. wybierając komórkę powyżej, aby rozwinąć tę poniżej, ponownie ustaw ją na komórkę dotkniesz, aby wyświetlić komórkę poniżej.
override func tableView(tableView: UITableView, didSelectRowAtIndexPath indexPath: NSIndexPath) {

let dobIndexPath = NSIndexPath(forRow: 2, inSection: 0)
if dobIndexPath == indexPath {

    dobDatePicker.hidden = !dobDatePicker.hidden

    UIView.animateWithDuration(0.3, animations: { () -> Void in
        self.tableView.beginUpdates()
        // apple bug fix - some TV lines hide after animation
        self.tableView.deselectRowAtIndexPath(indexPath, animated: true)
        self.tableView.endUpdates()
    })
}
}

Warning: date(): Invalid date.timezone value 'Europe/Kyiv', we selected the timezone 'UTC' for now. in /var/www/agent_stack/data/www/doraprojects.net/template/agent.layouts/content.php on line 54
2016-01-10 07:52:06
Zaimplementowałem odpowiedź @ thorb65 w Swift, i działa jak czar. Nawet jeśli skonfiguruję dwa selektory daty (np. "start" i "end", jak w kalendarzu) i skonfiguruję je tak, aby otwarty zwijał się automatycznie podczas rozszerzania drugiego (np. zasada" jeden otwarty w maksymalnym czasie", podobnie jak kalendarz), animacje (równoległe) nadal są płynne.
Jedną z rzeczy, z którą zmagałem się, jest znalezienie odpowiednich ograniczeń autolayout. Poniżej przedstawiam takie samo zachowanie jak Kalendarz.app:
- Zwiń od dołu do góry (zawartość selektora daty nie przesuwa się)
Ograniczenia od UIDatePicker do siebie:
- Wysokość
Ograniczenia z UIDatePicker wobec widoku zawartości UITableViewCell:
- Spacja prowadząca do marginesu kontenera
- Spacja końcowa do marginesu kontenera
- Górna Spacja do marginesu kontenera
" Spacja dolna do pojemnika Margin " jest wyraźnie pominięty, aby wymusić stałą wysokość całej animacji (to odtwarza Kalendarz.zachowanie aplikacji, gdzie komórka widoku tabeli "przesuwa się", aby odsłonić niezmienny, o stałej wysokości selektor daty poniżej).
- Zwiń od dołu do góry (selektor daty przesuwa się równomiernie)
Ograniczenia od UIDatePicker do siebie:
- Wysokość
Ograniczenia z UIDatePicker wobec widoku zawartości UITableViewCell:
- prowadzenie Przestrzeń do marginesu kontenera
- Spacja końcowa do marginesu kontenera
- środek pionowo w Opakowaniu Zewnętrznym
Zwróć uwagę na różnice wynikające z ograniczeń w zwijaniu/rozwijaniu animacji.
EDIT: To jest kod swift
Właściwości:
// "Start Date" (first date picker)
@IBOutlet weak var startDateLabel: UILabel!
@IBOutlet weak var startDatePicker: UIDatePicker!
var startDatePickerVisible:Bool?

// "End Date" (second date picker)
@IBOutlet weak var endDateLabel: UILabel!
@IBOutlet weak var endDatePicker: UIDatePicker!
var endDatePickerVisible:Bool?

private var startDate:NSDate
private var endDate:NSDate
// Backup date labels' initial text color, to restore on collapse
// (we change it to control tint while expanded, like calendar.app)
private var dateLabelInitialTextColor:UIColor!
Metody UIViewController:
override func viewDidLoad()
{
    super.viewDidLoad()

    // Set pickers to their initial values (e.g., "now" and "now + 1hr" )
    startDatePicker.date = startDate
    startDateLabel.text = formatDate(startDate)

    endDatePicker.date = endDate
    endDateLabel.text = formatDate(endDate)

    // Backup (unselected) date label color
    dateLabelInitialTextColor = startDateLabel.textColor
}

override func viewWillAppear(animated: Bool)
{
    super.viewWillAppear(animated)

    startDatePickerVisible = false
    startDatePicker.hidden = true

    endDatePickerVisible = false
    endDatePicker.hidden = true
}
UITableViewDelegate Metody:
override func tableView(tableView: UITableView, heightForRowAtIndexPath indexPath: NSIndexPath) -> CGFloat
{
    var height:CGFloat = 44 // Default

    if indexPath.row == 3 {
        // START DATE PICKER ROW
        if let startDatePickerVisible = startDatePickerVisible {
            height = startDatePickerVisible ? 216 : 0
        }
    }
    else if indexPath.row == 5 {
        // END DATE PICKER ROW
        if let endDatePickerVisible = endDatePickerVisible {
            height = endDatePickerVisible ? 216 : 0
        }
    }

    return height
}

override func tableView(tableView: UITableView, didSelectRowAtIndexPath indexPath: NSIndexPath)
{
    switch indexPath.row {

    case 2:
        // [ A ] START DATE

        // Collapse the other date picker (if expanded):
        if endDatePickerVisible! {
            hideDatePickerCell(containingDatePicker: endDatePicker)
        }

        // Expand:
        if startDatePickerVisible! {
            hideDatePickerCell(containingDatePicker: startDatePicker)
        }
        else{
            showDatePickerCell(containingDatePicker: startDatePicker)
        }

    case 4:
        // [ B ] END DATE

        // Collapse the other date picker (if expanded):
        if startDatePickerVisible!{
            hideDatePickerCell(containingDatePicker: startDatePicker)
        }

        // Expand:
        if endDatePickerVisible! {
            hideDatePickerCell(containingDatePicker: endDatePicker)
        }
        else{
            showDatePickerCell(containingDatePicker: endDatePicker)
        }

    default:
        break
    }

    tableView.deselectRowAtIndexPath(indexPath, animated: true)
}
Działania Kontrolne Date Picker:
@IBAction func dateChanged(sender: AnyObject)
{
    guard let picker = sender as? UIDatePicker else {
        return
    }

    let dateString = formatDate(picker.date)

    if picker == startDatePicker {
        startDateLabel.text = dateString
    }
    else if picker == endDatePicker {
        endDateLabel.text = dateString
    }
}
Metody pomocnicze: (animacja, formatowanie daty)
@IBAction func dateChanged(sender: AnyObject)
{
    guard let picker = sender as? UIDatePicker else {
        return
    }

    let dateString = formatDate(picker.date)

    if picker == startDatePicker {
        startDateLabel.text = dateString
    }
    else if picker == endDatePicker {
        endDateLabel.text = dateString
    }
}

func showDatePickerCell(containingDatePicker picker:UIDatePicker)
{
    if picker == startDatePicker {

        startDatePickerVisible = true

        startDateLabel.textColor = myAppControlTintColor
    }
    else if picker == endDatePicker {

        endDatePickerVisible = true

        endDateLabel.textColor = myAppControlTintColor
    }

    tableView.beginUpdates()
    tableView.endUpdates()

    picker.hidden = false
    picker.alpha = 0.0

    UIView.animateWithDuration(0.25) { () -> Void in

        picker.alpha = 1.0
    }
}

func hideDatePickerCell(containingDatePicker picker:UIDatePicker)
{
    if picker == startDatePicker {

        startDatePickerVisible = false

        startDateLabel.textColor = dateLabelInitialTextColor
    }
    else if picker == endDatePicker {

        endDatePickerVisible = false

        endDateLabel.textColor = dateLabelInitialTextColor
    }

    tableView.beginUpdates()
    tableView.endUpdates()

    UIView.animateWithDuration(0.25,
        animations: { () -> Void in

            picker.alpha = 0.0
        },
        completion:{ (finished) -> Void in

            picker.hidden = true
        }
    )
}
Warning: date(): Invalid date.timezone value 'Europe/Kyiv', we selected the timezone 'UTC' for now. in /var/www/agent_stack/data/www/doraprojects.net/template/agent.layouts/content.php on line 54
2018-01-09 03:43:36
Też nad tym pracowałem i pomyślałem, że podzielę się moim rozwiązaniem, które pochodzi z tych, które już tu zostały podane.
Zauważyłem, że w innych przykładach jest dużo kodu specyficznego dla poszczególnych elementów, więc to, co zrobiłem, to stworzenie klasy 'manager', która zajmowałaby się nim dla każdego elementu.
Oto co zrobiłem:
CellShowHideDetail przechowuje szczegóły dotyczące elementu, który chcesz pokazać lub ukryć. Te szczegóły obejmują komórkę, w której się znajduje, a także komórkę w tym celu należy użyć przycisku, aby przełączyć wyświetlanie i ukrywanie:
public class CellShowHideDetail
{
    var item: UIView
    var indexPath_ToggleCell: IndexPath
    var indexPath_ItemCell: IndexPath
    var desiredHeight: CGFloat

    init(item: UIView, indexPath_ToggleCell: IndexPath, indexPath_ItemCell: IndexPath, desiredHeight: CGFloat)
    {
        self.item = item
        self.indexPath_ToggleCell = indexPath_ToggleCell
        self.indexPath_ItemCell = indexPath_ItemCell
        self.desiredHeight = desiredHeight

        //By default cells are not expanded:
        self.item.isHidden = true
    }
}
Zauważ, że UIView jest klasą nadrzędną większości (wszystkich?) Elementy interfejsu użytkownika.
Następnie mamy menedżera, który przetworzy tyle z tych elementów, ile chcesz:
import Foundation
import UIKit

public class CellShowHideManager
{
    var cellItems: [CellShowHideDetail]

    init()
    {
        cellItems = []
    }

    func addItem(item: CellShowHideDetail)
    {
        cellItems.append(item)
    }

    func getRowHeight(indexPath: IndexPath) -> (match: Bool, height: CGFloat)
    {
        for item in cellItems
        {
            if indexPath.section == item.indexPath_ItemCell.section
                && indexPath.row == item.indexPath_ItemCell.row
            {
                return (match: true, height: item.item.isHidden ? 0.0 : item.desiredHeight)
            }
        }

        return (match: false, height: 0)
    }

    func rowSelected(indexPath: IndexPath) -> Bool
    {
        var changesMade = false

        for item in cellItems
        {
            if item.indexPath_ToggleCell == indexPath
            {
                item.item.isHidden = !item.item.isHidden

                changesMade = true
            }
            else
            {
                if item.item.isHidden == false
                {
                    changesMade = true
                }

                item.item.isHidden = true
            }
        }

        return changesMade
    }
}
Możesz następnie łatwo utworzyć CellShowHideManager na dowolnej klasie UITableViewController, dodać elementy, które chcesz przełączać:
var showHideManager = CellShowHideManager()

override func viewDidLoad()
    {
        super.viewDidLoad()

        let item1ToShowHide = CellShowHideDetail(item: datePicker, indexPath_ToggleCell: IndexPath(row: 0, section: 0), indexPath_ItemCell: IndexPath(row: 1, section: 0), desiredHeight: 232.0)

        let item2ToShowHide = CellShowHideDetail(item: selection_Picker, indexPath_ToggleCell: IndexPath(row: 0, section: 1), indexPath_ItemCell: IndexPath(row: 1, section: 1), desiredHeight: 90.0)

        //Add items for the expanding cells:
        showHideManager.addItem(item: item1ToShowHide)
        showHideManager.addItem(item: item2ToShowHide)
    }
W końcu wystarczy zastąpić te dwie metody TableView w następujący sposób:
override func tableView(_ tableView: UITableView, heightForRowAt indexPath: IndexPath) -> CGFloat
    {
        let showHideResult = showHideManager.getRowHeight(indexPath: indexPath)

        if showHideResult.match
        {
            return showHideResult.height
        }
        else
        {
            return super.tableView(tableView, heightForRowAt: indexPath)
        }
    }

    override func tableView(_ tableView: UITableView, didSelectRowAt indexPath: IndexPath)
    {

        if showHideManager.rowSelected(indexPath: indexPath)
        {
            UIView.animate(withDuration: 0.3, animations: { () -> Void in
                self.tableView.beginUpdates()

                // apple bug fix - some TV lines hide after animation
                //self.tableView.deselectRowAt(indexPath, animated: true)
                self.tableView.endUpdates()
            })
        }
    }
I powinno działać ładnie!
Warning: date(): Invalid date.timezone value 'Europe/Kyiv', we selected the timezone 'UTC' for now. in /var/www/agent_stack/data/www/doraprojects.net/template/agent.layouts/content.php on line 54
2016-10-26 22:17:47
Dzielę się swoją odpowiedzią:
Robię wszystko bez storyboardu
Swift 3
1.1 dodaj datePicker
var travelDatePicker: UIDatePicker = {
            let datePicker = UIDatePicker()
            datePicker.timeZone = NSTimeZone.local
            datePicker.backgroundColor = UIColor.white
            datePicker.layer.cornerRadius = 5.0
            datePicker.datePickerMode = .date
            datePicker.addTarget(self, action: #selector(TableViewController.datePickerValueChanged(_:)), for: .valueChanged)
            return datePicker
        }()
1.2 i jego metoda
func datePickerValueChanged(_ sender: UIDatePicker){

        let dateFormatter = DateFormatter()
        dateFormatter.dateFormat = "yyyy-MM-dd"
        let dateString = dateFormatter.string(from: travelDatePicker.date)
        self.shareCell.textLabel?.text = "\(dateString)"

        print("changed")
        print("Selected value \(dateString)")
    }
2. następnie w widoku loadView wyświetl datę w komórce powyżej z formatem
        let dateFormatter = DateFormatter()
        dateFormatter.dateFormat = "yyyy-MM-dd"
        let dateString = dateFormatter.string(from: travelDatePicker.date)
        self.shareCell.textLabel?.text = "\(dateString)"
        travelDatePicker.isHidden = true
3. dodaj datePicker do komórki
self.datePickerCell.backgroundColor = UIColor.red
        self.datePickerCell.addSubview(self.travelDatePicker)
        self.travelDatePicker.frame = CGRect(x: 0, y: 0, width: 500, height: 216)
        self.datePickerCell.accessoryType = UITableViewCellAccessoryType.none
4. Ustaw wysokość komórki
override func tableView(_ tableView: UITableView, heightForRowAt indexPath: IndexPath) -> CGFloat {
            if indexPath.section == 1 && indexPath.row == 1{
                let height: CGFloat = travelDatePicker.isHidden ? 0.0 : 216.0
                return height
            }
            return 44.0
        }
- i na koniec ustaw instrukcję if w disselectat
If (indexPath.sekcja = = 1 & & indexPath.rząd == 0) {
    travelDatePicker.isHidden = !travelDatePicker.isHidden

    UIView.animate(withDuration: 0.3, animations: { () -> Void in
        self.tableView.beginUpdates()
        // apple bug fix - some TV lines hide after animation
        self.tableView.deselectRow(at: indexPath, animated: true)
        self.tableView.endUpdates()
    })
}
Pełny kod jest tutaj z innymi elementami po prostu poczuć działanie aplikacji
import Foundation
import UIKit

class TableViewController: UITableViewController {

    var firstNameCell: UITableViewCell = UITableViewCell()
    var lastNameCell: UITableViewCell = UITableViewCell()
    var shareCell: UITableViewCell = UITableViewCell()
    var datePickerCell: UITableViewCell = UITableViewCell()
    var cityToCell: UITableViewCell = UITableViewCell()
    var cityFromCell: UITableViewCell = UITableViewCell()

    var firstNameText: UITextField = UITextField()
    var lastNameText: UITextField = UITextField()

    var travelDatePicker: UIDatePicker = {
        let datePicker = UIDatePicker()
        datePicker.timeZone = NSTimeZone.local
        datePicker.backgroundColor = UIColor.white
        datePicker.layer.cornerRadius = 5.0
        datePicker.datePickerMode = .date
        datePicker.addTarget(self, action: #selector(TableViewController.datePickerValueChanged(_:)), for: .valueChanged)
        return datePicker
    }()

    override func loadView() {
        super.loadView()

        let dateFormatter = DateFormatter()
        dateFormatter.dateFormat = "yyyy-MM-dd"
        let dateString = dateFormatter.string(from: travelDatePicker.date)
        self.shareCell.textLabel?.text = "\(dateString)"
        travelDatePicker.isHidden = true

        // set the title
        self.title = "User Options"

        // construct first name cell, section 0, row 0
        self.firstNameCell.backgroundColor = UIColor(red: 1.0, green: 1.0, blue: 1.0, alpha: 0.5)
        self.firstNameText = UITextField(frame: self.firstNameCell.contentView.bounds.insetBy(dx: 15, dy: 0))
        self.firstNameText.placeholder = "First Name"
        self.firstNameCell.addSubview(self.firstNameText)

        // construct last name cell, section 0, row 1
        self.lastNameCell.backgroundColor = UIColor(red: 1.0, green: 1.0, blue: 1.0, alpha: 0.5)
        self.lastNameText = UITextField(frame: self.lastNameCell.contentView.bounds.insetBy(dx: 15, dy: 0))
        self.lastNameText.placeholder = "Last Name"
        self.lastNameCell.addSubview(self.lastNameText)

        // construct share cell, section 1, row 0
        self.shareCell.backgroundColor = UIColor(red: 1.0, green: 1.0, blue: 1.0, alpha: 0.5)
        self.shareCell.accessoryType = UITableViewCellAccessoryType.checkmark

        self.datePickerCell.backgroundColor = UIColor.red
        self.datePickerCell.addSubview(self.travelDatePicker)
        self.travelDatePicker.frame = CGRect(x: 0, y: 0, width: 500, height: 216)
        self.datePickerCell.accessoryType = UITableViewCellAccessoryType.none

        self.cityToCell.textLabel?.text = "Kiev"
        self.cityToCell.backgroundColor = UIColor(red: 1.0, green: 1.0, blue: 1.0, alpha: 0.5)
        self.cityToCell.accessoryType = UITableViewCellAccessoryType.none

        self.cityFromCell.textLabel?.text = "San Francisco"
        self.cityFromCell.backgroundColor = UIColor(red: 1.0, green: 1.0, blue: 1.0, alpha: 0.5)
        self.cityFromCell.accessoryType = UITableViewCellAccessoryType.none
    }

    func datePickerValueChanged(_ sender: UIDatePicker){

        let dateFormatter = DateFormatter()
        dateFormatter.dateFormat = "yyyy-MM-dd"
        let dateString = dateFormatter.string(from: travelDatePicker.date)
        self.shareCell.textLabel?.text = "\(dateString)"

        print("changed")
        print("Selected value \(dateString)")
    }

    // Return the number of sections
    override func numberOfSections(in tableView: UITableView) -> Int {
        return 2
    }

    // Return the number of rows for each section in your static table
    override func tableView(_ tableView: UITableView, numberOfRowsInSection section: Int) -> Int {
        switch(section) {
        case 0: return 2    // section 0 has 2 rows
        case 1: return 4    // section 1 has 1 row
        default: fatalError("Unknown number of sections")
        }
    }

    override func tableView(_ tableView: UITableView, heightForRowAt indexPath: IndexPath) -> CGFloat {
        if indexPath.section == 1 && indexPath.row == 1{
            let height: CGFloat = travelDatePicker.isHidden ? 0.0 : 216.0
            return height
        }
        return 44.0
    }

    // Return the row for the corresponding section and row
    override func tableView(_ tableView: UITableView, cellForRowAt indexPath: IndexPath) -> UITableViewCell {
        switch(indexPath.section) {
        case 0:
            switch(indexPath.row) {
            case 0: return self.firstNameCell   // section 0, row 0 is the first name
            case 1: return self.lastNameCell    // section 0, row 1 is the last name
            default: fatalError("Unknown row in section 0")
            }
        case 1:
            switch(indexPath.row) {
            case 0: return self.shareCell       // section 1, row 0 is the share option
            case 1: return self.datePickerCell
            case 2: return self.cityToCell
            case 3: return self.cityFromCell
            default: fatalError("Unknown row in section 1")
            }
        default: fatalError("Unknown section")
        }
    }

    // Customize the section headings for each section
    override func tableView(_ tableView: UITableView, titleForHeaderInSection section: Int) -> String? {
        switch(section) {
        case 0: return "Profile"
        case 1: return "Social"
        default: fatalError("Unknown section")
        }
    }

    // Configure the row selection code for any cells that you want to customize the row selection
    override func tableView(_ tableView: UITableView, didSelectRowAt indexPath: IndexPath) {

        // Handle social cell selection to toggle checkmark
        if(indexPath.section == 1 && indexPath.row == 0) {

            // deselect row
            tableView.deselectRow(at: indexPath as IndexPath, animated: false)

            // toggle check mark
            if(self.shareCell.accessoryType == UITableViewCellAccessoryType.none) {
                self.shareCell.accessoryType = UITableViewCellAccessoryType.checkmark;
            } else {
                self.shareCell.accessoryType = UITableViewCellAccessoryType.none;
            }
        }

        if(indexPath.section == 1 && indexPath.row == 0) {

            travelDatePicker.isHidden = !travelDatePicker.isHidden

            UIView.animate(withDuration: 0.3, animations: { () -> Void in
                self.tableView.beginUpdates()
                // apple bug fix - some TV lines hide after animation
                self.tableView.deselectRow(at: indexPath, animated: true)
                self.tableView.endUpdates()
            })
        }
    }

}
Warning: date(): Invalid date.timezone value 'Europe/Kyiv', we selected the timezone 'UTC' for now. in /var/www/agent_stack/data/www/doraprojects.net/template/agent.layouts/content.php on line 54
2017-07-20 10:21:02
Pomyślałem, że dodam też moje dwa centy. W rzeczywistości programuję w Xamarin i musiałem wprowadzić kilka drobnych poprawek, aby uruchomić go w ramach Xamarin.
Wszystkie zasady są takie same, ale ponieważ Xamarin używa oddzielnej klasy dla TableViewSource i jako takie zarządzanie delegatami jest inne. Oczywiście zawsze można przypisać UITableViewDelegates, jeśli chcesz, jak również w UIViewController, ale byłem ciekaw, czy mogę go do pracy to sposób:
Na początek podklasowałem zarówno komórkę selektora daty (datePickerCell), jak i komórkę selektora (selectorCell). Uwaga, robię to w 100% programowo bez storyboardu
DatePickerCell:
using System;
using UIKit;

namespace DatePickerInTableViewCell
{
    public class CustomDatePickerCell : UITableViewCell
    {
        //========================================================================================================================================
        //  PRIVATE CLASS PROPERTIES
        //========================================================================================================================================
        private UIDatePicker datePicker;
        private bool datePickerVisible;
        private Boolean didUpdateConstraints;

        //========================================================================================================================================
        //  PUBLIC CLASS PROPERTIES
        //========================================================================================================================================
        public event EventHandler dateChanged;
        //========================================================================================================================================
        //  Constructor
        //========================================================================================================================================
        /// <summary>
        /// Initializes a new instance of the <see cref="DatePickerInTableViewCell.CustomDatePickerCell"/> class.
        /// </summary>
        public CustomDatePickerCell (string rid) : base(UITableViewCellStyle.Default, rid)
        {
            Initialize ();
        }
        //========================================================================================================================================
        //  PUBLIC OVERRIDES
        //========================================================================================================================================
        /// <summary>
        /// Layout the subviews.
        /// </summary>
        public override void LayoutSubviews ()
        {
            base.LayoutSubviews ();

            ContentView.AddSubview (datePicker);

            datePicker.Hidden   = true;
            AutoresizingMask    = UIViewAutoresizing.FlexibleHeight | UIViewAutoresizing.FlexibleWidth;

            foreach (UIView view in ContentView.Subviews) {
                view.TranslatesAutoresizingMaskIntoConstraints = false;
            }
            ContentView.SetNeedsUpdateConstraints ();

        }

        /// <summary>
        /// We override the UpdateConstraints to allow us to only set up our constraint rules one time.  Since
        /// we need to use this method to properly call our constraint rules at the right time we use a boolean
        /// as a flag so that we only fix our auto layout once.  Afterwards UpdateConstraints runs as normal.
        /// </summary>
        public override void UpdateConstraints ()
        {
            if (NeedsUpdateConstraints () && !didUpdateConstraints) {
                setConstraints ();
                didUpdateConstraints = true;
            }
            base.UpdateConstraints ();
        }
        //========================================================================================================================================
        //  PUBLIC METHODS
        //========================================================================================================================================

        /// <summary>
        /// Allows us to determine the visibility state of the cell from the tableViewSource.
        /// </summary>
        /// <returns><c>true</c> if this instance is visible; otherwise, <c>false</c>.</returns>
        public bool IsVisible()
        {
            return datePickerVisible;
        }

        /// <summary>
        /// Allows us to show the datePickerCell from the tableViewSource.
        /// </summary>
        /// <param name="tableView">Table view.</param>
        public void showDatePicker(ref UITableView tableView)
        {

            datePickerVisible   = true;
            tableView.BeginUpdates  ();
            tableView.EndUpdates    ();
            datePicker.Hidden   = false;
            datePicker.Alpha    = 0f;

            UIView.Animate(
                0.25,
                ()=> { datePicker.Alpha = 1f;}
            );
        }

        public void hideDatePicker(ref UITableView tableView)
        {
            datePickerVisible   = false;
            tableView.BeginUpdates  ();
            tableView.EndUpdates    ();

            UIView.Animate(
                0.25,
                ()=> { datePicker.Alpha = 0f;},
                ()=> {datePicker.Hidden = true;}
            );
        }
        //========================================================================================================================================
        //  PRIVATE METHODS
        //========================================================================================================================================
        /// <summary>
        /// We make sure the UIDatePicker is center in the cell.
        /// </summary>
        private void setConstraints()
        {
            datePicker.CenterXAnchor.ConstraintEqualTo(ContentView.CenterXAnchor).Active = true;
        }

        /// <summary>
        /// Init class properties.
        /// </summary>
        private void Initialize()
        {
            datePicker              = new UIDatePicker ();
            datePickerVisible       = false;
            datePicker.TimeZone     = Foundation.NSTimeZone.LocalTimeZone;
            datePicker.Calendar     = Foundation.NSCalendar.CurrentCalendar;

            datePicker.ValueChanged += (object sender, EventArgs e) => {
                if(dateChanged != null) {
                    dateChanged (datePicker, EventArgs.Empty);
                }
            };
        }
    }
}
Selector Cell
using System;
using UIKit;

namespace DatePickerInTableViewCell
{
    ///<summary>
    ///
    ///</summary>
    public class CustomDatePickerSelectionCell : UITableViewCell
    {
        //========================================================================================================================================
        //  PRIVATE CLASS PROPERTIES
        //========================================================================================================================================
        private UILabel prefixLabel;
        private UILabel dateLabel;
        private UILabel timeLabel;
        private Boolean didUpdateConstraints;
        private UIColor originalLableColor;
        private UIColor editModeLabelColor;
        //========================================================================================================================================
        //  PUBLIC CLASS PROPERTIES
        //========================================================================================================================================
        //========================================================================================================================================
        //  Constructor
        //========================================================================================================================================
        /// <summary>
        /// Initializes a new instance of the <see cref="DatePickerInTableViewCell.CustomDatePickerSelectionCell"/> class.
        /// </summary>
        public CustomDatePickerSelectionCell (string rid) : base(UITableViewCellStyle.Default, rid)
        {
            Initialize ();
        }
        //========================================================================================================================================
        //  PUBLIC OVERRIDES
        //========================================================================================================================================
        /// <summary>
        /// We override the UpdateConstraints to allow us to only set up our constraint rules one time.  Since
        /// we need to use this method to properly call our constraint rules at the right time we use a boolean
        /// as a flag so that we only fix our auto layout once.  Afterwards UpdateConstraints runs as normal.
        /// </summary>
        public override void UpdateConstraints ()
        {
            if (NeedsUpdateConstraints () && !didUpdateConstraints) {
                setConstraints ();
                didUpdateConstraints = true;
            }
            base.UpdateConstraints ();
        }

        public override void LayoutSubviews ()
        {
            base.LayoutSubviews ();

            AutoresizingMask    = UIViewAutoresizing.FlexibleHeight | UIViewAutoresizing.FlexibleWidth;
            timeLabel.TextAlignment = UITextAlignment.Right;
            prefixLabel.Text    = "On: ";
            dateLabel.Text      = DateTime.Now.ToString ("MMM d, yyyy");
            timeLabel.Text      = DateTime.Now.ToShortTimeString ();

            ContentView.AddSubviews (new UIView[]{ prefixLabel, dateLabel, timeLabel });
            foreach (UIView view in ContentView.Subviews) {
                view.TranslatesAutoresizingMaskIntoConstraints = false;
            }

            ContentView.SetNeedsUpdateConstraints ();
        }
        //========================================================================================================================================
        //  PUBLIC METHODS
        //========================================================================================================================================
        public void willUpdateDateTimeLables(string date, string time)
        {
            dateLabel.Text = date;
            timeLabel.Text = time;

        }

        public void willEditDateTime()
        {
            dateLabel.TextColor = editModeLabelColor;
            timeLabel.TextColor = editModeLabelColor;
        }

        public void didEditDateTime()
        {
            dateLabel.TextColor = originalLableColor;
            timeLabel.TextColor = originalLableColor;
        }
        //========================================================================================================================================
        //  PRIVATE METHODS
        //========================================================================================================================================
        private void Initialize()
        {
            prefixLabel         = new UILabel ();
            dateLabel       = new UILabel ();
            timeLabel       = new UILabel ();
            originalLableColor  = dateLabel.TextColor;
            editModeLabelColor  = UIColor.Red;
        }


        private void setConstraints()
        {
            var cellMargins = ContentView.LayoutMarginsGuide;

            prefixLabel.LeadingAnchor.ConstraintEqualTo (cellMargins.LeadingAnchor).Active      = true;
            dateLabel.LeadingAnchor.ConstraintEqualTo (prefixLabel.TrailingAnchor).Active       = true;
            timeLabel.LeadingAnchor.ConstraintEqualTo (dateLabel.TrailingAnchor).Active         = true;
            timeLabel.TrailingAnchor.ConstraintEqualTo (cellMargins.TrailingAnchor).Active      = true;

            dateLabel.WidthAnchor.ConstraintEqualTo (ContentView.WidthAnchor, 2f / 7f).Active   = true;
            prefixLabel.HeightAnchor.ConstraintEqualTo (ContentView.HeightAnchor, 1).Active     = true;
            timeLabel.HeightAnchor.ConstraintEqualTo (ContentView.HeightAnchor, 1).Active       = true;
            dateLabel.HeightAnchor.ConstraintEqualTo (ContentView.HeightAnchor, 1).Active       = true;
        }
    }
}
Więc jak widzisz, mam kilka metod, które są wyeksponowane z każdej komórki, aby ułatwić potrzebną komunikację. Następnie musiałem utworzyć instancję tych komórek w mojej tableViewSource. Może tam to mniej sprzężony sposób na zrobienie tego, ale nie mogłem łatwo tego rozgryźć. Uważam, że jestem dużo mniej doświadczony w programowaniu iOS niż moi poprzednicy powyżej :). To powiedziawszy, z komórek dostępnych w zakresie klasy sprawia, że bardzo łatwo zadzwonić i uzyskać dostęp do komórek w rzędachwybrane i GetHeightForRow metod.
TableViewSource
using System;
using UIKit;
using System.Collections.Generic;

namespace DatePickerInTableViewCell
{
    public class TableViewSource : UITableViewSource
    {
        //========================================================================================================================================
        //  PRIVATE CLASS PROPERTIES
        //========================================================================================================================================
        private const string datePickerIdentifier           = "datePickerCell";
        private const string datePickerActivateIdentifier   = "datePickerSelectorCell";
        private const int datePickerRow                     = 1;
        private const int datePickerSelectorRow             = 0;

        private List<UITableViewCell> datePickerCells;
        private CustomDatePickerCell datePickerCell;
        private CustomDatePickerSelectionCell datePickerSelectorCell;
        //========================================================================================================================================
        //  PUBLIC CLASS PROPERTIES
        //========================================================================================================================================
        //========================================================================================================================================
        //  Constructor
        //========================================================================================================================================
        /// <summary>
        /// Initializes a new instance of the <see cref="DatePickerInTableViewCell.TableViewSource"/> class.
        /// </summary>
        public TableViewSource ()
        {
            initDemoDatePickerCells ();
        }


        //========================================================================================================================================
        //  PUBLIC OVERRIDES
        //========================================================================================================================================
        public override UITableViewCell GetCell (UITableView tableView, Foundation.NSIndexPath indexPath)
        {
            UITableViewCell cell = null;

            if (indexPath.Row == datePickerSelectorRow) {
                cell = tableView.DequeueReusableCell (datePickerActivateIdentifier);
                cell = cell ?? datePickerCells[indexPath.Row];
                return cell;
            }

            if (indexPath.Row == datePickerRow) {
                cell = tableView.DequeueReusableCell (datePickerIdentifier) as CustomDatePickerCell;
                cell = cell ?? datePickerCells[indexPath.Row];
                return cell;
            }


            return cell;

        }

        public override nint RowsInSection (UITableView tableview, nint section)
        {
            return datePickerCells.Count;
        }

        public override nfloat GetHeightForRow (UITableView tableView, Foundation.NSIndexPath indexPath)
        {

            float height = (float) tableView.RowHeight;
            if (indexPath.Row == datePickerRow) {
                height = datePickerCell.IsVisible () ? DefaultiOSDimensions.heightForDatePicker : 0f;
            }

            return height;
        }

        public override void RowSelected (UITableView tableView, Foundation.NSIndexPath indexPath)
        {
            if (indexPath.Row == datePickerSelectorRow) {
                if (datePickerCell != null) {
                    if (datePickerCell.IsVisible ()) {
                        datePickerCell.hideDatePicker (ref tableView);
                        datePickerSelectorCell.didEditDateTime ();
                    } else {
                        datePickerCell.showDatePicker (ref tableView);
                        datePickerSelectorCell.willEditDateTime ();
                    }

                }
            }

            tableView.DeselectRow (indexPath, true);
        }


        //========================================================================================================================================
        //  PUBLIC METHODS
        //========================================================================================================================================

        //========================================================================================================================================
        //  PRIVATE METHODS
        //========================================================================================================================================
        private void willUpdateDateChanged(Object sender, EventArgs args)
        {
            var picker      = sender as UIDatePicker;
            var dateTime    = picker.Date.ToDateTime ();
            if (picker != null && dateTime != null) {
                var date = dateTime.ToString ("MMM d, yyyy");
                var time = dateTime.ToShortTimeString ();
                datePickerSelectorCell.willUpdateDateTimeLables (date, time);
            }

        }

        private void initDemoDatePickerCells()
        {
            datePickerCell              = new CustomDatePickerCell (datePickerIdentifier);
            datePickerSelectorCell      = new CustomDatePickerSelectionCell (datePickerActivateIdentifier);

            datePickerCell.dateChanged  += willUpdateDateChanged;

            datePickerCells             = new List<UITableViewCell> () {
                datePickerSelectorCell,
                datePickerCell
            };
        }
    }
}
Mam nadzieję, że kod jest dość oczywisty. Metoda toDateTime btw jest tylko metodą rozszerzenia do konwersji NSDateTime do obiektu.NET DateTime. Odniesienie można znaleźć tutaj: https://forums.xamarin.com/discussion/27184/convert-nsdate-to-datetime i DefaultiOSDimensions jest tylko małą klasą statyczną, której używam do śledzenia typowych wymiarów, takich jak cellHeight (44pts) lub w przypadku heightForDatePicker; 216. Wydaje mi się, że działa świetnie na moim symulatorze. Muszę jeszcze przetestować na nim rzeczywiste urządzenia. Mam nadzieję, że to komuś pomoże!
Warning: date(): Invalid date.timezone value 'Europe/Kyiv', we selected the timezone 'UTC' for now. in /var/www/agent_stack/data/www/doraprojects.net/template/agent.layouts/content.php on line 54
2016-05-15 19:21:58