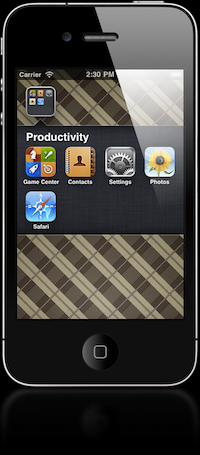
Jak zrobić coś takiego jak foldery iPhone ' a?
Chcę wiedzieć, czy jest sposób, aby zmienić mój widok, aby wyglądał jak foldery iPhone ' a. Innymi słowy, chcę, aby mój widok podzielił się gdzieś pośrodku i odsłonił widok pod nim. Czy to możliwe?
EDIT: Zgodnie z poniższą sugestią, ja mógłbym zrobić zrzut ekranu mojej aplikacji, robiąc to:
UIGraphicsBeginImageContext(self.view.bounds.size);
[self.view.layer renderInContext:UIGraphicsGetCurrentContext()];
UIImage *viewImage = UIGraphicsGetImageFromCurrentImageContext();
UIGraphicsEndImageContext();
EDIT: 2 Wymyśliłem, jak dodać kilka cieni do mojego widok, A oto co osiągnąłem (przycięty, aby pokazać odpowiednią część):
Edytuj:3
3 answers
Podstawową myślą będzie zrobienie zdjęcia swojego obecnego stanu i podzielenie go gdzieś. Następnie Animuj obie części, ustawiając nową klatkę. Nie wiem, jak programowo zrobić zrzut ekranu, więc nie mogę podać przykładowego kodu ...
EDIT: hej hej nie wygląda świetnie ale działa ^^
// wouldn't be sharp on retina displays, instead use "withOptions" and set scale to 0.0
// UIGraphicsBeginImageContext(self.view.bounds.size);
UIGraphicsBeginImageContextWithOptions(self.view.bounds.size, NO, 0.0);
[self.view.layer renderInContext:UIGraphicsGetCurrentContext()];
UIImage *f = UIGraphicsGetImageFromCurrentImageContext();
UIGraphicsEndImageContext();

CGRect fstRect = CGRectMake(0, 0, 320, 200);
CGRect sndRect = CGRectMake(0, 200, 320, 260); // was 0,200,320,280


CGImageRef fImageRef = CGImageCreateWithImageInRect([f CGImage], fstRect);
UIImage *fCroppedImage = [UIImage imageWithCGImage:fImageRef];
CGImageRelease(fImageRef);

CGImageRef sImageRef = CGImageCreateWithImageInRect([f CGImage], sndRect);
UIImage *sCroppedImage = [UIImage imageWithCGImage:sImageRef];
CGImageRelease(sImageRef);


UIImageView *first = [[UIImageView alloc]initWithFrame:fstRect];
first.image = fCroppedImage;
//first.contentMode = UIViewContentModeTop;
UIImageView *second = [[UIImageView alloc]initWithFrame:sndRect];
second.image = sCroppedImage;
//second.contentMode = UIViewContentModeBottom;

UIView *blank = [[UIView alloc]initWithFrame:CGRectMake(0, 0, 320, 460)];
blank.backgroundColor = [UIColor darkGrayColor];

[self.view addSubview:blank];
[self.view addSubview:first];
[self.view addSubview:second];

[UIView animateWithDuration:2.0 animations:^{
    second.center = CGPointMake(second.center.x, second.center.y+75);
}];
Możesz odkomentować dwie linie .contentMode i jakość się poprawi, ale w moim przypadku subview ma przesunięcie 10px lub tak (możesz to zobaczyć, ustawiając kolor tła na oba subviews)
/ / EDIT 2: ok znalazłem ten błąd. Korzystałem z całego ekranu 320x480, ale musiałem odciąć pasek stanu, więc powinien być 320x460 i wszystko działa świetnie ;)
Zamiast robić migawkę widoku, możesz użyć osobnego widoku dla każdego wiersza ikon. Będziesz musiał wykonać nieco więcej pracy z repozycjonowaniem rzeczy, ale wiersze nie będą statyczne, gdy folder jest otwarty (innymi słowy, będą nadal przerysowywać w razie potrzeby).
Warning: date(): Invalid date.timezone value 'Europe/Kyiv', we selected the timezone 'UTC' for now. in /var/www/agent_stack/data/www/doraprojects.net/template/agent.layouts/content.php on line 54
2010-12-21 15:49:37
Wziąłemkod relikda jako bazę i uczyniłem go nieco bardziej dynamicznym.
Możesz określić podzieloną pozycję i kierunek podczas wywoływania funkcji i dodałem granicę do podzielonych obrazów.
#define splitAnimationTime 0.5
- (void)split:(SplitDirection)splitDirection
 atYPostition:(int)splitYPosition
withRevealedViewHeight:(int)revealedViewHeight{

    // wouldn't be sharp on retina displays, instead use "withOptions" and set scale to 0.0
    // UIGraphicsBeginImageContext(self.view.bounds.size);
    UIGraphicsBeginImageContextWithOptions(self.view.bounds.size, NO, 0.0);
    [self.view.layer renderInContext:UIGraphicsGetCurrentContext()];
    UIImage *f = UIGraphicsGetImageFromCurrentImageContext();
    UIGraphicsEndImageContext();

    CGRect fullScreenRect = [self getScreenFrameForCurrentOrientation];

    CGRect upperSplitRect = CGRectMake(0, 0,fullScreenRect.size.width, splitYPosition);
    CGRect lowerSplitRect = CGRectMake(0, splitYPosition, fullScreenRect.size.width, fullScreenRect.size.height-splitYPosition);


    CGImageRef upperImageRef = CGImageCreateWithImageInRect([f CGImage], upperSplitRect);
    UIImage *upperCroppedImage = [UIImage imageWithCGImage:upperImageRef];
    CGImageRelease(upperImageRef);

    CGImageRef lowerImageRef = CGImageCreateWithImageInRect([f CGImage], lowerSplitRect);
    UIImage *lowerCroppedImage = [UIImage imageWithCGImage:lowerImageRef];
    CGImageRelease(lowerImageRef);


    UIImageView *upperImage = [[UIImageView alloc]initWithFrame:upperSplitRect];
    upperImage.image = upperCroppedImage;
    //first.contentMode = UIViewContentModeTop;

    UIView *upperBoarder = [[UIView alloc]initWithFrame:CGRectMake(0, splitYPosition, fullScreenRect.size.width, 1)];
    upperBoarder.backgroundColor = [UIColor whiteColor];
    [upperImage addSubview:upperBoarder];


    UIImageView *lowerImage = [[UIImageView alloc]initWithFrame:lowerSplitRect];
    lowerImage.image = lowerCroppedImage;
    //second.contentMode = UIViewContentModeBottom;

    UIView *lowerBoarder = [[UIView alloc]initWithFrame:CGRectMake(0, 0, fullScreenRect.size.width, 1)];
    lowerBoarder.backgroundColor = [UIColor whiteColor];
    [lowerImage addSubview:lowerBoarder];

    int reveledViewYPosition = splitYPosition;

    if(splitDirection==SplitDirectionUp){
        reveledViewYPosition = splitYPosition - revealedViewHeight;
    }


    UIView *revealedView = [[UIView alloc]initWithFrame:CGRectMake(0, reveledViewYPosition, fullScreenRect.size.width, revealedViewHeight)];
    revealedView.backgroundColor = [UIColor scrollViewTexturedBackgroundColor];


    [self.view addSubview:revealedView];
    [self.view addSubview:upperImage];
    [self.view addSubview:lowerImage];

    [UIView animateWithDuration:splitAnimationTime animations:^{
        if(splitDirection==SplitDirectionUp){
            upperImage.center = CGPointMake(upperImage.center.x, upperImage.center.y-revealedViewHeight);
        } else { //assume down
            lowerImage.center = CGPointMake(lowerImage.center.x, lowerImage.center.y+revealedViewHeight);
        }
    }];
}
To znaczy, że mogę to tak nazwać:
[self split:SplitDirectionUp atYPostition:500 withRevealedViewHeight:200];
Użyłem tych funkcji w zaktualizowanej funkcji split:
- (CGRect)getScreenFrameForCurrentOrientation {
    return [self getScreenFrameForOrientation:[UIApplication sharedApplication].statusBarOrientation];
}

- (CGRect)getScreenFrameForOrientation:(UIInterfaceOrientation)orientation {

    UIScreen *screen = [UIScreen mainScreen];
    CGRect fullScreenRect = screen.bounds;
    BOOL statusBarHidden = [UIApplication sharedApplication].statusBarHidden;

    //implicitly in Portrait orientation.
    if(orientation == UIInterfaceOrientationLandscapeRight || orientation ==  UIInterfaceOrientationLandscapeLeft){
        CGRect temp = CGRectZero;
        temp.size.width = fullScreenRect.size.height;
        temp.size.height = fullScreenRect.size.width;
        fullScreenRect = temp;
    }

    if(!statusBarHidden){
        CGFloat statusBarHeight = 20;
        fullScreenRect.size.height -= statusBarHeight;
    }

    return fullScreenRect;
}
I to enum:
typedef enum SplitDirection
{
    SplitDirectionDown,
    SplitDirectionUp
}SplitDirection;
Dodanie powrotu do funkcji normalnej i dodanie strzałki byłoby świetnym dodatkiem.
Warning: date(): Invalid date.timezone value 'Europe/Kyiv', we selected the timezone 'UTC' for now. in /var/www/agent_stack/data/www/doraprojects.net/template/agent.layouts/content.php on line 54
2017-05-23 10:32:35