Dodanie legendy do Pyplota w Matplotlib w najprostszy możliwy sposób
TL; DR -> Jak można utworzyć legendę dla wykresu liniowego w
Matplotlib'SPyPlotbez tworzenia dodatkowych zmiennych?
Proszę wziąć pod uwagę skrypt graficzny poniżej:
if __name__ == '__main__':
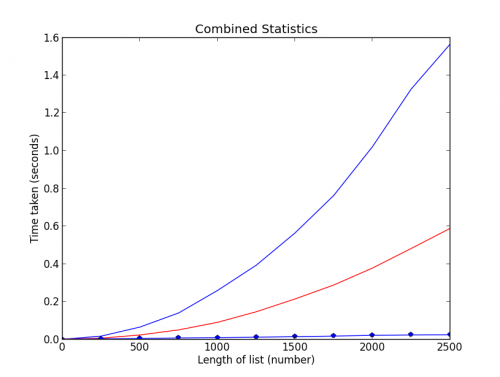
PyPlot.plot(total_lengths, sort_times_bubble, 'b-',
total_lengths, sort_times_ins, 'r-',
total_lengths, sort_times_merge_r, 'g+',
total_lengths, sort_times_merge_i, 'p-', )
PyPlot.title("Combined Statistics")
PyPlot.xlabel("Length of list (number)")
PyPlot.ylabel("Time taken (seconds)")
PyPlot.show()
Jak widzisz, jest to bardzo podstawowe użycie matplotlib ' S PyPlot. To idealnie generuje wykres podobny do poniższego:
ax = subplot(1,1,1)
p1, = ax.plot([1,2,3], label="line 1")
p2, = ax.plot([3,2,1], label="line 2")
p3, = ax.plot([2,3,1], label="line 3")

handles, labels = ax.get_legend_handles_labels()

# reverse the order
ax.legend(handles[::-1], labels[::-1])

# or sort them by labels
import operator
hl = sorted(zip(handles, labels),
            key=operator.itemgetter(1))
handles2, labels2 = zip(*hl)

ax.legend(handles2, labels2)
Zobaczysz, że muszę utworzyć dodatkową zmienną ax. Jak Mogę dodać legendę do mojego wykresu bez konieczności tworzenia dodatkowej zmiennej i zachowania prostoty obecnego skryptu?
7 answers
Dodaj label= do każdego z Twoich plot() połączenia, a następnie zadzwoń legend(loc='upper left').
Rozważ ten przykład (testowany z Pythonem 3.8.0):
import numpy as np
import matplotlib.pyplot as plt

x = np.linspace(0, 20, 1000)
y1 = np.sin(x)
y2 = np.cos(x)

plt.plot(x, y1, "-b", label="sine")
plt.plot(x, y2, "-r", label="cosine")
plt.legend(loc="upper left")
plt.ylim(-1.5, 2.0)
plt.show()
 Nieco zmodyfikowane z tego tutoriala: http://jakevdp.github.io/mpl_tutorial/tutorial_pages/tut1.html
Warning: date(): Invalid date.timezone value 'Europe/Kyiv', we selected the timezone 'UTC' for now. in /var/www/agent_stack/data/www/doraprojects.net/template/agent.layouts/content.php on line 54
2019-11-20 07:12:17
Możesz uzyskać dostęp do instancji Axes (ax) za pomocą plt.gca(). W tym przypadku możesz użyć
plt.gca().legend()
Możesz to zrobić używając słowa kluczowego label= w każdym wywołaniu plt.plot() lub przypisując etykiety jako krotkę lub listę w legend, jak w tym roboczym przykładzie:
import numpy as np
import matplotlib.pyplot as plt
x = np.linspace(-0.75,1,100)
y0 = np.exp(2 + 3*x - 7*x**3)
y1 = 7-4*np.sin(4*x)
plt.plot(x,y0,x,y1)
plt.gca().legend(('y0','y1'))
plt.show()

Jeśli jednak potrzebujesz uzyskać dostęp do instancji Axes więcej niż raz, zalecam zapisanie jej do zmiennej ax z
ax = plt.gca()
A następnie wywołanie ax zamiast plt.gca().
Warning: date(): Invalid date.timezone value 'Europe/Kyiv', we selected the timezone 'UTC' for now. in /var/www/agent_stack/data/www/doraprojects.net/template/agent.layouts/content.php on line 54
2018-06-26 18:12:16
Oto przykład, który Ci pomoże ...
fig = plt.figure(figsize=(10,5))
ax = fig.add_subplot(111)
ax.set_title('ADR vs Rating (CS:GO)')
ax.scatter(x=data[:,0],y=data[:,1],label='Data')
plt.plot(data[:,0], m*data[:,0] + b,color='red',label='Our Fitting
Line')
ax.set_xlabel('ADR')
ax.set_ylabel('Rating')
ax.legend(loc='best')
plt.show()

Warning: date(): Invalid date.timezone value 'Europe/Kyiv', we selected the timezone 'UTC' for now. in /var/www/agent_stack/data/www/doraprojects.net/template/agent.layouts/content.php on line 54
2017-12-06 07:00:58
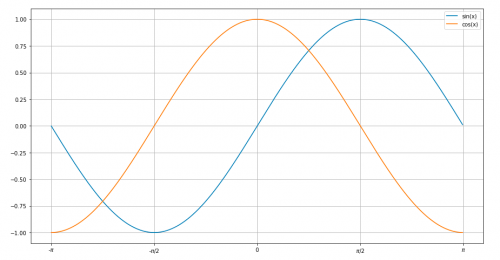
Prosty wykres dla krzywych sinus i cosinus z legendą.
Używane matplotlib.pyplot
import math
import matplotlib.pyplot as plt
x=[]
for i in range(-314,314):
    x.append(i/100)
ysin=[math.sin(i) for i in x]
ycos=[math.cos(i) for i in x]
plt.plot(x,ysin,label='sin(x)')  #specify label for the corresponding curve
plt.plot(x,ycos,label='cos(x)')
plt.xticks([-3.14,-1.57,0,1.57,3.14],['-$\pi$','-$\pi$/2',0,'$\pi$/2','$\pi$'])
plt.legend()
plt.show()
Warning: date(): Invalid date.timezone value 'Europe/Kyiv', we selected the timezone 'UTC' for now. in /var/www/agent_stack/data/www/doraprojects.net/template/agent.layouts/content.php on line 54
2018-09-03 17:45:25
Dodaj etykiety do każdego argumentu w wywołaniu wykresu odpowiadającego szeregowi, który jest wykresem, tzn. label = "series 1"
Następnie po prostu dodaj Pyplot.legend() na dole skryptu, a legenda wyświetli te etykiety.
Warning: date(): Invalid date.timezone value 'Europe/Kyiv', we selected the timezone 'UTC' for now. in /var/www/agent_stack/data/www/doraprojects.net/template/agent.layouts/content.php on line 54
2013-10-01 21:05:42
Możesz dodać własną legendę dokumentację
first = [1, 2, 4, 5, 4]
second = [3, 4, 2, 2, 3]
plt.plot(first, 'g--', second, 'r--')
plt.legend(['First List', 'Second List'], loc='upper left')
plt.show()

Warning: date(): Invalid date.timezone value 'Europe/Kyiv', we selected the timezone 'UTC' for now. in /var/www/agent_stack/data/www/doraprojects.net/template/agent.layouts/content.php on line 54
2020-07-30 20:16:53
    # Dependencies
    import numpy as np
    import matplotlib.pyplot as plt

    #Set Axes
    # Set x axis to numerical value for month
    x_axis_data = np.arange(1,13,1)
    x_axis_data

    # Average weather temp
    points = [39, 42, 51, 62, 72, 82, 86, 84, 77, 65, 55, 44]

    # Plot the line
    plt.plot(x_axis_data, points)
    plt.show()

    # Convert to Celsius C = (F-32) * 0.56
    points_C = [round((x-32) * 0.56,2) for x in points]
    points_C

    # Plot using Celsius
    plt.plot(x_axis_data, points_C)
    plt.show()

    # Plot both on the same chart
    plt.plot(x_axis_data, points)
    plt.plot(x_axis_data, points_C)

    #Line colors
    plt.plot(x_axis_data, points, "-b", label="F")
    plt.plot(x_axis_data, points_C, "-r", label="C")

    #locate legend
    plt.legend(loc="upper left")
    plt.show()
Warning: date(): Invalid date.timezone value 'Europe/Kyiv', we selected the timezone 'UTC' for now. in /var/www/agent_stack/data/www/doraprojects.net/template/agent.layouts/content.php on line 54
2020-03-31 16:07:19