Custom Preferencategory Headings
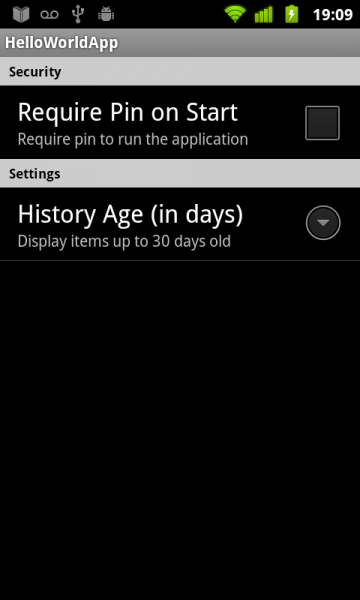
Mam prosty ekran preferencji zdefiniowany tak
<PreferenceScreen xmlns:android="http://schemas.android.com/apk/res/android">
    <PreferenceCategory android:title="Security">
        <CheckBoxPreference
            android:title="Require Pin on Start"
            android:summary="Require pin to run the application"
            android:key="@string/pref_require_pin"
            android:defaultValue="false" />
    </PreferenceCategory>

    <PreferenceCategory android:title="Settings">
        <ListPreference
           android:title="History Age (in days)"
           android:summary="Display items up to 30 days old"
           android:key="@string/pref_history_days"
           android:defaultValue="30"
           android:entries="@array/days_list"
           android:entryValues="@array/days_list"
           android:dialogTitle="Select History Age"/>
    </PreferenceCategory>
</PreferenceScreen>
Mam już ustawienia stylu i używane gdzie indziej w mojej aplikacji.
<style name="ListHeader">
    <item name="android:textColor">#000000</item>
    <item name="android:textStyle">bold</item>
    <item name="android:textSize">12sp</item>
    <item name="android:background">#cccccc</item>
    <item name="android:paddingTop">6px</item>
    <item name="android:paddingBottom">6px</item>
    <item name="android:paddingLeft">12px</item>
</style>
A oto moja aktywność
public class PreferencesActivity extends PreferenceActivity implements OnSharedPreferenceChangeListener {
    @Override
    public void onCreate(Bundle savedInstanceState) {
        super.onCreate(savedInstanceState);

        addPreferencesFromResource(R.layout.preferences);
    }
}
Jak zastosować własny styl do nagłówka PreferenceCategory?
4 answers
Powinieneś spojrzeć na Preference.Category styl:
<style name="Preference.Category">
    <item name="android:layout">@android:layout/preference_category</item>
   <item name="android:shouldDisableView">false</item>
   <item name="android:selectable">false</item>
</style>
Spójrzmy na preference_category.xml plik:
<!-- Layout used for PreferenceCategory in a PreferenceActivity. -->
<TextView xmlns:android="http://schemas.android.com/apk/res/android"
    style="?android:attr/listSeparatorTextViewStyle"
    android:id="@+android:id/title"
/>
Więc musisz utworzyć własny motyw, który rozszerza domyślne android Theme i nadpisać listSeparatorTextViewStyle wartość z ListHeader styl. A następnie zastosuj ten motyw do działania, które rozszerza PreferenceActivity.
Oto jak możesz to zrobić.
Pierwszy , w twoim styles.xml dodaj następny kod:
<style name="PreferenceListHeader"
       parent="@android:style/Widget.TextView.ListSeparator">

    <item name="android:textColor">#000000</item>
    <item name="android:textStyle">bold</item>
    <item name="android:textSize">12sp</item>
    <item name="android:background">#cccccc</item>
    <item name="android:paddingTop">6px</item>
    <item name="android:paddingBottom">6px</item>
    <item name="android:paddingLeft">12px</item>
</style>

<style name="Theme.Custom" parent="@android:style/Theme">
    <item name="android:listSeparatorTextViewStyle">@style/PreferenceListHeader</item>
</style>
Następnie w AndroidManifest.xml Dodaj motyw do swoich preferencji activity:
 <activity android:name=".MyPreferencesActivity"
           android:theme="@style/Theme.Custom"
           ... >
 ...
 </activity>
Warning: date(): Invalid date.timezone value 'Europe/Kyiv', we selected the timezone 'UTC' for now. in /var/www/agent_stack/data/www/doraprojects.net/template/agent.layouts/content.php on line 54
2011-06-09 19:13:14
@inazaruk dał odpowiedź wystarczająco dobrze, ale od ostatnich aktualizacji, ADT 18 and above, są pewne ograniczenia na styles podając błąd
Error retrieving parent for item: No resource found that matches the given name '@android:style/Widget.TextView.ListSeparator'.
Zobacz ten link Dla powodu problemu i rozwiązania . Ponieważ ten post nie dostarcza kodu do zrozumienia, podaję tutaj mój kod
 <style name="Widget.TextView.ListSeparator" parent="@android:style/Widget.TextView">
    <item name="android:layout_width">match_parent</item>
    <item name="android:layout_height">wrap_content</item>
    <item name="android:textStyle">bold</item>
    <item name="android:textSize">14sp</item>
    <item name="android:gravity">center_vertical</item>
</style>

<style name="PreferenceListHeader" parent="Widget.TextView.ListSeparator">
    <item name="android:textColor">#000000</item>
    <item name="android:textStyle">bold</item>
    <item name="android:textSize">18sp</item>
    <item name="android:background">#cccccc</item>
    <item name="android:paddingTop">6dp</item>
    <item name="android:paddingBottom">6dp</item>
    <item name="android:paddingLeft">12dp</item>
</style>

<style name="PreferenceScreen" parent="android:Theme.NoTitleBar">
    <item name="android:listSeparatorTextViewStyle">@style/PreferenceListHeader</item>
    <item name="android:background">#F2B1DBF3</item>
</style>
Warning: date(): Invalid date.timezone value 'Europe/Kyiv', we selected the timezone 'UTC' for now. in /var/www/agent_stack/data/www/doraprojects.net/template/agent.layouts/content.php on line 54
2013-10-07 09:43:08
Stylizacja w sposób opisany w odpowiedzi inazaruka jest dość prosta, ale zmienia tylko styl tekstu w nagłówku, nie oferuje sposobu na określenie zupełnie nowego układu (styl nie zastosuje elementu layout). Istnieje jednak proste rozwiązanie, jeśli rozszerzysz klasę:
public class MyPreferenceCategory extends PreferenceCategory {

  public MyPreferenceCategory(Context context) {
    super(context);
    setLayoutResource(R.layout.yourlayout);
  }

  public MyPreferenceCategory(Context context, AttributeSet attrs) {
    super(context, attrs);
    setLayoutResource(R.layout.yourlayout);
  }
}
I po prostu użyj tego zamiast oryginalnego PreferenceCategory podczas definiowania układu preferencji.
Twój układ może, oczywiście, mieć wszystko, co chcesz, w tym linie powyżej lub poniżej tekst, różne tła, podkładki, cokolwiek. Na przykład, wyświetli kolorowy podtytuł projektu materiału z linią powyżej:
<?xml version="1.0" encoding="utf-8"?>
<LinearLayout xmlns:android="http://schemas.android.com/apk/res/android"
    android:layout_width="match_parent"
    android:layout_height="wrap_content"
    android:orientation="vertical" >
    <View
        android:layout_width="match_parent"
        android:layout_height="1dp"
        android:layout_marginTop="6dp"
        android:background="?attr/divider_color" />
    <TextView
        android:id="@+android:id/title"
        android:layout_width="match_parent"
        android:layout_height="wrap_content"
        android:gravity="center_vertical"
        android:padding="12dp"
        android:textColor="?attr/colorAccent"
        android:textSize="14sp"
        android:textStyle="bold" />
</LinearLayout>
Warning: date(): Invalid date.timezone value 'Europe/Kyiv', we selected the timezone 'UTC' for now. in /var/www/agent_stack/data/www/doraprojects.net/template/agent.layouts/content.php on line 54
2015-01-21 21:42:42
Jak Gábor ' s answer, ale zamiast rozszerzyć PreferenceCategory można zrobić tak : 1. Stwórz swój własny układ.Nazwałem go preference_category.xml :
<?xml version="1.0" encoding="utf-8"?>
<LinearLayout xmlns:android="http://schemas.android.com/apk/res/android"
android:layout_width="match_parent"
android:layout_height="wrap_content"
android:orientation="vertical" >
<View
    android:layout_width="match_parent"
    android:layout_height="1dp"
    android:layout_marginTop="6dp"
    android:background="?attr/divider_color" />
<TextView
    android:id="@+android:id/title"
    android:layout_width="match_parent"
    android:layout_height="wrap_content"
    android:gravity="center_vertical"
    android:padding="12dp"
    android:textColor="?attr/colorAccent"
    android:textSize="14sp"
    android:textStyle="bold" />
</LinearLayout>
Ważne: układ musi zawierać widok tekstu o tym id: android: id=" @ + android: id / title "
2.i w preferencjach dodaj tę linię: android: layout= "@layout / preference_category "
<?xml version="1.0" encoding="utf-8"?>
<PreferenceScreen xmlns:android="http://schemas.android.com/apk/res/android" >

<PreferenceCategory
    android:key="Font_Settings"
    android:title="@string/UISetting"
    android:layout="@layout/preference_category" >
... //  other preferences in the category
</PreferenceCategory>
</PreferenceScreen>
Warning: date(): Invalid date.timezone value 'Europe/Kyiv', we selected the timezone 'UTC' for now. in /var/www/agent_stack/data/www/doraprojects.net/template/agent.layouts/content.php on line 54
2016-06-24 12:02:04