Jak narysować cień pod UIView?
Próbuję narysować cień pod dolną krawędzią UIVieww kakaowym dotyku. Rozumiem, że powinienem użyć CGContextSetShadow() do narysowania cienia, ale przewodnik programowania Quartz 2D jest trochę niejasny:
- Zapisz stan Grafiki.
- wywołaj funkcję
CGContextSetShadow, przekazując odpowiednie wartości. - wykonaj cały rysunek, do którego chcesz zastosować cienie.
- Przywróć stan Grafiki
Próbowałem w UIView podklasa:
- (void)drawRect:(CGRect)rect {
    CGContextRef currentContext = UIGraphicsGetCurrentContext();
    CGContextSaveGState(currentContext);
    CGContextSetShadow(currentContext, CGSizeMake(-15, 20), 5);
    CGContextRestoreGState(currentContext);
    [super drawRect: rect];
}
..ale to nie działa dla mnie i jestem trochę zatrzymany o (a) gdzie iść dalej i (B) jeśli jest coś, co muszę zrobić z moim UIView, aby to działa?
16 answers
W bieżącym kodzie zapisujesz GState bieżącego kontekstu, konfigurujesz go tak, aby rysował Cień .. i przywrócić go do tego, co było, zanim skonfigurowałeś go, aby narysował Cień. W końcu wywołujesz implementację drawRect klasy nadrzędnej:.
Każdy rysunek, na który ma wpływ ustawienie cienia, musi się zdarzyć po
CGContextSetShadow(currentContext, CGSizeMake(-15, 20), 5);
Ale przed
CGContextRestoreGState(currentContext);
Więc jeśli chcesz, aby superklasy drawRect: były "owinięte" w cień, to co powiesz na to, że zmieniasz swój kod w ten sposób?
- (void)drawRect:(CGRect)rect {
    CGContextRef currentContext = UIGraphicsGetCurrentContext();
    CGContextSaveGState(currentContext);
    CGContextSetShadow(currentContext, CGSizeMake(-15, 20), 5);
    [super drawRect: rect];
    CGContextRestoreGState(currentContext);
}
Warning: date(): Invalid date.timezone value 'Europe/Kyiv', we selected the timezone 'UTC' for now. in /var/www/agent_stack/data/www/doraprojects.net/template/agent.layouts/content.php on line 54
2013-06-01 12:37:56
O wiele łatwiejszym podejściem jest ustawienie atrybutów warstwy widoku przy inicjalizacji:
self.layer.masksToBounds = NO;
self.layer.shadowOffset = CGSizeMake(-15, 20);
self.layer.shadowRadius = 5;
self.layer.shadowOpacity = 0.5;
#import <QuartzCore/QuartzCore.h>
Warning: date(): Invalid date.timezone value 'Europe/Kyiv', we selected the timezone 'UTC' for now. in /var/www/agent_stack/data/www/doraprojects.net/template/agent.layouts/content.php on line 54
2015-09-17 20:49:39
self.layer.masksToBounds = NO;
self.layer.cornerRadius = 8; // if you like rounded corners
self.layer.shadowOffset = CGSizeMake(-15, 20);
self.layer.shadowRadius = 5;
self.layer.shadowOpacity = 0.5;
To spowolni działanie aplikacji. Dodanie następującej linii może poprawić wydajność, o ile widok jest wyraźnie prostokątny:
self.layer.shadowPath = [UIBezierPath bezierPathWithRect:self.bounds].CGPath;
Warning: date(): Invalid date.timezone value 'Europe/Kyiv', we selected the timezone 'UTC' for now. in /var/www/agent_stack/data/www/doraprojects.net/template/agent.layouts/content.php on line 54
2011-10-24 05:52:52
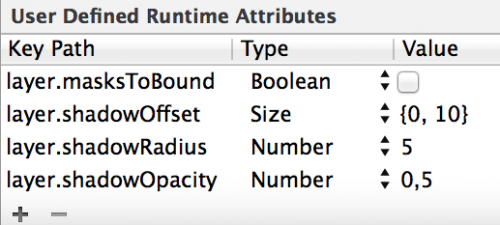
To samo rozwiązanie, ale dla przypomnienia: możesz zdefiniować Cień bezpośrednio w storyboardzie.
Ex:
Warning: date(): Invalid date.timezone value 'Europe/Kyiv', we selected the timezone 'UTC' for now. in /var/www/agent_stack/data/www/doraprojects.net/template/agent.layouts/content.php on line 54
2014-12-13 04:34:39
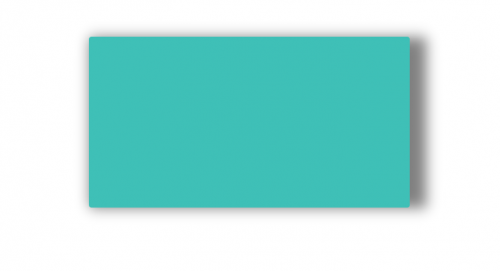
Możesz spróbować tego .... możesz grać wartościami.
shadowRadius określa ilość rozmycia. Dyktuje, dokąd zmierza Cień.
Swift 2.0
let radius: CGFloat = demoView.frame.width / 2.0 //change it to .height if you need spread for height
let shadowPath = UIBezierPath(rect: CGRect(x: 0, y: 0, width: 2.1 * radius, height: demoView.frame.height))
//Change 2.1 to amount of spread you need and for height replace the code for height

demoView.layer.cornerRadius = 2
demoView.layer.shadowColor = UIColor.blackColor().CGColor
demoView.layer.shadowOffset = CGSize(width: 0.5, height: 0.4)  //Here you control x and y
demoView.layer.shadowOpacity = 0.5
demoView.layer.shadowRadius = 5.0 //Here your control your blur
demoView.layer.masksToBounds =  false
demoView.layer.shadowPath = shadowPath.CGPath
Swift 3.0
let radius: CGFloat = demoView.frame.width / 2.0 //change it to .height if you need spread for height
let shadowPath = UIBezierPath(rect: CGRect(x: 0, y: 0, width: 2.1 * radius, height: demoView.frame.height))
//Change 2.1 to amount of spread you need and for height replace the code for height

demoView.layer.cornerRadius = 2
demoView.layer.shadowColor = UIColor.black.cgColor
demoView.layer.shadowOffset = CGSize(width: 0.5, height: 0.4)  //Here you control x and y
demoView.layer.shadowOpacity = 0.5
demoView.layer.shadowRadius = 5.0 //Here your control your blur
demoView.layer.masksToBounds =  false
demoView.layer.shadowPath = shadowPath.cgPath
Przykład z spreadem
Aby utworzyć podstawowy Cień
    demoView.layer.cornerRadius = 2
    demoView.layer.shadowColor = UIColor.blackColor().CGColor
    demoView.layer.shadowOffset = CGSizeMake(0.5, 4.0); //Here your control your spread
    demoView.layer.shadowOpacity = 0.5
    demoView.layer.shadowRadius = 5.0 //Here your control your blur
Podstawowy przykład cienia w Swift 2.0

Warning: date(): Invalid date.timezone value 'Europe/Kyiv', we selected the timezone 'UTC' for now. in /var/www/agent_stack/data/www/doraprojects.net/template/agent.layouts/content.php on line 54
2017-03-23 20:31:05
proste i czyste rozwiązanie za pomocą narzędzia Interface Builder
Dodaj plik o nazwie UIView.swift w Twoim projekcie (lub po prostu wklej to w dowolnym pliku):
import UIKit

@IBDesignable extension UIView {

    /* The color of the shadow. Defaults to opaque black. Colors created
    * from patterns are currently NOT supported. Animatable. */
    @IBInspectable var shadowColor: UIColor? {
        set {
            layer.shadowColor = newValue!.CGColor
        }
        get {
            if let color = layer.shadowColor {
                return UIColor(CGColor:color)
            }
            else {
                return nil
            }
        }
    }

    /* The opacity of the shadow. Defaults to 0. Specifying a value outside the
    * [0,1] range will give undefined results. Animatable. */
    @IBInspectable var shadowOpacity: Float {
        set {
            layer.shadowOpacity = newValue
        }
        get {
            return layer.shadowOpacity
        }
    }

    /* The shadow offset. Defaults to (0, -3). Animatable. */
    @IBInspectable var shadowOffset: CGPoint {
        set {
            layer.shadowOffset = CGSize(width: newValue.x, height: newValue.y)
        }
        get {
            return CGPoint(x: layer.shadowOffset.width, y:layer.shadowOffset.height)
        }
    }

    /* The blur radius used to create the shadow. Defaults to 3. Animatable. */
    @IBInspectable var shadowRadius: CGFloat {
        set {
            layer.shadowRadius = newValue
        }
        get {
            return layer.shadowRadius
        }
    }
}
Wtedy będzie to dostępne w Kreatorze interfejsów dla każdego widoku w panelu Narzędzia > Inspektor atrybutów:

Uwagi:
- Cień nie pojawi się w IB, tylko podczas wykonywania.
- Jak powiedział Mazen Kasser
Do tych którzy nie zdołali doprowadzić tego do skutku [...] upewnij się, że podgląd klipu (
clipsToBounds) nie jest włączony
Warning: date(): Invalid date.timezone value 'Europe/Kyiv', we selected the timezone 'UTC' for now. in /var/www/agent_stack/data/www/doraprojects.net/template/agent.layouts/content.php on line 54
2016-02-12 22:00:19
Używam tego jako część moich narzędzi. Dzięki temu możemy nie tylko ustawić cień, ale także uzyskać zaokrąglony róg dla dowolnego UIView. Możesz również ustawić preferowany kolor cienia. Zwykle preferowane jest czarne, ale czasami, gdy tło nie jest białe, możesz chcieć czegoś innego. Oto czego używam -
in utils.m
+ (void)roundedLayer:(CALayer *)viewLayer
              radius:(float)r
              shadow:(BOOL)s
{
    [viewLayer setMasksToBounds:YES];
    [viewLayer setCornerRadius:r];
    [viewLayer setBorderColor:[RGB(180, 180, 180) CGColor]];
    [viewLayer setBorderWidth:1.0f];
    if(s)
    {
        [viewLayer setShadowColor:[RGB(0, 0, 0) CGColor]];
        [viewLayer setShadowOffset:CGSizeMake(0, 0)];
        [viewLayer setShadowOpacity:1];
        [viewLayer setShadowRadius:2.0];
    }
    return;
}
Aby użyć tego musimy to nazwać - [utils roundedLayer:yourview.layer radius:5.0f shadow:YES];
Warning: date(): Invalid date.timezone value 'Europe/Kyiv', we selected the timezone 'UTC' for now. in /var/www/agent_stack/data/www/doraprojects.net/template/agent.layouts/content.php on line 54
2011-10-24 06:00:24
Swift 3
extension UIView {
    func installShadow() {
        layer.cornerRadius = 2
        layer.masksToBounds = false
        layer.shadowColor = UIColor.black.cgColor
        layer.shadowOffset = CGSize(width: 0, height: 1)
        layer.shadowOpacity = 0.45
        layer.shadowPath = UIBezierPath(rect: bounds).cgPath
        layer.shadowRadius = 1.0
    }
}
Warning: date(): Invalid date.timezone value 'Europe/Kyiv', we selected the timezone 'UTC' for now. in /var/www/agent_stack/data/www/doraprojects.net/template/agent.layouts/content.php on line 54
2020-06-20 09:12:55
Jeśli chcesz używać StoryBoard i nie chcesz wpisywać atrybutów runtime, możesz łatwo utworzyć rozszerzenie do widoków i uczynić je użytecznymi w storyboard.
Krok 1. Utwórz rozszerzenie
extension UIView {

@IBInspectable var shadowRadius: CGFloat {
    get {
        return layer.shadowRadius
    }
    set {
        layer.shadowRadius = newValue
    }
}

@IBInspectable var shadowOpacity: Float {
    get {
        return layer.shadowOpacity
    }
    set {
        layer.shadowOpacity = newValue
    }
}

@IBInspectable var shadowOffset: CGSize {
    get {
        return layer.shadowOffset
    }
    set {
        layer.shadowOffset = newValue
    }
}

@IBInspectable var maskToBound: Bool {
    get {
        return layer.masksToBounds
    }
    set {
        layer.masksToBounds = newValue
    }
}
}

Warning: date(): Invalid date.timezone value 'Europe/Kyiv', we selected the timezone 'UTC' for now. in /var/www/agent_stack/data/www/doraprojects.net/template/agent.layouts/content.php on line 54
2018-08-22 08:17:15
Do tych, którym się to nie udało (jak mnie!) po wypróbowaniu wszystkich odpowiedzi upewnij się, że w Inspektorze atrybutów nie jest włączona opcja podglądu klipu ...
Warning: date(): Invalid date.timezone value 'Europe/Kyiv', we selected the timezone 'UTC' for now. in /var/www/agent_stack/data/www/doraprojects.net/template/agent.layouts/content.php on line 54
2015-07-08 04:55:29
Szkic cienia za pomocą IBDesignable i IBInspectable w Swift 4
JAK GO UŻYWAĆ

SKETCH I XCODE OBOK SIEBIE

Kod
@IBDesignable class ShadowView: UIView {

    @IBInspectable var shadowColor: UIColor? {
        get {
            if let color = layer.shadowColor {
                return UIColor(cgColor: color)
            }
            return nil
        }
        set {
            if let color = newValue {
                layer.shadowColor = color.cgColor
            } else {
                layer.shadowColor = nil
            }
        }
    }

    @IBInspectable var shadowOpacity: Float {
        get {
            return layer.shadowOpacity
        }
        set {
            layer.shadowOpacity = newValue
        }
    }

    @IBInspectable var shadowOffset: CGPoint {
        get {
            return CGPoint(x: layer.shadowOffset.width, y:layer.shadowOffset.height)
        }
        set {
            layer.shadowOffset = CGSize(width: newValue.x, height: newValue.y)
        }

     }

    @IBInspectable var shadowBlur: CGFloat {
        get {
            return layer.shadowRadius
        }
        set {
            layer.shadowRadius = newValue / 2.0
        }
    }

    @IBInspectable var shadowSpread: CGFloat = 0 {
        didSet {
            if shadowSpread == 0 {
                layer.shadowPath = nil
            } else {
                let dx = -shadowSpread
                let rect = bounds.insetBy(dx: dx, dy: dx)
                layer.shadowPath = UIBezierPath(rect: rect).cgPath
            }
        }
    }
}
OUTPUT

Warning: date(): Invalid date.timezone value 'Europe/Kyiv', we selected the timezone 'UTC' for now. in /var/www/agent_stack/data/www/doraprojects.net/template/agent.layouts/content.php on line 54
2019-11-11 15:58:21
Swift 3
self.paddingView.layer.masksToBounds = false
self.paddingView.layer.shadowOffset = CGSize(width: -15, height: 10)
self.paddingView.layer.shadowRadius = 5
self.paddingView.layer.shadowOpacity = 0.5
Warning: date(): Invalid date.timezone value 'Europe/Kyiv', we selected the timezone 'UTC' for now. in /var/www/agent_stack/data/www/doraprojects.net/template/agent.layouts/content.php on line 54
2017-08-11 17:38:28
Możesz użyć mojej funkcji użytkowej utworzonej dla promieni cienia i rogu, jak poniżej:
- (void)addShadowWithRadius:(CGFloat)shadowRadius withShadowOpacity:(CGFloat)shadowOpacity withShadowOffset:(CGSize)shadowOffset withShadowColor:(UIColor *)shadowColor withCornerRadius:(CGFloat)cornerRadius withBorderColor:(UIColor *)borderColor withBorderWidth:(CGFloat)borderWidth forView:(UIView *)view{

    // drop shadow
    [view.layer setShadowRadius:shadowRadius];
    [view.layer setShadowOpacity:shadowOpacity];
    [view.layer setShadowOffset:shadowOffset];
    [view.layer setShadowColor:shadowColor.CGColor];

    // border radius
    [view.layer setCornerRadius:cornerRadius];

    // border
    [view.layer setBorderColor:borderColor.CGColor];
    [view.layer setBorderWidth:borderWidth];
}
Mam nadzieję, że ci pomoże!!!
Warning: date(): Invalid date.timezone value 'Europe/Kyiv', we selected the timezone 'UTC' for now. in /var/www/agent_stack/data/www/doraprojects.net/template/agent.layouts/content.php on line 54
2017-09-13 11:09:53
Wszystkie odpowiedzi dobrze, ale chcę dodać jeszcze jeden punkt
Jeśli napotkasz problem, gdy masz komórki tabeli, Wykryj nową komórkę, w której występuje niedopasowanie w cieniu, więc w tym przypadku musisz umieścić kod cienia w metodzie layoutsubview, aby zachowywał się ładnie we wszystkich warunkach.
-(void)layoutSubviews{
    [super layoutSubviews];

    [self.contentView setNeedsLayout];
    [self.contentView layoutIfNeeded];
    [VPShadow applyShadowView:self];
}
Lub w kontrolerach ViewControllers dla określonego widoku umieść kod cienia w następującej metodzie, aby działał dobrze
-(void)viewDidLayoutSubviews{
    [super viewDidLayoutSubviews];

    [self.viewShadow layoutIfNeeded];
    [VPShadow applyShadowView:self.viewShadow];
}
Zmodyfikowałem moją implementację shadow dla nowego twórcy bardziej uogólnionej formy ex:
/*!
 @brief Add shadow to a view.

 @param layer CALayer of the view.

 */
+(void)applyShadowOnView:(CALayer *)layer OffsetX:(CGFloat)x OffsetY:(CGFloat)y blur:(CGFloat)radius opacity:(CGFloat)alpha RoundingCorners:(CGFloat)cornerRadius{
    UIBezierPath *shadowPath = [UIBezierPath bezierPathWithRoundedRect:layer.bounds cornerRadius:cornerRadius];
    layer.masksToBounds = NO;
    layer.shadowColor = [UIColor blackColor].CGColor;
    layer.shadowOffset = CGSizeMake(x,y);// shadow x and y
    layer.shadowOpacity = alpha;
    layer.shadowRadius = radius;// blur effect
    layer.shadowPath = shadowPath.CGPath;
}
Warning: date(): Invalid date.timezone value 'Europe/Kyiv', we selected the timezone 'UTC' for now. in /var/www/agent_stack/data/www/doraprojects.net/template/agent.layouts/content.php on line 54
2017-09-14 06:20:54
Dla innych Xamarian, Xamarin.Wersja odpowiedzi na iOS/C# wyglądałaby następująco:
public override void DrawRect(CGRect area, UIViewPrintFormatter formatter)
{
    CGContext currentContext = UIGraphics.GetCurrentContext();
    currentContext.SaveState();
    currentContext.SetShadow(new CGSize(-15, 20), 5);
    base.DrawRect(area, formatter);
    currentContext.RestoreState();
}
Główna różnica polega na tym, że nabywasz instancję CGContext, na której bezpośrednio wywołujesz odpowiednie metody.
Warning: date(): Invalid date.timezone value 'Europe/Kyiv', we selected the timezone 'UTC' for now. in /var/www/agent_stack/data/www/doraprojects.net/template/agent.layouts/content.php on line 54
2018-10-03 09:12:20
Możesz użyć tego Extension, aby dodać cień
extension UIView {

    func addShadow(offset: CGSize, color: UIColor, radius: CGFloat, opacity: Float)
    {
        layer.masksToBounds = false
        layer.shadowOffset = offset
        layer.shadowColor = color.cgColor
        layer.shadowRadius = radius
        layer.shadowOpacity = opacity

        let backgroundCGColor = backgroundColor?.cgColor
        backgroundColor = nil
        layer.backgroundColor =  backgroundCGColor
    }
}
Możesz to nazwać jak
your_Custom_View.addShadow(offset: CGSize(width: 0, height: 1), color: UIColor.black, radius: 2.0, opacity: 1.0)
Warning: date(): Invalid date.timezone value 'Europe/Kyiv', we selected the timezone 'UTC' for now. in /var/www/agent_stack/data/www/doraprojects.net/template/agent.layouts/content.php on line 54
2019-10-13 10:45:44