Jaki jest cel znacznika Androida w układach XML?
Czytałempost Romain Guy na tag <merge />, ale nadal nie rozumiem, jak to jest przydatne. Jest to rodzaj zamiennika znacznika <Frame />, czy też jest używany w ten sposób:
<merge xmlns:android="....">
<LinearLayout ...>
    .
    .
    .
</LinearLayout>
</merge>
Potem <include /> kod w innym pliku?
5 answers
<merge/> jest to przydatne, ponieważ może pozbyć się niepotrzebnych ViewGroups, tj. układów, które są po prostu używane do zawijania innych widoków i same nie służą żadnemu celowi.
Na przykład, jeśli masz <include/> układ z innego pliku bez użycia merge, oba pliki mogą wyglądać mniej więcej tak:
Layout1.xml:
<FrameLayout>
   <include layout="@layout/layout2"/>
</FrameLayout>
Layout2.xml:
<FrameLayout>
   <TextView />
   <TextView />
</FrameLayout>
Który jest funkcjonalnie równoważny temu pojedynczemu układowi:
<FrameLayout>
   <FrameLayout>
      <TextView />
      <TextView />
   </FrameLayout>
</FrameLayout>
That FrameLayout in layout2.xml może nie być przydatny. Pomaga się go pozbyć. Oto jak to wygląda używając merge (layout1.xml nie zmienia się):
Layout2.xml:
<merge>
   <TextView />
   <TextView />
</merge>
Jest to funkcjonalnie równoważne temu układowi:
<FrameLayout>
   <TextView />
   <TextView />
</FrameLayout>
Ale ponieważ używasz <include/>, możesz ponownie użyć układu w innym miejscu. Nie musi być używany do zastąpienia tylko FrameLayouts - możesz go użyć do zastąpienia dowolnego układu, który nie dodaje czegoś użytecznego do sposobu, w jaki wygląda/zachowuje się twój widok.
Warning: date(): Invalid date.timezone value 'Europe/Kyiv', we selected the timezone 'UTC' for now. in /var/www/agent_stack/data/www/doraprojects.net/template/agent.layouts/content.php on line 54
2019-09-05 05:11:07
Znacznik include
The <include> tag pozwala podzielić układ na wiele plików: pomaga radzić sobie z złożonym lub nadmiernym interfejsem użytkownika.
Załóżmy, że dzielisz swój złożony układ za pomocą dwóch plików nagłówkowych w następujący sposób:
Top_level_activity.xml :
<LinearLayout xmlns:android="http://schemas.android.com/apk/res/android"
    android:id="@+id/layout1"
    android:layout_width="match_parent"
    android:layout_height="match_parent"
    android:orientation="vertical" >

    <!-- First include file -->
    <include layout="@layout/include1.xml" />

    <!-- Second include file -->
    <include layout="@layout/include2.xml" />

</LinearLayout>
Następnie należy napisać include1.xml i include2.xml.
Pamiętaj, że xml z plików nagłówkowych jest po prostu wrzucany do twojego top_level_activity układ w czasie renderowania (prawie jak makro #INCLUDE dla C).
Pliki nagłówkowe to zwykły układ XML.
Include1.xml :
<?xml version="1.0" encoding="utf-8"?>
<TextView xmlns:android="http://schemas.android.com/apk/res/android"
    android:id="@+id/textView1"
    android:text="First include"
    android:textAppearance="?android:attr/textAppearanceMedium"/>
... and include2.xml :
<?xml version="1.0" encoding="utf-8"?>
<Button xmlns:android="http://schemas.android.com/apk/res/android"
    android:id="@+id/button1"
    android:text="Button" />
xmlns:android="http://schemas.android.com/apk/res/android.
Więc renderowana wersja top_level_activity.xml jest:
<LinearLayout xmlns:android="http://schemas.android.com/apk/res/android"
    android:id="@+id/layout1"
    android:layout_width="match_parent"
    android:layout_height="match_parent"
    android:orientation="vertical" >

    <!-- First include file -->
    <TextView
        android:id="@+id/textView1"
        android:text="First include"
        android:textAppearance="?android:attr/textAppearanceMedium"/>

    <!-- Second include file -->
    <Button
        android:id="@+id/button1"
        android:text="Button" />


</LinearLayout>
W Twoim kodzie Javy wszystko to jest przezroczyste: findViewById(R.id.textView1) w Klasa activity zwraca właściwy widżet (nawet jeśli widżet został zadeklarowany w pliku xml innym niż układ activity).
I wisienka na torcie: edytor wizualny radzi sobie z tym płynnie. Układ najwyższego poziomu jest renderowany z dołączonym xml.
Fabuła zagęszcza
Ponieważ plik include jest klasycznym plikiem XML układu, oznacza to, że musi mieć jeden górny element. Jeśli więc plik musi zawierać więcej niż jeden widżet, musiałby użyć układu.
Powiedzmy, że include1.xml ma teraz dwa TextView: układ musi być zadeklarowany. Wybierzmy LinearLayout.
Include1.xml :
<LinearLayout xmlns:android="http://schemas.android.com/apk/res/android"
    android:id="@+id/layout2"
    android:layout_width="match_parent"
    android:layout_height="match_parent"
    android:orientation="vertical" >

    <TextView
        android:id="@+id/textView1"
        android:text="Second include"
        android:textAppearance="?android:attr/textAppearanceMedium"/>

    <TextView
        android:id="@+id/textView2"
        android:text="More text"
        android:textAppearance="?android:attr/textAppearanceMedium"/>

</LinearLayout>
The top_level_activity.xml będzie renderowany jako:
<LinearLayout xmlns:android="http://schemas.android.com/apk/res/android"
    android:id="@+id/layout1"
    android:layout_width="match_parent"
    android:layout_height="match_parent"
    android:orientation="vertical" >

    <!-- First include file -->
    <LinearLayout
        android:id="@+id/layout2"
        android:layout_width="match_parent"
        android:layout_height="match_parent"
        android:orientation="vertical" >

       <TextView
            android:id="@+id/textView1"
            android:text="Second include"
            android:textAppearance="?android:attr/textAppearanceMedium"/>

       <TextView
            android:id="@+id/textView2"
            android:text="More text"
            android:textAppearance="?android:attr/textAppearanceMedium"/>

   </LinearLayout>

     <!-- Second include file -->
   <Button
        android:id="@+id/button1"
        android:text="Button" />

</LinearLayout>
ale poczekaj dwa poziomy {[17] } są zbędne !
Rzeczywiście, dwa zagnieżdżone LinearLayout nie służą żadnemu celowi, ponieważ dwa TextView mogą być zawarte w layout1dla dokładnie tak samo rendering .
Wprowadź znacznik scalania
Znacznik <merge> jest tylko atrapą znacznika, który zapewnia najwyższy poziom elementu do radzenia sobie z tego rodzaju problemami redundancji.
Teraz include1.XML staje się:
<merge xmlns:android="http://schemas.android.com/apk/res/android">

    <TextView
        android:id="@+id/textView1"
        android:text="Second include"
        android:textAppearance="?android:attr/textAppearanceMedium"/>

    <TextView
        android:id="@+id/textView2"
        android:text="More text"
        android:textAppearance="?android:attr/textAppearanceMedium"/>

</merge>
A teraz top_level_activity.xml {[35] } jest renderowany jako:
<LinearLayout xmlns:android="http://schemas.android.com/apk/res/android"
    android:id="@+id/layout1"
    android:layout_width="match_parent"
    android:layout_height="match_parent"
    android:orientation="vertical" >

    <!-- First include file -->
    <TextView
        android:id="@+id/textView1"
        android:text="Second include"
        android:textAppearance="?android:attr/textAppearanceMedium"/>

    <TextView
        android:id="@+id/textView2"
        android:text="More text"
        android:textAppearance="?android:attr/textAppearanceMedium"/>

    <!-- Second include file -->
    <Button
        android:id="@+id/button1"
        android:text="Button" />

</LinearLayout>
Zachowałeś jeden poziom hierarchii, unikaj jednego bezużytecznego widoku: Romain Guy śpi już lepiej.
Nie jesteś teraz szczęśliwsza?Warning: date(): Invalid date.timezone value 'Europe/Kyiv', we selected the timezone 'UTC' for now. in /var/www/agent_stack/data/www/doraprojects.net/template/agent.layouts/content.php on line 54
2014-03-18 22:27:09
Blazeroni już to wyjaśniłem, chcę tylko dodać kilka punktów.
-
<merge>służy do optymalizacji layouts.It służy do redukcji niepotrzebnego zagnieżdżania. - gdy układ zawierający znacznik
<merge>jest dodawany do innego układu, węzeł<merge>jest usuwany, a jego widok potomny jest dodawany bezpośrednio do nowego rodzica.
Warning: date(): Invalid date.timezone value 'Europe/Kyiv', we selected the timezone 'UTC' for now. in /var/www/agent_stack/data/www/doraprojects.net/template/agent.layouts/content.php on line 54
2019-03-26 10:08:17
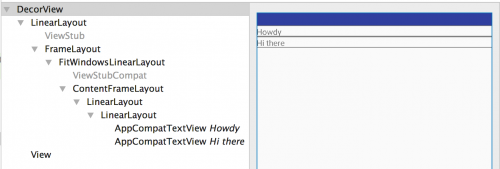
Aby mieć bardziej dogłębną wiedzę o tym, co się dzieje, stworzyłem następujący przykład. Spójrz na activity_main.XML i content_profile.pliki xml .
activity_main.xml
<LinearLayout xmlns:android="http://schemas.android.com/apk/res/android"
    android:layout_width="match_parent"
    android:layout_height="match_parent"
    android:orientation="vertical">

    <include layout="@layout/content_profile" />

</LinearLayout>
content_profile.xml
<LinearLayout xmlns:android="http://schemas.android.com/apk/res/android"
    android:layout_width="match_parent"
    android:layout_height="match_parent"
    android:orientation="vertical">

    <TextView
        android:layout_width="match_parent"
        android:layout_height="wrap_content"
        android:text="Howdy" />

    <TextView
        android:layout_width="match_parent"
        android:layout_height="wrap_content"
        android:text="Hi there" />

</LinearLayout>
Tutaj cały plik układu po napompowaniu wygląda tak.
<LinearLayout>
    <LinearLayout>
        <TextView />
        <TextView />
    </LinearLayout>
</LinearLayout>
Zobacz, że istnieje LinearLayout wewnątrz nadrzędnego LinearLayout, który nie służy żadnemu celowi i jest zbędny. Spojrzenie na narzędzie layout through Layout Inspector wyraźnie to wyjaśnia.
content_profile.xml po zaktualizowaniu kodu używać merge zamiast ViewGroup jak LinearLayout.
<merge xmlns:android="http://schemas.android.com/apk/res/android">

    <TextView
        android:layout_width="match_parent"
        android:layout_height="wrap_content"
        android:text="Howdy" />

    <TextView
        android:layout_width="match_parent"
        android:layout_height="wrap_content"
        android:text="Hi there" />

</merge>
Teraz nasz layout wygląda tak
<LinearLayout>
    <TextView />
    <TextView />
</LinearLayout>
Tutaj widzimy, że redundantna LinearLayout ViewGroup jest usuwana. Teraz narzędzie Layout Inspector daje następującą hierarchię układu.

Więc zawsze staraj się używać merge gdy układ nadrzędny może pozycjonować układy potomne, lub dokładniej użyć merge gdy rozumiesz, że w hierarchii będzie nadmiarowa Grupa widoków.
Warning: date(): Invalid date.timezone value 'Europe/Kyiv', we selected the timezone 'UTC' for now. in /var/www/agent_stack/data/www/doraprojects.net/template/agent.layouts/content.php on line 54
2017-10-18 19:51:11
Innym powodem użycia scalania jest używanie niestandardowych grup widoków w ListViews lub GridViews. Zamiast używać wzorca viewHolder w adapterze listy, można użyć widoku niestandardowego. Widok niestandardowy nadmuchuje xml, którego głównym elementem jest znacznik scalania. Kod adaptera:
public class GridViewAdapter extends BaseAdapter {
     // ... typical Adapter class methods
     @Override
     public View getView(int position, View convertView, ViewGroup parent) {
        WallpaperView wallpaperView;
        if (convertView == null)
           wallpaperView = new WallpaperView(activity);
        else
            wallpaperView = (WallpaperView) convertView;

        wallpaperView.loadWallpaper(wallpapers.get(position), imageWidth);
        return wallpaperView;
    }
}
Oto niestandardowa Grupa widoków:
public class WallpaperView extends RelativeLayout {

    public WallpaperView(Context context) {
        super(context);
        init(context);
    }
    // ... typical constructors

    private void init(Context context) {
        View.inflate(context, R.layout.wallpaper_item, this);
        imageLoader = AppController.getInstance().getImageLoader();
        imagePlaceHolder = (ImageView) findViewById(R.id.imgLoader2);
        thumbnail = (NetworkImageView) findViewById(R.id.thumbnail2);
        thumbnail.setScaleType(ImageView.ScaleType.CENTER_CROP);
    }

    public void loadWallpaper(Wallpaper wallpaper, int imageWidth) {
        // ...some logic that sets the views
    }
}
A oto XML:
<merge xmlns:android="http://schemas.android.com/apk/res/android">

    <ImageView
        android:id="@+id/imgLoader"
        android:layout_width="30dp"
        android:layout_height="30dp"
        android:layout_centerInParent="true"
        android:src="@drawable/ico_loader" />

    <com.android.volley.toolbox.NetworkImageView
        android:id="@+id/thumbnail"
        android:layout_width="wrap_content"
        android:layout_height="wrap_content" />

</merge>
Warning: date(): Invalid date.timezone value 'Europe/Kyiv', we selected the timezone 'UTC' for now. in /var/www/agent_stack/data/www/doraprojects.net/template/agent.layouts/content.php on line 54
2015-02-08 06:03:13