Python scatter plot. Rozmiar i styl markera
Mam zestaw danych, które chcę pokazać jako wykres punktowy. Chcę, aby każdy punkt był wykreślony jako kwadrat o rozmiarze dx.
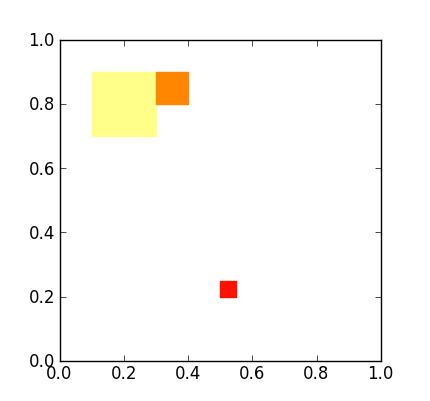
          x = [0.5,0.1,0.3]
          y = [0.2,0.7,0.8]
          z = [10.,15.,12.]
          dx = [0.05,0.2,0.1]

          scatter(x,y,c=z,s=dx,marker='s')
Problem polega na tym, że rozmiar s odczytywany przez funkcję scatter jest w punktach^2. Chciałbym mieć każdy punkt reprezentowany przez kwadrat obszaru DX^2, Gdzie ten obszar jest w jednostkach "rzeczywistych", jednostkach wykresu. Mam nadzieję, że to zrozumiesz.
4 answers
Translate from user data coordinate system to display coordinate system.
I użyj edgecolors = 'none' do rysowania twarzy bez konturów.
import numpy as np

fig = figure()
ax = fig.add_subplot(111)
dx_in_points = np.diff(ax.transData.transform(zip([0]*len(dx), dx)))
scatter(x,y,c=z,s=dx_in_points**2,marker='s', edgecolors='none')
Warning: date(): Invalid date.timezone value 'Europe/Kyiv', we selected the timezone 'UTC' for now. in /var/www/agent_stack/data/www/doraprojects.net/template/agent.layouts/content.php on line 54
2012-01-31 15:58:48
Jeśli chcesz znaczniki, które zmieniają rozmiar z rozmiarem rysunku, możesz użyć łat:
from matplotlib import pyplot as plt
from matplotlib.patches import Rectangle

x = [0.5, 0.1, 0.3]
y = [0.2 ,0.7, 0.8]
z = [10, 15, 12]
dx = [0.05, 0.2, 0.1]

cmap = plt.cm.hot
fig = plt.figure()
ax = fig.add_subplot(111, aspect='equal')

for x, y, c, h in zip(x, y, z, dx):
    ax.add_artist(Rectangle(xy=(x, y),
                  color=cmap(c**2),        # I did c**2 to get nice colors from your numbers
                  width=h, height=h))      # Gives a square of area h*h

plt.show()
Zauważ, że:
- kwadraty nie są wyśrodkowane w
(x,y). x, y są właściwie koordami kwadrat w lewo. Pozwoliłem mu w ten sposób uprościć mój kod. Ty należy użyć(x + dx/2, y + dx/2). - kolor pochodzi z gorącej kolormapy. Użyłam z * * 2, aby dać kolory. należy również dostosować to do swoich potrzeb
Na koniec drugie pytanie. Możesz dostać obramowanie rozrzutu zaznacza się za pomocą argumentów słowa kluczowego
edgecolor lub edgecolors. Są to odpowiednio argument koloru matplotlib lub Sekwencja krotek rgba. Jeśli ustawisz parametr na "brak", obramowania nie będą rysowane.Warning: date(): Invalid date.timezone value 'Europe/Kyiv', we selected the timezone 'UTC' for now. in /var/www/agent_stack/data/www/doraprojects.net/template/agent.layouts/content.php on line 54
2012-01-31 16:04:29
Myślę, że możemy zrobić to lepiej z kolekcją łatek. Według dokumentów:
To (PatchCollection) ułatwia przypisanie kolorowej mapy do niejednorodnej kolekcja łat.
Może to również poprawić szybkość wykreślania , ponieważ PatchCollection będzie rysuj szybciej niż duża liczba łat.
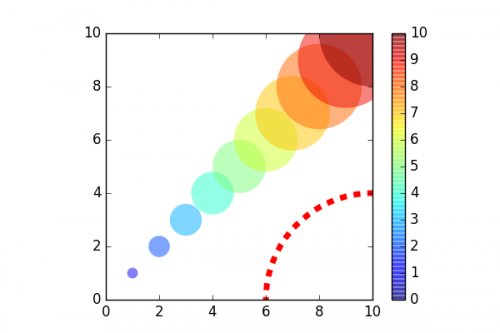
Załóżmy, że chcesz narysować rozrzut okręgów o podanym promieniu w jednostce danych:
def circles(x, y, s, c='b', vmin=None, vmax=None, **kwargs):
    """
    Make a scatter of circles plot of x vs y, where x and y are sequence
    like objects of the same lengths. The size of circles are in data scale.

    Parameters
    ----------
    x,y : scalar or array_like, shape (n, )
        Input data
    s : scalar or array_like, shape (n, )
        Radius of circle in data unit.
    c : color or sequence of color, optional, default : 'b'
        `c` can be a single color format string, or a sequence of color
        specifications of length `N`, or a sequence of `N` numbers to be
        mapped to colors using the `cmap` and `norm` specified via kwargs.
        Note that `c` should not be a single numeric RGB or RGBA sequence
        because that is indistinguishable from an array of values
        to be colormapped. (If you insist, use `color` instead.)
        `c` can be a 2-D array in which the rows are RGB or RGBA, however.
    vmin, vmax : scalar, optional, default: None
        `vmin` and `vmax` are used in conjunction with `norm` to normalize
        luminance data.  If either are `None`, the min and max of the
        color array is used.
    kwargs : `~matplotlib.collections.Collection` properties
        Eg. alpha, edgecolor(ec), facecolor(fc), linewidth(lw), linestyle(ls),
        norm, cmap, transform, etc.

    Returns
    -------
    paths : `~matplotlib.collections.PathCollection`

    Examples
    --------
    a = np.arange(11)
    circles(a, a, a*0.2, c=a, alpha=0.5, edgecolor='none')
    plt.colorbar()

    License
    --------
    This code is under [The BSD 3-Clause License]
    (http://opensource.org/licenses/BSD-3-Clause)
    """
    import numpy as np
    import matplotlib.pyplot as plt
    from matplotlib.patches import Circle
    from matplotlib.collections import PatchCollection

    if np.isscalar(c):
        kwargs.setdefault('color', c)
        c = None
    if 'fc' in kwargs: kwargs.setdefault('facecolor', kwargs.pop('fc'))
    if 'ec' in kwargs: kwargs.setdefault('edgecolor', kwargs.pop('ec'))
    if 'ls' in kwargs: kwargs.setdefault('linestyle', kwargs.pop('ls'))
    if 'lw' in kwargs: kwargs.setdefault('linewidth', kwargs.pop('lw'))

    patches = [Circle((x_, y_), s_) for x_, y_, s_ in np.broadcast(x, y, s)]
    collection = PatchCollection(patches, **kwargs)
    if c is not None:
        collection.set_array(np.asarray(c))
        collection.set_clim(vmin, vmax)

    ax = plt.gca()
    ax.add_collection(collection)
    ax.autoscale_view()
    if c is not None:
        plt.sci(collection)
    return collection
Wszystkie argumenty i słowa kluczowe (z wyjątkiem marker) funkcji scatter będą działać w podobny sposób.
Napisałam gist w tym okręgi , elipsy i kwadraty/prostokąty . Jeśli chcesz kolekcję innych kształtów, możesz ją zmodyfikować samodzielnie.
Jeśli chcesz narysować colorbar po prostu uruchom colorbar() lub przekaż zwracany obiekt collection do funkcji colorbar.
Przykład:
from pylab import *
figure(figsize=(6,4))
ax = subplot(aspect='equal')

#plot a set of circle
a = arange(11)
out = circles(a, a, a*0.2, c=a, alpha=0.5, ec='none')
colorbar()

#plot one circle (the lower-right one)
circles(1, 0, 0.4, 'r', ls='--', lw=5, fc='none', transform=ax.transAxes)

xlim(0,10)
ylim(0,10)
Wyjście:
Warning: date(): Invalid date.timezone value 'Europe/Kyiv', we selected the timezone 'UTC' for now. in /var/www/agent_stack/data/www/doraprojects.net/template/agent.layouts/content.php on line 54
2016-09-25 02:59:08
Aby ten Python 3 był kompatybilny, dodałem następujący fragment kodu
try:
    basestring
except NameError:
    basestring = str
Od
Jak sprawdzić, czy zmienna jest ciągiem znaków z kompatybilnością Pythona 2 i 3
Jest to konieczne, ponieważ {[1] } nie jest dostępne w Pythonie 3. W Pythonie 2 Celem {[1] } było włączenie zarówno str, jak i unicode. W Pythonie 3 nie ma rozróżnienia między str i unicode, A jest to po prostu str.
Warning: date(): Invalid date.timezone value 'Europe/Kyiv', we selected the timezone 'UTC' for now. in /var/www/agent_stack/data/www/doraprojects.net/template/agent.layouts/content.php on line 54
2017-05-23 12:03:08